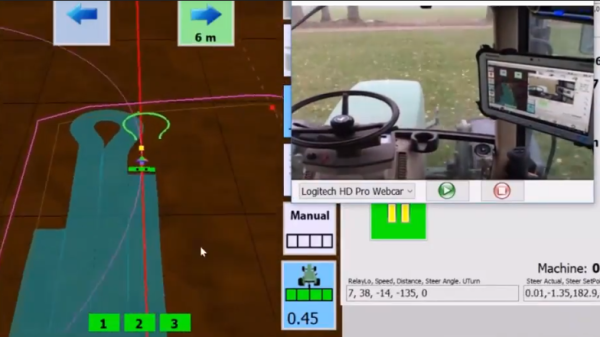
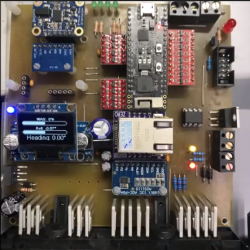
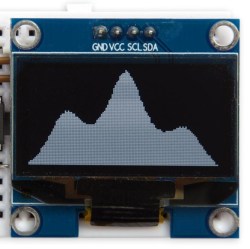
[Coffeetrac]’s ESP32-based Autosteer controller board, complete with OLD OLED display for debugging and easy status reference.Modern agricultural equipment has come a long way, embracing all kinds of smart features and electronic controls. While some manufacturers would prefer to be the sole gatekeepers of the access to these advanced features, that hasn’t stopped curious and enterprising folks from working on DIY solutions. One such example is this self-steering tractor demo by [Coffeetrac], which demonstrates having a computer plot and guide a tractor through an optimal coverage pattern.
A few different pieces needed to come together to make this all work. At the heart of it all is [Coffeetrac]’s ESP32-based Autosteer controller, which is the hardware that interfaces to the tractor and allows for steering and reading sensors electronically. AgOpenGPS is the software that reads GPS data, interfaces to the Autosteer controller, and tells equipment what to do; it can be thought of as a mission planner.
[Coffeetrac] put it all together with everything controlled by a tablet mounted in the tractor’s cab. The video is embedded below, complete with a “cockpit view” via webcam right alongside the plotted course and sensor data.
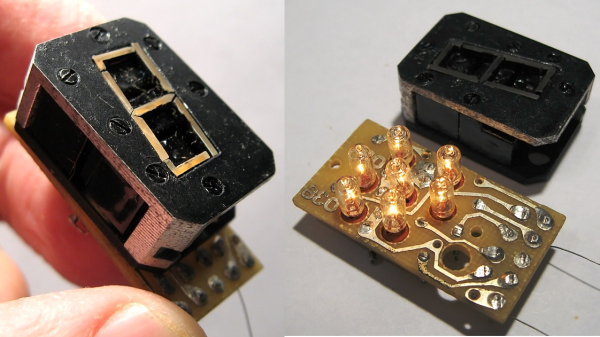
In a way, all 7-segment displays are alike; at least from the outside looking in. On the inside it can be quite another story, and that’s certainly the case with the construction of this Soviet-era 7-segment numerical display. From the outside it may look a bit sturdier than usual, but it’s still instantly recognizable for what it is. On the inside is an unusual mixture of incandescent bulbs and plastic light guides.
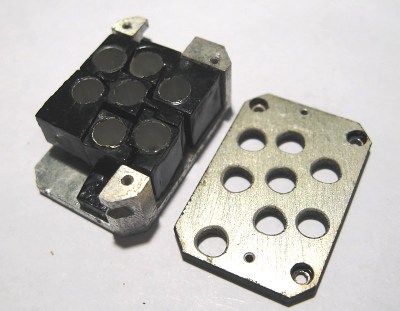
The black-coated blocks of plastic on the left (shown from the rear) act as light guides. The holes are for nesting the incandescent bulbs. Note the puzzle-like arrangement of the uniquely shaped pieces.
The rear of the display is a PCB with a vaguely hexagonal pattern of low-voltage incandescent bulbs, and each bulb mates to one segment of the display. The display segments themselves are solid blocks of plastic, one for each bulb, and each a separate piece. These are painted black, with the only paint-free areas being a thin segment at the top for the display, and a hole in the back for the mating bulb.
The result is that each plastic piece acts as a light guide, ensuring that a lit bulb on the PCB results in one of the seven thin segments on the face being lit as well. An interesting thing is that the black paint is the only thing preventing unwanted light from showing out the front, or leaking from one segment to another; usually some kind of baffle is used for this purpose in displays from this era.
More curiously, each plastic segment is a unique shape apparently unrelated to its function. We think this was probably done to ensure foolproof assembly; it forms a puzzle that can only fit together one way. The result is a compact and remarkably sturdy unit that shows how older and rugged tech isn’t necessarily bulky. Another example of small display tech from the Soviet era is this tiny 7-segment display of a completely different manufacture, which was usually used with an integrated bubble lens to magnify the minuscule display.
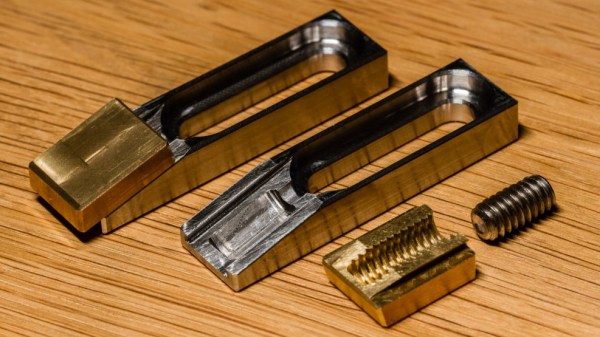
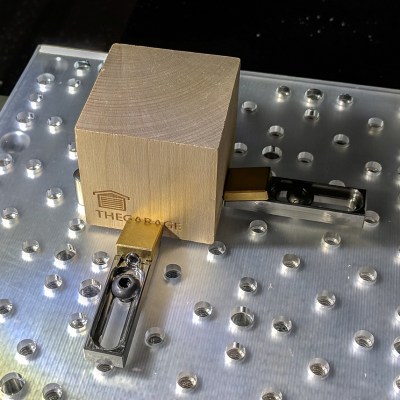
[Kevin] owns a benchtop CNC mill that has proven itself to be a capable tool, but after becoming familiar with some of its shortcomings, he has made a few modifications. In order to more efficiently hold and access workpieces on his custom fixturing table, he designed and made his own toe clamps and they look beautiful.
The usual way to secure a piece of stock to a fixturing table is to use top-down clamps, which hold the workpiece from the top and screw down into the table. However, this method limits how much of the stock can be accessed by the cutting tool, because the clamps are in the way. The most common way around this is to mount a vise to the table and clamp the workpiece in that. This leaves the top surface completely accessible. Unfortunately, [Kevin]’s benchtop Roland MDX-450 has a limited work area and he simply couldn’t spare the room. His solution was toe clamps, which screw down to the table and have little tabs that move inwards and downward. The tabs do the work of clamping and securing a piece of stock while maintaining a very low profile themselves.
The clamp bases are machined from stainless steel and the heads are brass, and the interface between the two is a set screw. Inserting a hex wrench and turning the screw moves the head forward or back, allowing a workpiece to be clamped from the sides with minimal interference. His design was done in Fusion 360 and is shared online.
Some time ago [Xose Pérez] got interested in generating a notification when his washer had completed a cycle, and now with added features like reporting power usage and cost, he’s put it all together into a Node-Red node that makes it easy to modify or integrate with other projects.
[Xose] started this journey with a Laundry Monitor he created that effectively used cheap hardware (and his own firmware) to monitor his washing machine’s current usage. That sensor was used as the basis for sending notifications informing him whenever the appliance’s cycle was done. Since then, he has continued to take household power monitoring seriously, and with a bit of added work can not only tell when a given appliance has been started and stopped, but can also summarize the energy usage and cost of the appliance, making the notifications more useful. The package is named node-red-contrib-power-monitor and is also hosted on GitHub.
Cheap WiFi-enabled smart switches are making it possible for even the dumbest of appliances to join the Internet of Things, so don’t ignore [Xose]’s complementary work on ESPurna, which is an alternative open-source firmware for a wide variety of ESP8266 and ESP8285 based smart switches, lights and sensors.
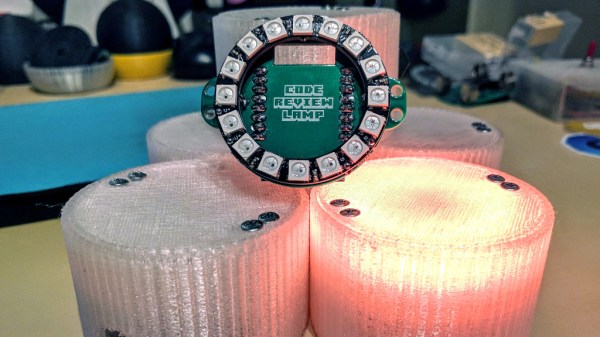
[Dimitris Platis] works in an environment with a peer review process for accepting code changes. Code reviews generally are a good thing. One downside though, is that a lack of responsiveness from other developers can result in a big hit to team’s development speed. It isn’t that other developers are unwilling to do the reviews, it’s more that individuals are often absorbed in their own work and notification emails are easily missed. There is also a bit of a “tragedy of the commons” vibe to the situation, where it’s easy to feel that someone else will surely attend to the situation, but often no one does. To combat this, [Dimitris] built this Code Review Lamp, a subtle notification that aims to prod reviewers into action.
The lamp is based on a ring of RGB LEDs and a Wemos D1 Mini board. The Wemos utilizes the popular ESP8266, so it’s easy to develop for. The LED ring and Wemos are tied together with a slick custom PCB. Mounting the LED ring on the top of the PCB and the Wemos on the bottom allows for easy powering via a USB cable while directing light upward. The assembly is placed in a translucent 3D printed enclosure creating a pleasant diffuse light source.
Every developer gets a Code Review Lamp. The lamps automatically log in to the change management system to check whether anything is awaiting review. If a review is ready, the Lamp glows in a color specific to the individual developer. All this serves as a gentle but persistent reminder that someone’s work is being held up until a review is completed.
We love the way that the device has a clear purpose: it does its job without any unnecessary features or parts. It’s similar to this ESP8266 IoT Motion Sensor in that it has a single job to do, and focuses on it well.
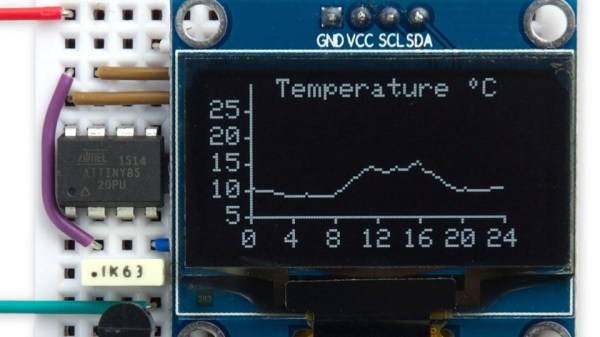
Small I2C OLED displays are common nowadays, and thanks to the work of helpful developers, there are also a variety of graphics libraries for using them. Most of them work by using a RAM buffer, which means that anything one wants to draw gets written to a buffer representing the screen, and the contents of that buffer are copied out to the display whenever it is updated. The drawback is that for some microcontrollers, there simply isn’t enough RAM for this approach to work. For example, a 128×64 monochrome OLED requires a 1024 byte buffer, but that’s bad news if a microcontroller has only 512 bytes of RAM in total like the ATtiny85. [David Johnson-Davies] has two solutions: a Tiny Graphics Library that needs no RAM buffer and an even slimmer Tiny Function Plotter, which we’ll discuss in order.
Tiny Function Plotter works on both SSD1306 and SH1106-based displays.
[David]’s Tiny Graphics Library works by taking advantage of a feature of SH1106 driver-based displays: the ability to read the display over I2C as well as write to it. With the ability to perform read-modify-write on a section at a time, using a large RAM buffer can be avoided. The only catch is that the library only works with OLEDs using the SH1106, but the good news is that these are very common at the usual Chinese resellers. ([David] notes that SH1106 is sometimes misspelled as “SSH1106”, so keep that in mind when searching.)
What about all those other SSD1306-based OLED displays out there? Are they out of luck? Not quite. [David] has one more trick up his sleeve: his Tiny Function Plotter works on the SSD1306 and also requires no RAM buffer. It’s unable to write text, but it can easily handle drawing graphs plotting things like values over time while needing very little overhead.
Another approach we’ve seen for using OLEDs driven by microcontrollers with limited memory is the solution [Michael] used in Tiny Sideways Tetris, which was done in part by realizing the smallest screen element he needed was a 4×4 block, and using that premise as the basis of a simple compression scheme.
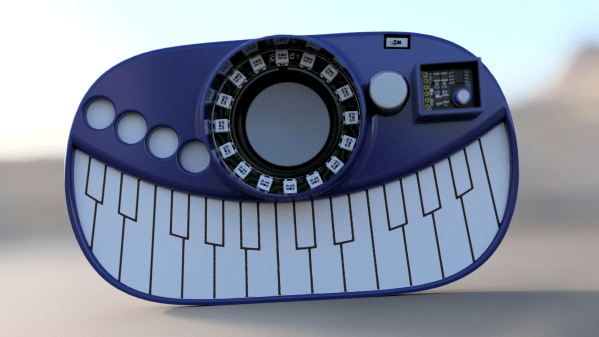
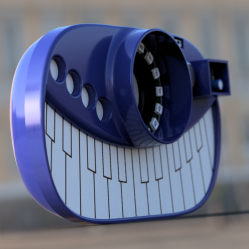
Stylish! is a wearable music synthesizer that combines slick design with stylus based operation to yield a giant trucker-style belt buckle that can pump out electronic tunes. With a PCB keyboard and LED-surrounded inset speaker that resembles an eyeball over a wide grin, Stylish! certainly has a unique look to it. Other synthesizer designs may have more functions, but certainly not more style.
The unit’s stylus and PCB key interface resemble a Stylophone, but [Tim Trzepacz] has added many sound synthesis features as well as a smooth design and LED feedback, all tied together with battery power and integrated speaker and headphone outputs. It may have been originally conceived as a belt buckle, but Stylish! certainly could give conference badge designs a run for their money.
The photo shown is a render, but a prototype is underway using a milled PCB and 3D printed case. [Tim]’s Google photo gallery has some good in-progress pictures showing the prototyping process along with some testing, and his GitHub repository holds all the design files, should anyone want a closer look under the hood. Stylish! was one of the twenty finalists selected for the Musical Instrument Challenge portion of the 2018 Hackaday Prize and is therefore one of the many projects in the running for the grand prize!
 The usual way to secure a piece of stock to a fixturing table is to use top-down clamps, which hold the workpiece from the top and screw down into the table. However, this method limits how much of the stock can be accessed by the cutting tool, because the clamps are in the way. The most common way around this is to mount a vise to the table and clamp the workpiece in that. This leaves the top surface completely accessible. Unfortunately, [Kevin]’s benchtop Roland MDX-450 has a limited work area and he simply couldn’t spare the room. His solution was toe clamps, which screw down to the table and have little tabs that move inwards and downward. The tabs do the work of clamping and securing a piece of stock while maintaining a very low profile themselves.
 The unit’s stylus and PCB key interface resemble a


