If you’ve watched as many machining videos as we have, no doubt you’ve seen someone commit the cardinal sin of metalworking: using caliper jaws to scratch a mark into metal. Even if it’s a cheap Harbor Freight caliper rather than an expensive Starrett or Mitutoyo tool being abused, derision and scorn predictably rain down upon the hapless sinner’s head.
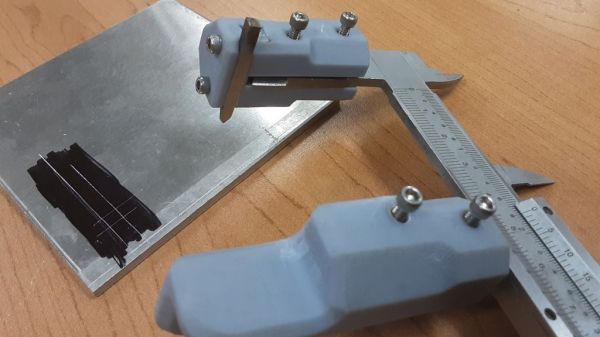
The criticism is not without its merit, of course. Recognizing this, [Nelson Stoldt] came up with these clamp-on nosepieces designed to turn calipers into a better marking tool. Using stock calipers as marking gauges always introduces some error, since the jaws are equal lengths and thus have to be held at a slight angle to the workpiece in order to make a mark. The caliper jaws correct for this admittedly negligible error by extending one jaw, allowing it to ride on a reference face while the other jaw remains perpendicular to the workpiece. As a bonus, the short jaw has a slot to mount a steel marking knife, saving the caliper jaws from damage.
[Nelson] chose to 3D-print his caliper jaws, but they could just as easily be milled from solid stock to make them a little more durable. Then again, you could always 3D-print the calipers in the first place, and integrate these jaws right into them.
If there’s one thing you can say about [Stefan] from CNC Kitchen, it’s that he’s methodical when he’s working on an improvement to his 3D printing processes, or when he’s chasing down a problem with a printer. Case in point: this root-cause analysis of extrusion inconsistencies with an entry-level 3D printer.
The printer in question is a Cetus MK3, a printer that found its way onto many benches due to its ridiculously low price and high-quality linear bearings. Unfortunately, there’s still a lot to be desired about the printer, and its tendency for inconsistent layers was chief among [Stefan]’s gripes. Such “blubbiness” can be pinned on any number of problems, but rather than guess, [Stefan] went through a systematic process of elimination to find the root cause. We won’t spoil the ending, but suffice it to say that the problem was subtle, and could probably be the cause of similar problems with other printers. The fix was also easy, and completely mechanical — just a couple of parts to replace. The video below shows the whole diagnosis process, as well as the before and after comparisons. [Stefan] also teases an upcoming treatment on how he converted the Cetus from the stock proprietary control board, which we’re interested in seeing.
We found a couple of headlines this week that seemed pretty alarming at first, mentioning as they did both “Chinese grannies” and “stun guns.” Digging a little deeper, it appears that widespread elder abuse isn’t what this is about, although there certainly is an unsavory aspect to the story. Apparently, it’s pretty common in Chinese cities for large groups of people to get together for exercise, with “square dancing” being one popular form. This isn’t the “do-si-do and allemande right” square dancing that made high school gym class really awkward for a few days, but rather large groups of mostly older women busting moves to Chinese music in public spaces. It’s the music that’s bothering some people, enough so that they’re buying “stun guns” that can somehow turn off the dancing grannies’ music. None of the articles go into any detail on the device besides describing it as a flashlight-looking thing, and that it appears to do no permanent damage to the sound system. We’d love to know where to get one of these things — you know, for science. And really, it’s kind of sad that people are taking offense at senior citizens just looking for a bit of exercise and social contact.
A couple of weeks back, we mentioned TeachMePCB, a free online PCB design class designed to take you from zero to PCB designer. We’ve been working through the course material and enjoying it, but it strikes us that there’s a lot to keep track when you’re designing a PCB, especially if you’re new to the game. That’s where this very detailed PCB design checklist would come in handy. It takes you right from schematic review and breadboard testing of subassemblies right through to routing traces to avoid crosstalk and stray capacitance problems, and right on to panelization tips and even how to make sure assembly services get your build right. Reading through the list, you get the feeling that each item is something that tripped up the author (grosdode) at one time or another. So it’s a little like having someone with hard-won experience watching over your shoulder as you work, and that can’t really be a bad thing.
Our friend Jeroen Vleggaar over at Huygens Optics on YouTube posted a video the other day about building an entire Schmidt-Cassegrain reflecting telescope out of a single piece of glass. The video is mostly an interview with optical engineer Rik ter Horst, who took up the building of monolithic telescopes as a hobby. It turns out that one of his scopes will be flying to space aboard a cubesat in January. If you’re a fan of precision optics, you’ll want to check this out. Jeroen also teased that he’ll be building his own version of Rik’s monolithic telescope, so watch for an article on that soon.
Heads up — applications are now being accepted for the Open Hardware Summit’s Ada Lovelace Fellowships. This year there are up to ten fellowships offered, each of which includes a $500 travel stipend to attend the Open Hardware Summit in April. The fellowships seek to foster a more diverse community in open-source hardware; applications are being accepted until December 17th, so hurry.
And finally, if you’ve got some spare cycles, you might want to turn your Mark 1 eyeballs to the task of spotting walrus from space. The World Wildlife Federation (WWF) is crowdsourcing its walrus census efforts by training people to spot the well-armed marine mammals in satellite photos. Assessing population numbers and distribution is important to understanding their ecology, and walrus are cute and cuddly (no, they’re not), so getting people to count them makes sense. But this seems like a job for machine vision — there has to be a model trained to recognize walrus, right? Or maybe just something to count dark spots against a white background? Maybe someone can whip something up to make this job a bit easier and less subjective.
It’s almost hard to remember a time when the obvious answer to most questions about manufacturing wasn’t “Throw it on the CNC.” CNC machines have become so entrenched that the acronym has become a verb; few people would misunderstand a statement like “Let’s just CNC that.”
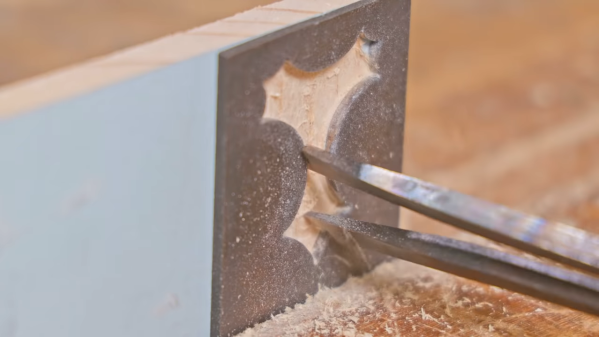
But before CNC machines became so ubiquitous, there were plenty of clever tricks for cutting material in a controlled fashion, as [Pask] shows us with this tool to machine wood for inlays. The tool is called a parser (or passer) drill, and is designed for use in conjunction with a steel template. [Pask]’s version seems pretty easy to make; a pair of mild steel bars are forged flat into spade shapes before having a cutting surface ground into them. The two halves of the drill are welded together and ground down to fit in the chuck of a hand drill, a modern nod to the fact that few people will want to use the traditional bow and breastplate that drove the original parser drills.
In use, a steel template that determines the shape of the inlay is affixed to the workpiece. The cutting edges of the bits are plunged into the template cutout to machine out the wood; the overhangs of the bits act as depth stop and guide. It only takes a few seconds to make a neat, CNC-free inlay. The video below shows the tool being made and in action.
It’s nice to see what can be accomplished without the need for fancy CNC machines. Not that we have anything against them, of course, but when the same results can be had with some scraps of steel and a little ingenuity, it’s pretty impressive. Looking for something between manual tools and CNC for woodworking? The pantorouter might be just your speed.
The PS/2-style port was once about as ubiquitous on PCs as USB connectors are today, and more than a few of us accumulated a fair collection of keyboards and mice that sported the 6-pin mini-DIN plug. They’re not nearly as common today, but when you need one, you need one, so if your stockpile of PS/2 keyboards has dwindled to nothing, you might want to look at rolling your own PS/2 remote keyboard dongle.
That backstory on [Remy Sharp]’s build starts with his acquisition of a neptUNO, a 160€ FPGA retrocomputer that gives you access to just about every Z80 and 6502 computer of yesteryear. While the box supports USB keyboards, [Remy] had trouble getting one to work. So out came a Wemos D1 Mini, which was wired up to a stub of PS/2 cable. The microcontroller is powered by the PS/2 port, and connects to the WiFi network on boot-up and starts a WebSocket server. It also served up a page of HTML, which lets him connect with any device and send keystrokes to the neptUNO. He also added a couple of hardware buttons to the dongle, to access menus on the neptUNO directly. The video below shows it in action.
Perhaps unsurprisingly, [Remy] says he took inspiration for this build from [Ben Eater]’s excellent PS/2 deep dive. We’d like to think he saw that here first, but either way, it’s a valuable reference on how keyboards used to work.
It’s interesting what you see when you train a black light on everyday objects. We strongly suggest not doing this in a hotel room, but if you shine UV light on, say, a printed circuit board, you might see what [Sam Ettinger] did, which led him to build these cool low-profile seven-segment fluorescent PCB displays.
As it turns out, at least some FR-4 PCBs fluoresce under UV light, giving off a ghostly blue-green glow. Seeing the possibilities, [Sam] designed a PCB with cutouts in the copper and solder mask in the shape of a traditional seven-segment display. The backside of the PCB has pads for UV LEDs and current-limiting resistors, which shine through the board and induce the segments to glow. Through-slots between the segments keep light from one segment from bleeding over into the next; while [Sam] left the slots unfilled, they could easily be filled with solder. The fluorescent property of FR-4, and therefore the brightness and tint of the segments, seems to vary by board thickness and PCB manufacturer, but it looks like most PCBs will show pretty good results.
We’d say the obvious first improvement might be to cover the back of the display with black epoxy, to keep stray light down, and to improve contrast. But they look pretty great just as they are. We can also see how displays with other shapes, like icons and simple symbols. Or maybe even alphanumeric characters — say, haven’t we seen something like that before?
The spooky season is upon us, and with it the race to come up with the geekiest way to scare the kids. Motion-activated jump-scare setups are always a crowd-pleaser, but kind of a cheap thrill in our opinion. So if you’re looking for something different for your Halloween scare-floor, you might consider “spirit writing” with ultrasound.
The idea that [Dan Beaven] has here is a variation on the ultrasonic levitation projects we’ve seen so many of over the last couple of years. While watching bits of styrofoam suspended in midair by the standing waves generated by carefully phased arrays of ultrasonic transducers is cool, [Dan] looks set to take the concept to the next level. Very much still a prototype, the setup has a 256-transducer matrix suspended above a dark surface. Baking powder is sprinkled over the writing surface to stand in for dust, which is easily disturbed by the sound waves reflecting off the hard surface. The array can be controlled to make it look like an unseen hand is tracing out a design in the dust, and the effect is pretty convincing. We’d have chosen “REDRUM” rather than a pentagram, but different strokes.
[Dan] obviously has a long way to go before this is ready for the big night, but the proof-of-concept is sound. While we wait for the finished product, we’ll just file this away as a technique that might have other applications. SMD components are pretty small and light, after all — perhaps an ultrasonic pick-and-place? In which case, sonic tweezers might be just the thing.