Duplex technology for Google Assistant

Google’s Duplex AI Has Conversation Indistinguishable From Human’s

First Google gradually improved its WaveNet text-to-speech neural network to the point where it sounds almost perfectly human. Then they introduced Smart Reply which suggests possible replies to your emails. So it’s no surprise that they’ve announced an enhancement for Google Assistant called Duplex which can have phone conversations for you.

What is surprising is how well it works, as you can hear below. The first is Duplex calling to book an appointment at a hair salon, and the second is it making reservation’s with a restaurant.

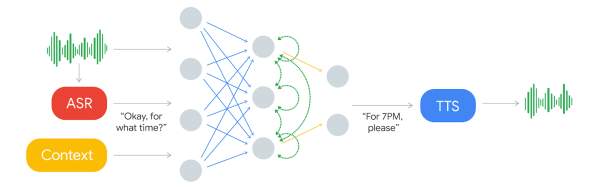
Note that this reverses the roles when talking to a computer on the phone. The computer is the customer who calls the business, and the human is on the business side. The goal of the computer is to book a hair appointment or reserve a table at a restaurant. The computer has to know how to carry out a conversation with the human without the human knowing that they’re talking to a computer. It’s for communicating with all those businesses which don’t have online booking systems but instead use human operators on the phone.

Not knowing that they’re talking to a computer, the human will therefore speak as it would with another human, with all the pauses, “hmm”s and “ah”s, speed, leaving words out, and even changing the context in mid-sentence. There’s also the problem of multiple meanings for a phrase. The “four” in “Ok for four” can mean 4 pm or four people.

The component which decides what to say is a recurrent neural network (RNN) trained on many anonymized phone calls. The input is: the audio, the output from Google’s automatic speech recognition (ASR) software, and context such as the conversation’s history and the parameters of the conversation (e.g. book places at a restaurant, for how many, when), and more.

Producing the speech is done using Google’s text-to-speech technologies, Wavenet and Tacotron. “Hmm”s and “ah”s are inserted for a more natural sound. Timing is also taken into account. “Hello?” gets an immediate response. But they introduce latency when responding to more complex questions since replying too soon would sound unnatural.

There are limitations though. If it decides it can’t complete a task then it hands the conversation over to a human operator. Also, Duplex can’t handle a general conversation. Instead, multiple instances are trained on different domains. So this isn’t the singularity which we’ve talked about before. But if you’re tired of talking to computers at businesses, maybe this will provide a little payback by having the computer talk to the business instead.

On a more serious note, would you want to know if the person you were speaking to was in fact a computer? Perhaps Google should preface each conversation with “Hi! This is Google Assistant calling.” And even knowing that, would you want to have a human conversation with a computer, knowing that it’s “um”s were artificial? This may save time for the person whom the call is on behalf of, but the person being called may wish the computer would be a little more computer-like and speak more efficiently. Let us know your thoughts in the comments below. Or just check out the following Google I/O ’18 keynote presentation video where all this was announced.

Continue reading “Google’s Duplex AI Has Conversation Indistinguishable From Human’s”

Pic16maze secret maze game

PIC16Maze Upgrades Secret Maze Game

We really like it when a reader is inspired by something they see on Hackaday, build on it, and let us know so we can pass it on. In this case, [Vegipete] made a secret maze game using a minimal number of parts and some neat software trickery.

It’s built around an 8-pin PIC16F18313 microcontroller, uses a joystick for input, and nine WS2812 LEDs to display the player and the surrounding maze walls. His inspiration was [David Johnson-Davies’] minimalist secret maze game built around the 8-pin ATTiny85. In that one, [David] cleverly used charlieplexing to get four pins to control four LEDs and four pushbuttons. [Vegipete’s] use of the WS2812 LEDs allowed him to control the LEDs with just one pin, and also get color while using three pins for the joystick and its button. He may use another pin in the future for sound and vibration.

He goes into some detail on the WS2812 protocol, how communication is done with the LEDs using just one pin and different pulse-lengths to represent 0 and 1. We’ll leave you to see his post for more depth but basically, he introduces a module on the PIC called the Configurable Logic Cell (CLC) which makes this easy and frees up processor cycles for the user’s code to do other things.

Secret maze wall bitsHis source code is available on request but he does detail a neat software trick he uses for rotating the view. It may be confusing for some but as you move through the maze, your viewpoint rotates so that up is always the direction you’re facing. Luckily, the walls surrounding the user can be represented using 8-bits, four for east, west, north, and south, and four more for the corners. The maze is stored as a bitmap and from it, 8-bit values are extracted for the current position, each bit representing a wall around the position. To rotate the walls to match the user’s current orientation, the bits are simply shifted as needed. Then they’re shifted out to set each LED. Check it out in the video below.

It works very well despite the minimal interface and part count.

Continue reading “PIC16Maze Upgrades Secret Maze Game”

Mike's robot dog

Mike’s Robot Dog Is A First Step In The Right Direction

Humans can traverse pretty much any terrain thanks to their legs and fast-acting balancing system. So if you want a robot which should have equal flexibility, legs are a good way to go, this confirmed by all the achievements of Boston Dynamics’ robots. It was therefore natural for [Mike Rigsby] to model his robot dog after Boston Dynamics’ dog-like robot, SpotMini.

The build log on his Hackaday.io page makes for interesting reading. For example, he started out with the legs oriented like SpotMini but found that when trying to stand, the front legs worked fine but the rear ones slid or the dog shifted rearward or both happened. His solution was to take a cue from his 1990s Sony robot dog, Aibo, by reversing the orientation of the rear legs. He then upgraded his servo motors to ones with double the torque and increased the strength of the legs’ structure. In the first video below, you can see that his dog now lifts itself up to a standing position perfectly.

So far, to give it more of a dog-like personality he’s mounted Google’s AIY Vision Kit which changes a light’s color based on the degree to which a person is smiling, though we think a wagging tail would work well too. The possibilities are endless but one step at a time. See the second video below for a demonstration of the use of the Vision Kit.

Continue reading “Mike’s Robot Dog Is A First Step In The Right Direction”

Make or buy lithium ion battery pack

Comparing Making To Buying A Lithium Ion Battery Pack

At Hackaday we’re all about DIY. However, projects can have many components, and so there’s sometimes a choice between making something or buying it. In this case, [GreatScott!] wondered if it would be cheaper to make or buy a lithium-ion battery pack for his new eBike kit. To find out, he decided to make one.

After some calculations, he found he’d need thirteen 18650 cells in series but decided to double the capacity by connecting another thirteen in parallel. That gave him a 5 Ah capacity battery pack with a nominal voltage of 48.1 V and one capable of supplying a constant current of 40 A. Rather than connect them by soldering the nickel strips, he purchased a kWeld battery spot welder, adding to the cost of the build. He charged his new battery pack using his bench power supply but being concerned about uneven charging of the cells over the battery pack’s lifetime, he added a Battery Management System (BMS). The resulting battery pack powers his eBike motor just fine.

After adding up all the costs, he found it was only a tiny bit cheaper than prices for comparable battery packs on eBay, which were €24.4 per Ah (US$29.5 per Ah). The only way it would be cheaper is if he made multiple packs, spreading out the one-time cost of the battery spot welder. So that means it’s really up to your preference. See his video below to judge for yourself if you’d rather do it the DIY way. And then let us know what you’d do in the comments below.

Continue reading “Comparing Making To Buying A Lithium Ion Battery Pack”

Mechanisms: The Lever, It’s Everywhere

Levers are literally all around us. You body uses them to move, pick up a pen to sign your name and you’ll use mechanical advantage to make that ballpoint roll, and that can of soda doesn’t open without a cleverly designed lever.

I got onto this topic quite by accident. I was making an ornithopter and it was having trouble lifting its wings. For the uninitiated, ornithopters are machines which fly by flapping their wings. The problem was that the lever arm was too short. To be honest, as I worked I wasn’t even thinking in terms of levers, and only realized that there was one after I’d fine-tuned its length by trial and error. After that, the presence of a lever was embarrassingly obvious.

I can probably be excused for not seeing a lever right away because it wasn’t the type we most often experience. There are different classes of levers and it’s safe to say that most people aren’t even aware of this. Let’s take a closer look at these super useful, and sometimes hidden mechanisms known as levers.

Continue reading “Mechanisms: The Lever, It’s Everywhere”

Litar: LiDAR air guitar

Litar: An Air Guitar Using LiDAR

This year, [Blecky’s] Hackaday Prize Entry is an air guitar which uses multiple LiDAR sensors to create the virtual strings. What’s also neat is that he’s using his own LiDAR sensor, the MappyDot Plus, an enhanced version of his 2017 Prize Entry, the MappyDot.

He uses a very clever arrangement of six sensors to get four virtual strings. Each sensor scans a 25-degree field of view. Three adjacent sensors are used to define a string, with the string being in the overlap of the outer two of those sensors. The middle sensor is used for the distance data.

For the chords, he started out using some commercially made joysticks but ran into some ergonomic issues. Also, the manufacturer was discontinuing the product, a no-no for an open source project. So he abandoned that approach and designed his own buttons. He came up with a PCB with a linear hall effect sensor and some springs on it. The button has a magnet attached to its underside and sits on the springs. That way he gets the press and can do vibrato as well.

He plans to use Bluetooth MIDI so that you can play the sound on a phone or laptop but for now he lights up an LED beside each sensor as you press the strings.

Firing Bullets Through Propellers

Early airborne combat was more like a drive-by shooting as pilot used handheld firearms to fire upon other aircraft. Whomever could boost firepower and accuracy would have the upper hand and so machine guns were added to planes. But it certainly wasn’t as simple as just bolting one to the chassis.

This was during World War I which spanned 1914 to 1918 and the controllable airplane had been invented a mere eleven years before. Most airplanes still used wooden frames, fabric-covered wings, and external cable bracing. The engineers became pretty inventive, even finding ways to fire bullets through the path of the wooden propeller blades while somehow not tearing them to splinters.

Continue reading “Firing Bullets Through Propellers”