Vintage Mini Inkjet Prints On-Demand ASCII Art

Readers of a certain age may fondly remember ASCII art emerging from line printers in a long-gone era of computing; for others, it’s just wonderfully retro. Well, when [Emily Velasco] found a vintage Kodak Diconix 150 inkjet at a local thrift store for $4, she knew what she had to do: turn it into a dedicated ASCII-art machine.

Dating to the mid-1980s, the diminutive printer she scored was an early example of consumer inkjet technology; with only 12 “jets,” it sported a resolution roughly equivalent to the dot-matrix impact printers of the day. [Emily] notes that this printer would have cost around $1000 in today’s money — this is from a time before printer companies started selling the printer itself as a loss leader to make revenue on the back end selling consumables. It seems you can’t escape the razor-and-blades model, though: [Emily] had to pay $16 for a new ink cartridge to revive the $4 printer.

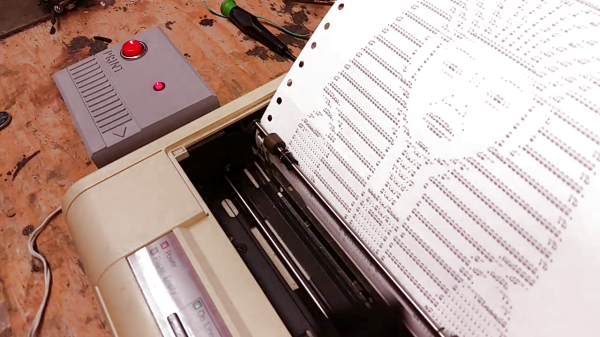
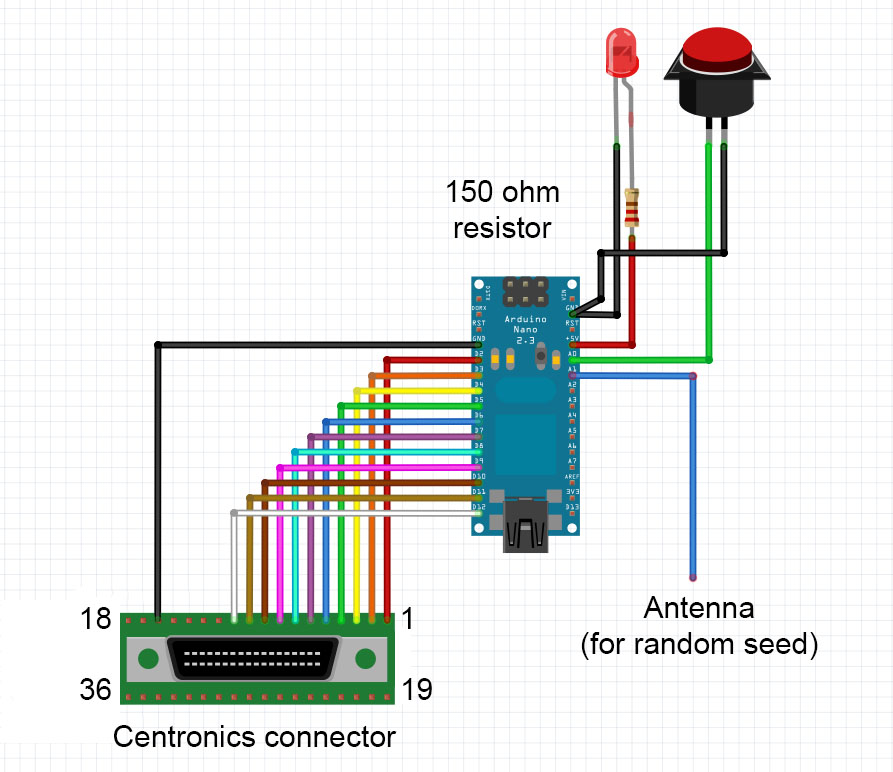
With the new ink in place, and some tractor-feed paper acquired, [Emily] started work on the art generator. The concept is something that might have been sold on late-night TV ads: a “cartridge” you plug into your printer to make ASCII masterpieces. Starting with a stripped-down Centronics printer cable that matches the printer’s port, she added an Arduino nano to store and serve up the art. The user interface is foolproof: a single button press causes a random selection from one of ten ASCII images to be printed. The whole thing is ensconced within a slick 3D printed case.

One of the coolest aspects of this project is the lack of power supply. When she first hooked the Arduino to the printer’s parallel port, [Emily] noticed that it powered right up with no external supply, and in true hacker fashion, just ran with it. Upon reflection, it seems that power is being supplied by the printer status lines, Busy and/or Ack, through the input protection diodes of the Atmega328 on the nano.

We really like this project, and are more than a little bummed we tossed those old printers that were kicking around the Hackaday labs for years. If you still have yours, and would like turn out some rad ASCII art, the code for this project is up on GitHub.

We’re no strangers to [Emily]’s work, but if you aren’t familiar with it, check out her inspiring talk from the 2019 Hackaday Superconference. Meanwhile, don’t miss the excellent video about the ASCII art printer cartridge, after the break.

Continue reading “Vintage Mini Inkjet Prints On-Demand ASCII Art”

RTFM: ADCs And DACs

It’s tough to find a project these days that doesn’t use an analog-to-digital converter (ADC) or digital-to-analog converter (DAC) for something. Whether these converters come as built-in peripherals on a microcontroller, or as separate devices connected over SPI, I2C, or parallel buses, all these converters share some common attributes, and knowing how to read the specs on them can save you a lot of headaches when it comes to getting things working properly.

There are some key things to know about these devices, and the first time you try to navigate a datasheet on one, you may find yourself a bit confused. Let’s take a deep dive into the static (DC) properties of these converters — the AC performance is complex enough to warrant its own follow-up article.

Continue reading “RTFM: ADCs And DACs”

Trill: Easy Positional Touch Sensors For Your Projects

Creating capacitive touch-sensitive buttons is easy these days; many microcontrollers have cap-sense hardware built-in. This will work for simple on/off control, but what if you want a linear, position-sensitive input, like you’d find on a computer touchpad or your smartphone screen? Not so easy — at least until now. Trill is a family of capacitive touch sensors you can add to your projects as a linear slider, a square touchpad, or by creating your own touch surface.

Trill was created by the same team that designed Bela, an embedded platform for low-latency interactive applications, especially with audio. The new trio of Trill sensors rely on capacitive sensing to track finger movement, and communicate over I2C with your microcontroller or development board of choice. The Trill I2C library targets Arduino and Bela, but should be easy to port to any I2C host.

The hardware and software are both open-source — or will be as the Kickstarter that launched this morning has already met its goal. The firmware for the Cypress CY8C20636A (PDF) controller that powers these sensors will be released CC-BY-NC-SA. But, starting with the controller itself sounds like a lot of work that Trill has already done for you, so let’s have a look at what we know so far, along with a healthy dose of speculation.

Continue reading “Trill: Easy Positional Touch Sensors For Your Projects”

Print A Drill Press For Your Printed Circuit Boards

If you make printed circuit boards the old fashioned way by etching them yourself, you may need to drill a lot of holes; even surface-mount converts still need header pins on occasion. But, drilling these holes by hand often leads to broken drill bits, which always seems to happen with one un-drilled hole and no spare bits left. [Daumemo] came up with a solution: a 3D printed drill press for a Dremel or similar rotary tool.

While you can buy commercial presses designed to fit these tools, there’s a certain satisfaction to building your own, and if you have a well-stocked parts bin you might even finish it before a mail-ordered version could arrive. Certainly you could do it at lower cost. The design is straightforward, and uses printed parts augmented with “reprap vitamins” (i.e. the non-printable, typically metal, components). If you’ve ever built — or repaired — a 3D printer, you may have these pieces already: a couple of LM8UU bearings, some 8 mm steel rod, and a pair of springs seem like the most esoteric parts required, although even these could probably be substituted without much trouble.

Only a few pieces need to be printed: a base is outfitted with a removable table for holding the workpiece, while a lever actuates the frame holding the tool. [Daumemo] chose to print the design in ABS, but found that it flexes a little too much, occasionally requiring some care during use — a stiffer filament such as PLA might yield better results. Overall, though, this seems like a great project for that 3D printer you haven’t used in a while.

Be sure to check out the video of the press in action, after the break.

Continue reading “Print A Drill Press For Your Printed Circuit Boards”

Mechpen: SCARA Drawbot For The Big Picture

It’s not uncommon to find us doodling on paper as an aid to thinking, for recreation, or simply because we’re bored. But, this kind of manual labor is so last century. It’s 2019, and we should have robots to fill our notebooks with cross-hatched illustrations. Well, [Alex Weber] is way ahead of us on this account: the outstanding SCARA drawbot he created can be unleashed to draw all manner of things at his command.

The robot, named Mechpen, and pronounced “McPen”, is of a SCARA (Selective Compliance Assembly Robot Arm) design, with two parallel axes controlling the x-y movement of the arm. Robot design is always a series of trade-offs; in this case, [Alex] has sacrificed some accuracy to achieve a long reach. Two NEMA 23 stepper motors reside in the base, along with all the electronics. This makes the base a heavy 15 kg, which is good as it helps stabilize the arm during movement. The arm uses a mix of off-the-shelf and custom hardware, most of which is dotted with holes drilled to reduce the mass of the moving parts. Two 700 mm sections of the arm made from carbon fiber tubes give the drawbot a 140 cm reach — long enough to fill an A0 paper with its beautiful mechanical doodling.

The brains behind the arm are two-tiered. An Einsy RAMBo board, designed for 3D printers, controls the stepper motors. Above that, a Raspberry Pi runs Octoprint to control the ‘bot. This choice turned out to be very convenient for working around a mechanical issue: the elbow flexes too far in the Z-axis. The difference in pen height between the elbow at 90 vs 180 degrees was 20-25 mm; too much to fix with just a spring-loaded pen. The solution: use a bed-leveling algorithm designed for 3D printers. A VL6180X distance sensor measures the distance to the paper over a number of grid points, then the software moves the servo up and down accordingly while drawing to keep the pen on the paper.

Some custom-written software converts SVG graphic files to gcode suitable for printing, allows selection of different stroke and fill types, and separation of different colors into individual gcode files to be plotted with different pens.

Definitely check out the video of Mechpen in action, after the break.

Continue reading “Mechpen: SCARA Drawbot For The Big Picture”

Faux-Neon Sign Says What?, Auf Deutsch

To a speaker of English, a sign asking ‘Was?” may not make much sense. In German, however, the question is a more thought-provoking “What?” That’s exactly the point of this faux-neon sign created by [noniq]. The sign uses silicone-enclosed “neon-like” LED strips to spell out the question for all to see — and ponder.

While true neon aficionados will bristle at even calling such LED strips “faux neon” (check the comments below for examples), we really like them for sign projects like this. They’re great-looking, inexpensive, easy to work with, and available with RGB LEDs for variable colors. In this case, they were mounted on 3 mm polystyrene plate glued to a wooden frame made from 22 mm square beams.

One of the things that caught our eye about this build is the use of a CNC mill to create a prototype. With the strokes milled out of a foam board, the final effect could be visualized before committing to the design. This board later served as a template for cutting the LED strips to length — clever! We suspect this could also be done with a hobby knife and a liberal dose of patience by those without access to a CNC mill.

Of course, this type of project doesn’t always turn out perfect the first time. The sign was missing a dot for the question mark, light leakage from ends of the individual segments was creating distracting bright spots on the base, areas where the silicone had been removed to connect the LEDs were noticeably darker, and the letters looked too thin. We’re looking forward to the promised second post, in which [noniq] describes the solution to these issues.

This isn’t the first time we’ve seen these LED strips used for sign-making, like in this logo build last Spring.

Running Doom On A Doomed GPS

What’s the first thing you think of when you see an old GPS navigation system for sale cheap at a garage sale? Our research indicates that 100% of people would wonder if it could run Doom; at least that’s what we conclude from the single data point we have, anyway. [Jason Gin] asked and answered the question — with a resounding yes — about his recent acquisition.

The unit in question is a Magellan RoadMate 1412 running Windows CE. After some playing, [Jason] found that simply connecting the unit to a computer via USB caused all the application files to appear as a FAT-formatted volume. Replacing the obviously-named “MapNavigator.exe” with a copy of TotalCommander/CE allowed browsing around the filesystem.

This revealed that much was missing from the CE install, including the Explorer shell and command prompt. Either could be used to launch Doom with the required command-line arguments. Luckily, [Jason] had another trick ready, namely using MortScript (a scripting engine) to launch the Doom executable. This worked like a charm, and after a few tweaks, he now has a dedicated demo box.

We say “demo box” instead of “Doom machine” because without a keyboard, you can’t actually play the game — only view the demo. In a valiant attempt, he connected a USB OTG connector, but the GPS doesn’t seem to recognize input devices, only USB storage devices. Keep at it, [Jason], we’d love to see you crack this one!

[Jason] is no stranger to hacking Windows CE devices. Last time we checked in, the target was a KeySight DSO1102G oscilloscope.

Continue reading “Running Doom On A Doomed GPS”