Repairing 200+ Raspberry Pis For A Good Cause

If somebody told you they recently purchased over 200 Raspberry Pis, you might think they were working on some kind of large-scale clustering project. But in this case, [James Dawson] purchased the collection of broken single-board computers with the intention of repairing them so they could be sent to developing countries for use in schools. It sounds like the logistics of that are proving to be a bit tricky, but we’re happy to report he’s at least made good progress on getting the Pis back up and running.

He secured this trove of what he believes to be customer returned Raspberries or the princely sum of £61 ($83 USD). At that price, even if only a fraction ended up being repairable, you’d still come out ahead. Granted all of these appear to be the original Model B, but that’s still a phenomenal deal in our book. Assuming of course you can find some reasonable way to triage them to sort out what’s worth keeping.

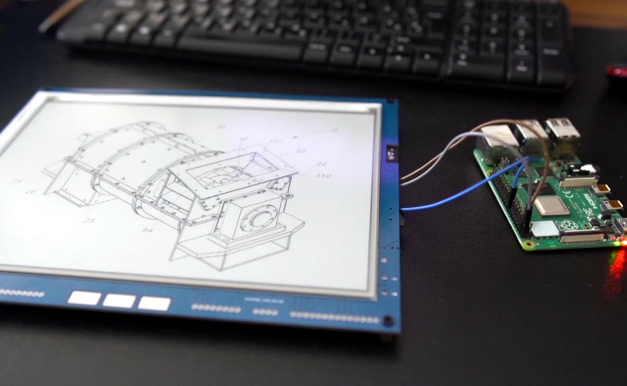
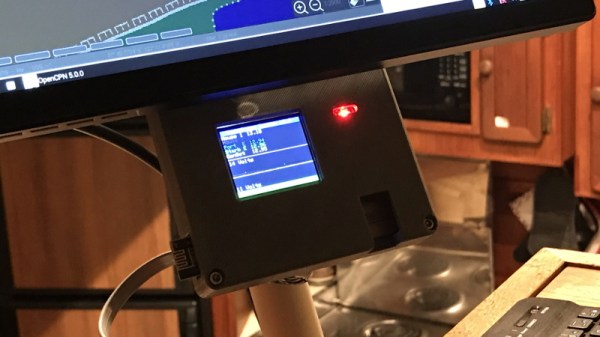
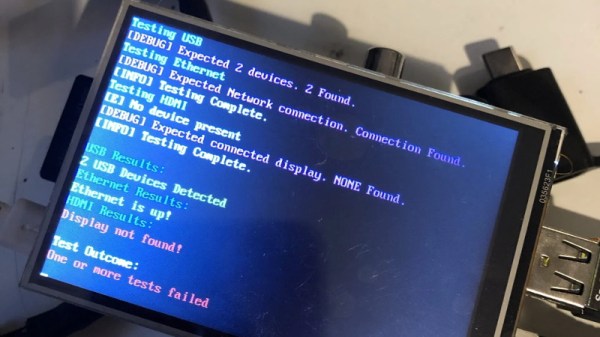
To that end, [James] came up with a Bash script that allowed him to check several hardware components including the USB, Ethernet, I2C, and GPIO. With the script on an SD card and a 3.5″ TFT plugged into the Pi’s header for output, he was able to quickly go through the box to get an idea of what sort of trouble he’d gotten himself into. He was only about half way through the process when he wrote this particular blog post, but by that point, he’d found just 40 Pis which wouldn’t start at all. He suspects these might be victims of some common issue in the power circuitry that he’ll investigate at a later date.

The majority of Pis he checked were suffering from nothing worse than some bent GPIO pins or broken SD card slots. Some of the more abused examples had their USB ports ripped off entirely, but were otherwise fine. Another 10 had dead Ethernet, and 4 appear to have damaged traces leading to their HDMI ports. While we’re interested in hearing if [James] can get those 40 dark Pis to fire back up, so far the results are quite promising.

Donating hardware is always a tricky thing, so for now [James] says he’ll be selling the repaired Pis on eBay and donating the proceeds to the Raspberry Pi Foundation so they can continue to develop hardware that will (potentially) accomplish their goal of giving students all over the world a functional computer.

ESP32 Inkplate Gives Kindle Displays A Second Chance

Over the years, we’ve seen plenty of hackers repurpose their Kindle or similar e-reader to reap the benefits of its electronic paper display. Usually this takes the form of some software running on the reader itself, since cracking the firmware is a lot easier than pulling out the panel and figuring out how to operate it independently. But what if somebody had already done that hard work for you?

Enter the Inkplate. By pairing a recycled Kindle display with an ESP32, Croatian electronics company e-radionica says they’ve not only created an open hardware e-paper display that’s easy for hackers and makers to use, but keeps electronic waste out of the landfill. Last year the $99 USD 6 inch version of the Inkplate ended its CrowdSupply campaign at over 920% of its original goal. The new 9.7 inch model is priced at $129, and so far managed to blow past its own funding goal just hours after the campaign went live. Clearly, the demand is there.

The new model’s e-paper display isn’t just larger, it also features a higher 1200 x 825 resolution and reduced refresh time. Outside of the screen improvements, you’ll also find more GPIO pins, an RTC module to keep more accurate time, and a USB Type-C port for both programming and power. You also get a choice of languages to use, with both Arduino and MicroPython libraries available for interfacing with the display. Interestingly, the Inkplate also features a so-called “Peripheral Mode” that allows you to draw graphics primitives on the screen using commands sent over UART.

While we’ve recently seen some very promising efforts to repurpose old e-paper displays, the turn-key solution offered by the Inkplate is admittedly very compelling. If you’re looking for an easy way to jump on the electronic paper bandwagon that works out of the box, this might be your chance.

[Thanks to Krunoslav for the tip.]

MouSTer Brings USB To Retro Computers

Folks who like the take the old Amiga out for the occasional Sunday drive usually do it because they have wistful memories of the simpler times. Back when you could edit documents or view spreadsheets on a machine that had RAM measured in kilobytes instead of gigabytes. But even the most ardent retro computer aficionado usually allows for a bit of modern convenience.

Enter the mouSTer. This tiny device converts a common USB HID mouse into something older computers can understand. It even supports using Sony’s PlayStation 4 controller as a generic game pad. While the firmware is still getting tweaked, the team has confirmed its working on several classic machines and believe it should work on many more. Considering the prices that some of these old peripherals command on the second hand market, using a USB mouse or controller on your vintage computer isn’t just more convenient, but will likely be a lot cheaper.

Confirmed retrocomputing superfan [Drygol] is a member of the team working on mouSTer, and in a recent post to his retrohax blog, he talks a bit about what’s happened since his last update over the summer. He also talks a bit about the challenges they’ve faced to get it into production. Even if you’re not into poking around on vintage computers, there are lessons to be learned here about what it takes to move from a handful of prototypes to something you can actually sell to the public.

We especially liked the details about the mouSTer enclosure, or lack thereof. Originally [Drygol] says they were going to have the cases injection molded, but despite initial interest from a few companies they talked to, nobody ended up biting because it needed to be done with relatively uncommon low pressure injection. While 3D printing is still an option, the team ended up using clear heatshrink tubing to create a simple conformal protective shell over the electronics. Personally we think it looks great like this, but it sounds like this is only a temporary solution until something a bit more robust can be implemented.

As you might imagine we’ve seen DIY projects that aimed to bring modern input devices to vintage computers like the Atari ST, but the diminutive proportions of the mouSTer and the fact that it’s a turn-key product is sure to appeal to those who want to minimize headaches when working with their classic gear.

Continue reading “MouSTer Brings USB To Retro Computers”

Third Time’s The Charm For This Capable Cyberdeck

For those who decide to build their own personal cyberdeck, it’s often as much about the journey as it is the final product. The recent write-up that [Sophie Wheeler] put together about the process that lead her to build her own bespoke mobile computer is a perfect example. She went through three distinct design phases to create something that had what she describes as a “retro-futuristic, hand-built, utilitarian aesthetic”, and we think you’ll agree the final product is right on target.

At Hackaday, we’re strong believers that you can learn just as much from a failed attempt as you will from a rousing success, which is why we especially appreciate the way [Sophie] has documented this project. The basic layout and general bill of materials for his hypothetical cyberdeck had been sorted out in her head for about a year, but it took a few attempts until everything came together in a way she was happy with. Rather than pretend those early missteps never happened, she’s decided to present each one and explain why it didn’t quite work out.

This laser-cut acrylic design was difficult to assemble.

Frankly both earlier attempts look pretty slick to us, but of course the only person who’s opinion really counts when it comes to a good cyberdeck is the one who’s building it. The original acrylic design was a bit too fiddly, and while the first attempt at 3D printing the computer’s frame and enclosure went much better, it still left something to be desired.

The final result is a clean and straightforward design that has plenty of room inside for a Raspberry Pi 4, UPSPack V3 power management board, 10,000 mAh battery, internal USB hub, and a AK33 mechanical keyboard. Topside there’s a 7” 1024×600 IPS LCD with touch overlay that’s naturally been offset in the traditional cyberdeck style, and on the right side of the enclosure there’s a bay that holds a KKMoon RTL-SDR. Though that could certainly be swapped out for something else should you decide to print out your own version of this Creative Commons licensed design.

In our 2020 review we noted the incredible influx of cyberdeck builds we’d seen over the last 12 months, and judging by just what we’ve seen in just these last few weeks, 2021 should be another bumper year for these unique computers.

3D Printed Pi Arcade Is An Emulation Horn Of Plenty

Let’s be honest, building a home arcade cabinet isn’t exactly the challenge it once was. There’s plenty of kits out there that do all the hard work for you, and they even sell some pretty passable turn-key units at Walmart now. If you want to put a traditional arcade cabinet in your home, it’s not hard to get one.

Which is why this wild build by [Rafael Rubio] is so interesting. The entirely 3D printed enclosure looks like some kind of art piece from the 1970s, and is a perfect example of the kind of unconventional designs made possible by low-cost additive manufacturing. Building something like this out of wood or metal would be nightmare, especially for the novice; but with even a relatively meager desktop 3D printer you’re only a few clicks away from running off your own copy.

Removable side panels allow access to the electronics.

Inside the nautilus-like enclosure is a Raspberry Pi running Retropie, a 10″ LCD panel from Pimoroni, and a GeeekPi interface board that connects up to the 8-way joystick and arcade buttons. [Rafael] has included a Bill of Materials and an assembly overview that you can follow along with, though the cavernous internal dimensions of the enclosure certainly give you ample of room for improvisation if you’d rather blaze your own path.

Like the retro-futuristic computer terminals created by [Oriol Ferrer Mesià], this arcade machine completely reinvents a traditional design that most people take for granted. Is this layout actually better than the standard arcade cabinet? It’s not really our place to say. But it’s certainly a new and unconventional approach to “solved” problem, and that’s what we’re all about.

Multi-Channel Battery Monitor Aces First Sea Trial

A little over a a year ago, we covered an impressive battery monitor that [Timo Birnschein] was designing for his boat. With dedicated batteries for starting the engines, cranking over the generator, and providing power to lights and other amenities, the device had to keep tabs on several banks of cells to make sure no onboard systems were dipping into the danger zone. While it was still a work in progress, it seemed things were progressing along quickly.

But we know how it is. Sometimes a project unexpectedly goes from having your full attention to winning an all-expense-paid trip to the back burner. In this case, [Timo] only recently put the necessary finishing touches on his monitor and got it installed on the boat. Recent log entries on the project’s Hackaday.io page detail some of the changes made since the last time we checked in, and describe the successful first test of the system on the water.

Certainly the biggest issue that was preventing [Timo] from actually using the monitor previously was the lack of an enclosure and mounting system for it. He’s now addressed those points with his 3D printer, and in the write-up provides a few tips on shipboard ergonomics when it comes to mounting a display you’ll need to see from different angles.

The printed enclosure also allowed for the addition of some niceties like an integrated 7805 voltage regulator to provide a solid 5 V to the electronics, as well as a loud piezo beeper that will alert him to problems even when he can’t see the screen.

Under the hood he’s also made some notable software improvements. With the help of a newer and faster TFT display library, he’s created a more modern user interface complete with a color coded rolling graph to show voltages changes over time. There’s still a good chunk of screen real estate available, so he’s currently brainstorming other visualizations or functions to implement. The software isn’t using the onboard NRF24 radio yet, though with code space quickly running out on the Arduino Nano, there’s some concern about getting it implemented.

As we said the first time we covered this project, you don’t need to have a boat to learn a little something from the work [Timo] has put into his monitoring system. Whether you’re tracking battery voltages or temperatures reported by your BLE thermometers, a centralized dashboard that can collect and visualize that data is a handy thing to have.

Scanner Snooping Uncovers Focus Farce

From his comments about the noisy image and limited controls, we’re going to go out on a limb and assume [Andrew Jeddeloh] isn’t a huge fan of using his Epson V550 for scanning film. But is it really irredeemable? That’s what he set out to determine in a recent series of posts on his blog, and from what we can tell, it’s not looking good for the old Epson.

The first post attempts to quantify the optical capabilities of the scanner by determining its modulation transfer function (MTF), point spread function (PSF), and comparing its horizontal and vertical resolution. As you might expect, the nuances of these measurements are a bit beyond the average user. The short version of his analysis is that the scanner’s slide frame does indeed seem to be holding objects at the proper “sweet spot” for this particular image sensor; meaning that contrary to the advice he’d seen online, there’s nothing to be gained by purchasing custom film or slide holders.

MTF versus height of film from bed.

While investigating the optical properties of the scanner, [Andrew] became curious about the automatic focus options offered by the VueScan software he was using. The images produced appeared to be identical regardless of what option he selected, and he began to suspect the feature wasn’t actually doing anything. To confirm his theory, he wrote a shim program that would sit between the proprietary VueScan program and the V550 driver and log all of the data passing between them.

After tweaking various options and comparing the captured data streams, [Andrew] determined that enabling automatic focus in VueScan doesn’t do anything. At least, not with his scanner. He did notice a few extra bytes getting sent to the driver depending on which focus options were selected, but the response from the scanner didn’t change. He thinks the program likely has some kind of generic framework for enabling these kind of features on supported hardware, and it’s just mistakenly showing the autofocus options for a scanner that doesn’t support it.

If there’s some film you want to digitize, but you’re saddled with a scanner like the V550, you could always do it with a camera instead. You could even put together a passable film scanner with LEGO.