Battery Swap Gives Nissan LEAF New Lease On Life

It’s often said that one of the advantages of owning an electric vehicle is reduced maintenance costs, and for the most part, that’s true. That is, until the vehicle’s battery pack starts to show its age. Then you might be on the hook for a repair bill comparable to swapping out the engine on your old gas-burner. Depending on the age of the vehicle at that point, you might find yourself in the market for a new ride.

But in his latest video, [Daniel Öster] demonstrates that you can replace the battery in a modern electric vehicle without breaking the bank. While it’s not exactly an easy job, he manages to swap the pack in his 2012 Nissan LEAF from the comfort of his own garage using common tools and with the vehicle up on jack stands. The old battery wasn’t completely shot, so he was even able to recoup some of his costs by selling it; bringing the total price of the operation to approximately €2,122 ($2,500 USD).

Splicing on a new diagnostic connector.

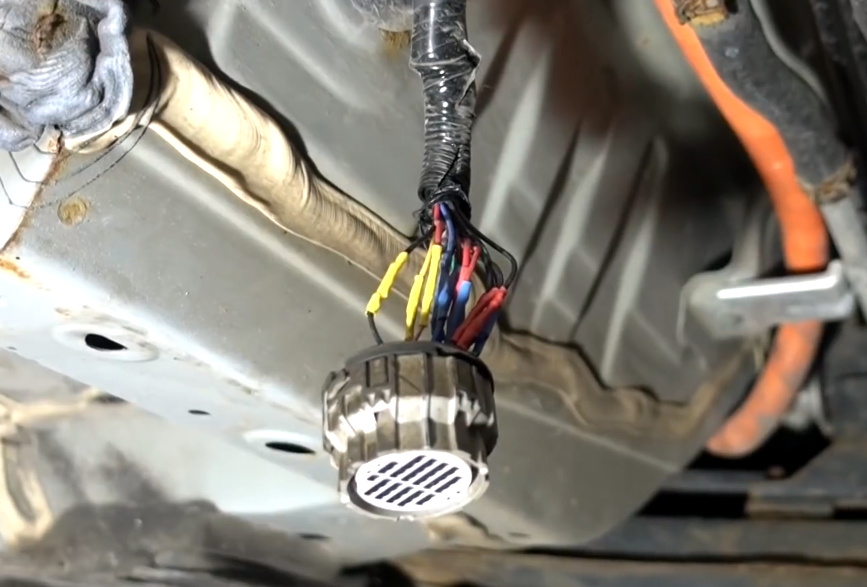
While that wouldn’t be a bad deal even for a simple swap, the operation was actually an upgrade. The car was originally sold with a 24 kWh battery, but [Daniel] has replaced it with a 30 kWh pack intended for the 2017 LEAF. His car now has a greater range than it did the day it rolled off the assembly line, though as you might expect, the installation was more complex than it would have been with a contemporary battery.

[Daniel] has produced a kit that has all the adapters required to perform your own battery upgrade, including a module that translates the diagnostic signals from the newer battery into something the older vehicle can understand. With all the electrical bits simplified, all you’ve got to worry about is drilling the new battery mounting holes in the frame.

The battery pack is truly the heart and soul of an electric car, so its no surprise that mechanics and hackers alike are eager to learn as much about them as possible. They’ll have their work cut out for them, as the technology is only going to get more advanced with time.

Continue reading “Battery Swap Gives Nissan LEAF New Lease On Life”

Digital Preservation For Old Batteries

The times they are a-changin’. It used to be that no household was complete without a drawer filled with an assortment of different sizes and types of batteries, but today more and more of our gadgets are using integrated rechargeable cells. Whether or not that’s necessarily an improvement is probably up for debate, but the fact of the matter is that some of these old batteries are becoming harder to find as time goes on.

Which is why [Stephen Arsenault] wants to preserve as many of them as possible. Not in some kind of physical battery museum (though that does sound like the sort of place we’d like to visit), but digitally in the form of 3D models and spec sheets. The idea being that if you find yourself in need of an oddball, say the PRAM battery for a Macintosh SE/30, you could devise your own stand-in with a printed shell.

The rather brilliantly named Battery Backups project currently takes the form of a Thingiverse Group, which allows other alkaline aficionados to submit their own digitized cells. The cells that [Stephen] has modeled so far include not only the STL files for 3D printing, but the CAD source files in several different flavors so you can import them into your tool of choice.

Like the efforts to digitally preserve vintage input devices, it’s not immediately clear how many others out there are willing to spend their afternoons modeling up antiquated batteries. But then again, we’ve long since learned not to underestimate the obscure interests of the hacker community.

Cluster Deck Packs Four Pis Into One Portable Package

Parallel computing is a fair complex subject, and something many of us only have limited hands-on experience with. But breaking up tasks into smaller chunks and shuffling them around between different processors, or even entirely different computers, is arguably the future of software development. Looking to get ahead of the game, many people put together their own affordable home clusters to help them learn the ropes.

As part of his work with decentralized cryptocurrency, [Jay Doscher] recently found himself in need of a small research cluster. He determined that the Raspberry Pi 4 would give him the best bang for his buck, so he started work on a small self-contained cluster that could handle four of the single board computers. As we’ve come to expect given his existing body of work, the final result is compact, elegant, and well documented for anyone wishing to follow in his footsteps.

The core unit would make a great desktop cluster.

Outwardly the cluster looks quite a bit like the Mil-Plastic that he developed a few months back, complete with the same ten inch Pimoroni IPS LCD. But the internal design of the 3D printed case has been adjusted to fit four Pis with a unique staggered mounting arrangement that makes a unit considerably more compact than others we’ve seen in the past. In fact, even if you didn’t want to build the whole Cluster Deck as [Jay] calls it, just printing out the “core” itself would be a great way to put together a tidy Pi cluster for your own experimentation.

Thanks to the Power over Ethernet HAT, [Jay] only needed to run a short Ethernet cable between each Pi and the TP-Link five port switch. This largely eliminates the tangle of wires we usually associate with these little Pi clusters, which not only looks a lot cleaner, but makes it easier for the dual Noctua 80 mm to get cool air circulated inside the enclosure. Ultimately, the final product doesn’t really look like a cluster of Raspberry Pis at all. But then, we imagine that was sort of the point.

Of course, a couple of Pis and a network switch is all you really need to play around with parallel computing on everyone’s favorite Linux board. How far you take the concept after that is entirely up to you.

OSIRIS-REx Reaches Out And Touches Asteroid Bennu

After a four year trek through deep space, OSIRIS-REx made history this evening as it became the first NASA spacecraft to try and collect a surface sample from an asteroid (Editor’s note: servers may be down due to the breaking news). Once sensors verify the collected material is safely onboard, the vehicle will begin drifting away from the 490 meter wide Bennu in preparation of its eventual departure and return to Earth. If all goes according to plan, the craft’s conical Sample Return Capsule carrying its precious cargo will renter the atmosphere and land at the Utah Test and Training Range in September of 2023.

OSIRIS-REx with solar panels in “Y-Wing” configuration.

Due to its extremely low gravity and rocky surface, a traditional landing on Bennu was deemed impractical. Instead, OSIRIS-REx performed a daring touch and go maneuver that brought the spacecraft into contact with the surface for just a few seconds.

A camera on the bottom of the vehicle took images every few minutes during the descent and ran them through an onboard system called Natural Feature Tracking (NFT) that autonomously steered it away from dangerous surface features. As a precaution, the solar panels on the OSIRIS-REx were angled backwards in a “Y-Wing” configuration shortly before the descent to help protect them from striking the surface or being damaged by ejected material.

Once the colander-like Touch-And-Go Sample Acquisition Mechanism (TAGSAM) mounted to the end of the spacecraft’s 3.35 meter (11 foot) articulated robotic arm arm made contact with the regolith, pressurized nitrogen was used to kick up material and push it towards storage caches built into the mechanism. With so much riding on the successful collection of surface material, this largely passive system was selected to minimize the possible failures in the critical few seconds that OSIRIS-REx would be in contact with Bennu. Mission planners say it might take until Saturday to determine if a sample was successfully collected, and that the spacecraft has the ability to perform two more attempts if needed.

After its discovery in September 1999, both the Arecibo Observatory and the Goldstone Deep Space Network were used to make radar observations of Bennu to study its shape and size. Calculations have shown it has a cumulative 1 in 2,700 chance of striking the Earth by the year 2199. By mapping the asteroid, studying it at close range, and bringing a geological sample back home, NASA hopes to gain valuable insight on how similar near-Earth objects can be detected and ultimately diverted if needed.

This (mostly) Transparent Tesla Coil Shows It All

You’d be forgiven for assuming that a Tesla coil is some absurdly complex piece of high-voltage trickery. Clarke’s third law states that “any sufficiently advanced technology is indistinguishable from magic”, and lighting up a neon tube from across the room sure looks a lot like magic. But in his latest Plasma Channel video, [Jay Bowles] tries to set the record straight by demonstrating a see-through Tesla coil that leaves nothing to the imagination.

Of course, we haven’t yet mastered the technology required to produce transparent copper wire, so you can’t actually see through the primary and secondary coils themselves. But [Jay] did wind them on acrylic tubes to prove there aren’t any pixies hiding in there. The base of the coil is also made out of acrylic, which lets everyone see just how straightforward the whole thing is.

Beyond the coils, this build utilizes the DIY high-voltage power supply that [Jay] detailed a few months back. There’s also a bank of capacitors mounted to a small piece of acrylic, and a clever adjustable spark gap that’s made of little more than a few strategically placed pieces of copper pipe and an alligator clip. Beyond a few little details that might not be obvious at first glance, such as grounding the secondary coil to a layer of aluminum tape on the bottom of the base, it’s all right there in the open. No magic, just science.

[Jay] estimates this beauty can produce voltages in excess of 100,000 volts, and provides a demonstration of its capabilities in the video after the break. Unfortunately, before he could really put the new see-through coil through its paces, it took a tumble and was destroyed. A reminder that acrylic enclosures may be pretty, but they certainly aren’t invulnerable. With the value of hindsight, we’re sure the rebuilt version will be even better than the original.

If you’d rather not have your illusions shattered, we’ve seen plenty of complex Tesla coils to balance this one out. With witchcraft like PCB coils and SMD components, some of them still seem pretty magical.

Continue reading “This (mostly) Transparent Tesla Coil Shows It All”

Simplifying The Ruggedized Raspberry Pi Portable

Over the last year we’ve seen a wave of portable computer builds that center around the Raspberry Pi taking up residence inside a commercial heavy-duty storage case. It’s not hard to see why; whether you spring for the Pelican case or get a cheaper alternative, these water-tight cases are far stronger than anything you’re going to 3D print or otherwise cobble together in the home shop. Especially if you can avoid popping any holes in the side.

Inspired by these builds but looking to make it even easier and cheaper to roll your own version, [Dmitry] recently took the wraps off of what he calls the Militarish Pi. You don’t need a CNC to cut out any face plates or a 3D printer to create an internal framework for all your components. You could even do it without soldering anything, if you really wanted to. Short of just buying one of these rigs pre-built from somebody, it’s hard to imagine it could get much easier than this.

Most of the effort involves cutting the PVC foam sheet that holds the Raspberry Pi, battery pack, and the driver board for the LCD in the bottom of the $15 USD case [Dmitry] managed to track down on AliExpress. The “carbon fiber” sticker he put on the PVC sheet won’t do much for the structural integrity of the build, but it sure looks nice. Of course if you have access to the appropriate tools, you could certainly cut the plate out of something stouter. As for the display, the nine inch LCD is perfectly sized to press fit into the lid.

Rounding out the build, [Dmitry] found a cheap Android phone case that included a tiny USB keyboard which plugs right into the Pi and he’s looking to add a BlackBerry trackball to the setup down the line. We especially like the large open area that he’s kept around the Raspberry Pi’s ports that allow you to easily hook up to the network or plug in a flash drive. It could also be a nice compartment to keep your RTL-SDR for some mobile radio work.

For those that don’t mind spending name-brand money and have access to a 3D printer, the Raspberry Pi Quick Kit by [Jay Doscher] is another great way to get yourself a rough and tumble Pi without reinventing the wheel.

PyBot Is A 3D Printed SCARA Arm For The Masses

We’ve all seen videos of blisteringly fast SCARA arms working on assembly lines, and more than a few of us have fantasied about having that same kind of technology for the home shop. Unfortunately, while the prices for things like 3D printers and oscilloscopes have dropped lower than what many would have believed possible a decade ago, high-performance robotics are still too pricey for the home player.

Unless of course, you’re willing to build it yourself. The PyBot designed by [jjRobots] is an open source robotic arm that should be well within the means of the average hardware hacker. One could argue that this is a project made entirely possible by desktop 3D printing; as not only are most of the structural components printed, but most of the mechanical elements are common 3D printer parts. Smooth rods, linear bearings, lead screws, and NEMA 17 motors are all exceptionally cheap these days thanks to the innumerable 3D printer kits that make use of them.

A custom control board keeps the wiring tight.

Those who’ve researched similar projects might notice that the design of this arm has clearly been influenced by the Mostly Printed SCARA (MPSCARA). But while that robot was designed to carry an extruder and act as a 3D printer, [jjRobots] intends for the PyBot to be more of a general purpose platform. By default it features a simple gripper, but that can easily be changed out for whatever tool or gadget you have in mind.

In the base of the arm is a custom control board that combines an Arduino M0, an ESP8266, and a trio of stepper motor drivers. But if you wanted to build your own version from the parts bin, you could certainly wire up all the principle components manually. As the name implies, the PyBot is controlled by Python tools running on the computer, so it should be relatively easy to get this capable arm to do your bidding.

We’ve seen some impressive 3D printed robotic arms over the years, but the simplicity of the PyBot is particularly compelling. This looks like something that you could reasonably assemble and program over a weekend or two, and then put to work in your ad-hoc PPE factory.