The Open Source Mars Rover, One Year Later

As the name implies, here at Hackaday we strive to bring you interesting projects every single day. But that doesn’t necessarily mean a project only gets one day to grace these storied pages. Quite the opposite, in fact. We’re always happy to revisit a project and find out how far it’s evolved since we last crossed paths with it, especially when the creators themselves reach out to give us an update.

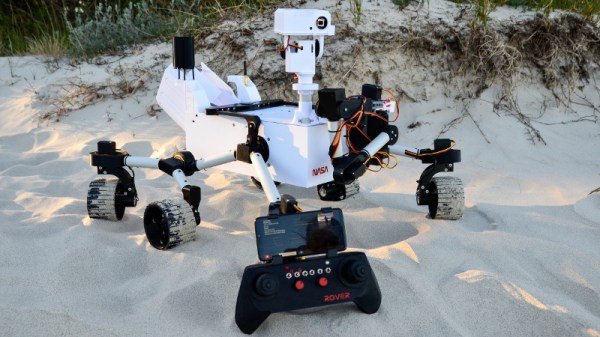
Which is exactly what happened when [Jakob Krantz] recently wrote in to get us up to speed on this incredible open source rover project. We first saw this 3D printed Curiosity inspired robot a little less than a year ago, and at that point it was essentially just a big box with the distinctive NASA rocker-bogie suspension bolted on. Now it not only looks a lot closer to the Martian rovers that inspired it, but it’s also learned a number of new tricks that really take this project to the next level.

The articulated head and grabber arm don’t just help sell the Curiosity look, they’re actually functional. [Jakob] notes that he doesn’t have kinematics integrated yet, so moving the arm around is more for show than practical application, but in the future it should be able to reach out and grab objects. With the new cameras in the head, he’ll even be able to get a first person view of what he’s picking up.

Last year [Jakob] was using a standard RC transmitter to drive the rover around, but he’s since put together a custom controller that’s truly a thing of beauty. It uses an ESP32 and LoRa module to communicate with matching hardware inside the rover, as well as a smartphone clipped onto the top that’s displaying telemetry and video over WiFi. The controller is actually its own separate project, so even if you aren’t in the market for a scaled down Mars rover, its controller could come in handy for your next robotics project.

Presumably the multi-mission radioisotope thermoelectric generator (MMRTG) on the back of the rover is just pretend….but with this guy, we’re not so sure. Give him another year, and who knows.

Review: Calculator Kit Is Just A Few Hacks From Greatness

While most people are satisfied with a calculator application on their smartphone these days, there’s still something to be said for the old fashioned desk calculator. Maybe it’s the fact the batteries last long enough that you can’t remember the last time you changed them, or the feel of physical buttons under your fingers. It could even be the fact that it keeps your expensive smartphone from needing to sit out on the workbench. Whatever the reason, it’s not uncommon to see a real-life calculator (or two) wherever solder smoke tends to congregate.

Which is precisely the idea behind this DIY calculator kit. Available from the usual overseas retailers for about $15 USD, it has some hobbyist-oriented features such as the ability to decode resistor color bands, convert hexadecimal numbers, and calculate resistor values for driving LEDs. If you’re going to keep a knock-around calculator on your bench, why not build the thing yourself?

Given the dual nature of this product, a DIY electronics kit and a functional desk calculator for electronic hobbyists, it seems only appropriate to review both aspects of it individually. Which is good, since there may be more to this product than just the sum of its parts.

Continue reading “Review: Calculator Kit Is Just A Few Hacks From Greatness”

AVR Multi-Tool Learns The Latest Tricks

Like many of us who fiddle with microcontrollers, [Mike] and [Brian] often found themselves using an ISP programmer and a USB-to-serial adapter. But when they started working on the latest generation of ATtiny chips, they found themselves in need of a Unified Program, and Debug Interface (UPDI) programmer as well. So they decided to wrap all three functions into one handy open hardware gadget.

They call their creation the AVR General Purpose Programmer, or AVRgpp for short. It runs on an ATmega328P with a Pro Mini bootloader, which means that the programmer itself is fully compatible with the Arduino IDE. USB-to-serial capability is provided by a CH330N, and a MC14053 digital switch IC is used to select between talking to the AVRgpp’s onboard MCU or the target device.

A 128 x 32 I2C OLED and two push buttons are used to select the device’s current mode, and there’s a physical switch to select between 5 V or 3.3 V power for the target. There’s also a ST662 12 V regulator, as UPDI targets occasionally need a high voltage pulse to switch into programming mode. Everything is packaged up in a pocket-sized laser cut enclosure that you can easily toss in your bag.

[Mike] and [Brian] say they are considering putting the AVRgpp into small scale production if there’s enough interest, so let them know if you’d like to get one without having to build it yourself.

Pop Open Your Neighbor’s Front Door With 12 Volts

Many in the community are skeptical about the security of commercial smart home devices, and for good reason. It’s not like you have to look far to find examples of poorly implemented systems, or products that are abandoned by their manufacturers and left without critical security updates. But the design flaw in this video doorbell really drives home how little thought some companies give to their customer’s security.

As explained by [Savvas], and demonstrated in the video after the break, all you need to do if you want to get into a home equipped with one of these vulnerable door bells is pop the unit off the wall and hit it with 12 volts DC.

Incredibly, the terminals that connect to the electronic lock inside the house are completely accessible on the back of the unit. They even labeled them, on the off-chance the robber forgets which wire is which. It’s not even as though the thing is held on with some kind of weird security screws, it’s just a garden variety Phillips.

In the video, [Savvas] even shows he used a little gadget attached to a QuickCharge USB battery bank to get a portable 12 VDC source suitable for tripping these locks. Which, interestingly enough, is based on a trick he read about in the Hackaday comments. Something to consider while penning your next comment on these storied pages.

[Savvas] says he’s reached out to the company to get their side of the story, but so far, hasn’t received a response. We aren’t surprised, this is a fundamental flaw in the product’s execution. Clearly they wanted to make an easy to install device that doesn’t require any additional electronics in the house, and this is the inevitable end result of that oversimplification. All the more reason to roll your own smart doorbell.

Continue reading “Pop Open Your Neighbor’s Front Door With 12 Volts”

Experimenting With Vibratory Wind Generators

We’ve all got a pretty good mental image of the traditional wind-powered generator: essentially a big propeller on a stick. Some might also be familiar with vertical wind turbines, which can operate no matter which way the wind is blowing. In either case, they use some form of rotating structure to harness the wind’s energy.

But as demonstrated by [Robert Murray-Smith], it’s possible to generate electrical power from wind without any moving parts. With simple components, he shows how you can build a device capable of harnessing the wind with nothing more than vibrations. Alright, so we suppose that means the parts are technically moving, but you get the idea.

In the video after the break, [Robert] shows two different devices that operate under the same basic principle. For the first, he cuts the cone out of a standard speaker and glues a flat stick to the voice coil. As the stick moves back and forth in the wind, the coil inside of the magnet’s field and produces a measurable voltage. This proves the idea has merit and can be thrown together easily, but isn’t terribly elegant.

For the revised version, he glues a coil to a small piece of neoprene rubber, which in turn is glued to a slat taken from a Venetian blind. On the opposite side of the coil, he glues a magnet. When the blind slat starts vibrating in the wind, the oscillation of the magnet relative to the coil is enough to produce a current. It’s tiny, of course. But if you had hundreds or even thousands of these electric “blades of grass”, you could potentially build up quite a bit of energy.

If this all sounds a bit too theoretical for your tastes, you can always 3D print yourself a more traditional wind turbine. We’ve even seen them in vertical form, if you want to get fancy.

Continue reading “Experimenting With Vibratory Wind Generators”

The Segway Is Dead, Long Live The Segway

Before it was officially unveiled in December 2001, the hype surrounding the Segway Human Transporter was incredible. But it wasn’t because people were excited to get their hands on the product, they just wanted to know what the thing was. Cryptic claims from inventor Dean Kamen that “Ginger” would revolutionize transportation and urban planning lead to wild speculation. When somebody says their new creation will make existing automobiles look like horse-drawn carriages in comparison, it’s hard not to get excited.

Dean Kamen unveils the Segway

There were some pretty outlandish theories. Some believed that Kamen, a brilliant engineer and inventor by all accounts, had stumbled upon some kind of anti-gravity technology. The kids thought they would be zipping around on their own Back to the Future hover boards by Christmas, while Mom and Dad were wondering what the down payment on a floating minivan might be. Others thought the big secret was the discovery of teleportation, and that we were only a few years out from being able to “beam” ourselves around like Captain Kirk.

Even in hindsight, you really can’t blame them. Kamen had the sort of swagger and media presence that we today associate with Elon Musk. There was a general feeling that this charismatic maverick was about to do what the “Big Guys” couldn’t. Or even more tantalizing, what they wouldn’t do. After all, a technology which made the automobile obsolete would change the world. The very idea threatened a number of very big players, not least of which the incredibly powerful petroleum industry.

Of course, we all know what Dean Kamen actually showed off to the world that fateful day nearly 20 years ago. The two-wheeled scooter was admittedly an impressive piece of hardware, but it was hardly a threat to Detroit automakers. Even the horses were largely unconcerned, as you could buy an actual pony for less than what the Segway cost.

Now, with the announcement that Segway will stop production on their eponymous personal transporter in July, we can confidently say that history will look back on it as one of the most over-hyped pieces of technology ever created. But that’s not to say Kamen’s unique vehicle didn’t have an impact. Continue reading “The Segway Is Dead, Long Live The Segway”

Mini “Gaming PC” Nails The Look, Streams The Games

To have a proper gaming “rig”, you need more than a powerful GPU and heaps of RAM. You’ve also got to install a clear side-panel so lesser mortals can ogle your wiring, and plenty of multicolored LEDs to make sure it’s never actually dark when you’re up playing at 2 AM. Or at least, that’s what the Internet has led us to believe.

The latest project from [Michael Pick] certainly isn’t doing anything to dispel that stereotype. In fact, it’s absolutely reveling in it. The goal was to recreate the look of a high-end custom gaming PC on a much smaller scale, with a Raspberry Pi standing in for the “motherboard”. Assuming you’re OK with streaming them from a more powerful machine on the network, this diminutive system is even capable of playing modern titles.

But really, the case is the star of the show here. Starting with a 3D printed frame, [Michael] really went all in on the details. We especially liked the little touches such as the fiber optics used to bring the Pi’s status and power LEDs out to the top of the case, and the tiny and totally unnecessary power button. There’s even a fake graphics card inside, with its own functional fan.

Even if you’re not interested in constructing custom enclosures for your Raspberry Pi, there are plenty of tips and tricks in the video after the break that are more than worthy of filing away for future use. For example, [Michael] shows how he fixed the fairly significant warping on his 3D printed case with a liberal application of Bondo and a straight-edge to compare it to.

This isn’t the first time we’ve seen a Raspberry Pi masquerade as a high-end computer, but it’s surely the most effort we’ve ever seen put into the gag.

Continue reading “Mini “Gaming PC” Nails The Look, Streams The Games”