YARH.IO Is The Hackable Pi Portable Of Our Dreams

Less than a decade ago, building a completely custom portable computer was more or less out of the question. Sure you could have cobbled something together with a Gumstix board and the dinky NTSC/PAL screen pulled from a portable DVD player, but it wouldn’t exactly have been a daily driver. But now we have cheap high definition LCD panels, desktop 3D printers, and of course, the Raspberry Pi.

We’ve seen these elements combined into bespoke personal computing devices too many times to count now, but very few of them can compare to the incredible YARH.IO. It’s been designed from the ground up for easy assembly and customization; you don’t have to worry about getting custom PCBs made or tracking down some piece of unobtanium hardware. Everything inside of the 3D printed enclosure is an off-the-shelf module, needing little more than the occasional scrap of protoboard to tie them all together.

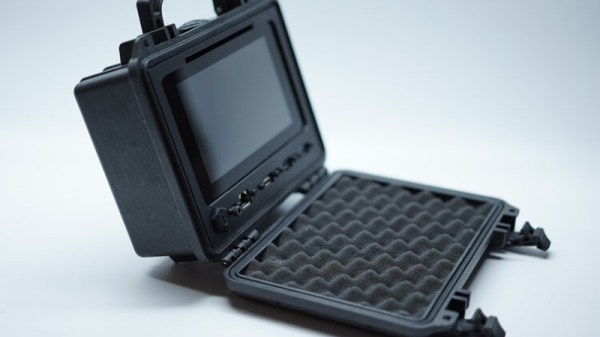
YARH.IO in tablet mode.

One glance at the rugged design of the YARH.IO, and it’s clear this device wasn’t meant to live on a shelf. Whether it’s getting tossed around the workbench or thrown into a bag on the way to a hacker con, the militarized design of this portable is ready for action. Using appropriately strong materials such as PETG and ABS, we have no doubt the enclosure will survive whatever the on-the-go hacker can throw at it.

But what’s arguably the best feature of the YARH.IO also happens to be the least obvious: the modular design of the enclosure allows you to remove the lower keyboard section and use it as a battery powered Linux tablet (albeit a rather chunky one). Whether the keyboard is attached or not, you still have access to the Pi’s expansion header thanks to a clever pass-through.

Like with the Mil-Plastic that [Jay Doscher] released recently, we know these 3D printed kits will never be as strong as the real military gear they’re emulating. But let’s be realistic, none of us keyboard warriors will be taking them into an actual battlefield anytime soon. What’s more important is that their modular construction allows them to be easily modified for whatever the user’s needs might be. With as far as the state-of-the-art in DIY bespoke computing as come in the last decade, we can’t wait to see what the future holds.

World’s Only Flying Twin Mustang Goes On Sale

Given the incredible success of the P-51 Mustang during the Second World War, it’s perhaps no surprise that the United States entertained the idea of combining two of the iconic fighters on the same wing to create a long-range fighter that could escort bombers into Japan. But the war ended before the F-82 “Twin Mustang” became operational, and the advent of jet fighters ultimately made the idea obsolete. Just five examples of this unique piece of history are known to exist, and the only one in airworthy condition can now be yours.

Assuming you’ve got $12 million laying around, anyway. Even for a flyable WWII fighter, that’s a record setting price tag. But on the other hand, you’d certainly be getting your money’s worth. It took over a decade for legendary restoration expert [Tom Reilly] and his team to piece the plane, which is actually a prototype XP-82 variant, together from junkyard finds. Even then, many of the parts necessary to get this one-of-a-kind aircraft back in the sky simply no longer existed. The team had to turn to modern techniques like CNC machining and additive manufacturing to produce the necessary components, in some cases literally mirroring the design in software so it could be produced in left and right hand versions.

Recovering half of the Twin Mustang in 2008.

We first covered this incredible restoration project back in 2018, before the reborn XP-82 had actually taken its first flight. Since then the plane has gone on to delight crowds with the sound of two counter-rotating Merlin V-12 engines and win several awards at the Oshkosh airshow. The listing for the aircraft indicates it only has 25 hours on the clock, but given its rarity, we can’t blame [Tom] and his crew for keeping the joyrides to a minimum.

As important as it is to make sure these incredible pieces of engineering aren’t lost to history, the recent crash of the B-17G Nine-O-Nine was a heartbreaking reminder that there’s an inherent element of risk to flying these 70+ year old aircraft. A world-class restoration and newly manufactured parts doesn’t remove the possibility of human error or freak weather. While we’d love to see and hear this beauty taxiing around our local airport, it’s a warbird that should probably stay safely in the roost. Hopefully the $12 million price tag will insure whoever takes ownership of the world’s only flying F-82 treats it with the respect it’s due.

Flipper Zero Blasts Past Funding Goal And Into Our Hearts

There’s never been a better time to be a hardware hacker: the tools are cheap, the information is free, and the possibilities are nearly endless. But that doesn’t mean there isn’t room for improvement. The Flipper Zero was developed to make the world of hardware hacking even more accessible, and as of this writing, has officially ended its Kickstarter campaign after raising a staggering $4.8 million. To say the community is excited about this little gadget is perhaps an understatement.

So what does the Flipper Zero do that’s gotten everyone so worked up? Well, for one, it’s not so much what it can do as how it does them. Taking inspiration from the already popular pwnagotchi project, the Flipper Zero gamifies the normally rather mundane tasks of sniffing for 433 MHz signals and flashing EEPROMs with the addition of an animated dolphin that’s sustained by your hacking. If you want the little fellow to grow and be happy, you need to keep poking and prodding around at any piece of hardware you come across.

If you’re looking for a comprehensive list of features, that’s a little harder to nail down. Partially because the device has picked up a number of new tricks (such as support for Bluetooth and NFC) thanks to the fact it made better than 8,000% of its original funding goal, but also because it can be expanded with additional hardware and software which obviously won’t get developed until the community gets their hands on the core device.

But even the core functionality, demonstrated in the video after the break, is quite compelling. The Flipper Zero’s CC1101 transceiver chip (anyone else thinking of the IM-ME right now?) allows it to record, analyze, and play back RF signals from 300 to 928 MHz, meaning you can instantly take over remote control systems that aren’t using a rolling code for authentication. It can also read and emulate many different RFID cards, record and transmit IR signals, emulate a USB HID device and run programmable payloads, and act as a USB to UART/SPI/I2C adapter. All contained in a sleek and pocket-sized enclosure that looks like a proper cyberpunk hacking gadget.

We’re extremely interested in seeing what the community can do with the Flipper Zero, especially now that the extra windfall has allowed the team to create a formal Developer Program for people who want to help work on the core platform or produce add-on modules. After banking nearly $5 million, this will be the yardstick by which all other crowd sourced hacking gadgets are measured for years to come; let’s hope they make it count.

Continue reading “Flipper Zero Blasts Past Funding Goal And Into Our Hearts”

Building An Open Source ThinkPad Battery

If you own a laptop that’s got a few years on the clock, you’ve probably contemplated getting a replacement battery for it. Which means you also know how much legitimate OEM packs cost compared to the shady eBay clones. You can often get two or three of the knock-offs for the same price as a single real battery, but they never last as long as the originals. If they even work properly at all.

Which is why [Alexander Parent] decided to take the road less traveled and scratch built a custom battery for his ThinkPad T420. By reverse engineering how the battery pack communicated with the computer, he reasoned he would be able to come up with an open source firmware that worked at least as well as what the the third party ones are running. Which from the sounds of it, wasn’t a very high bar. From a more practical standpoint, it also meant he’d be able to create a higher capacity battery pack than what was commercially available should he chose to.

A logic analyzer wired in between one of the third party batteries and a spare T420 motherboard allowed [Alexander] to capture all the SMBus chatter between the two. From there he wrote some Arduino code that would mimic a battery as a proof of concept. He was slowed down a bit by an undocumented CRC check, but in the end he was able to come up with a fairly mature firmware that even allows you to provide a custom vendor name and model number for your pack.

The code was shifted over to an ATtiny85, with a voltage divider wired up to one of the pins so it can read the pack voltage. [Alexander] says his firmware still doesn’t do a great job of reporting the actual battery capacity remaining, but it’s close enough for his purposes. He came up with a simple PCB design to hold the MCU and support components, which eventually he plans on putting inside of a 3D printed case that actually plugs into the back of his T420.

This project is obviously still in a relatively early stage, but we’re very interested to see [Alexander] take it all the way. The ThinkPad has long been the hacker’s favorite laptop, and we can think of no machine more worthy of a fully open hardware and software battery pack.

This 3D Printed “Bladeless” Fan Gets It Done Cheap

Not long after Dyson unveiled their “bladeless” fan, a fairly steady stream of ever cheaper clones have been hitting the market. But this 3D printed version created by [Elite Worm] must surely be one of the most budget-friendly takes on the concept. If you’ve got a 3D printer, we’d wager you’ve already got most of the parts required to build your own.

See, there’s a blade.

To be clear, of course there’s a blade. They aren’t magic, obviously. The fan is just small, and hidden inside the base. Air is pulled from the sides and bottom, and into the ring mounted to the top of the unit. When the air eventually exits the thin slit in the ring, it “sticks” to the sides due to the Coandă effect and produces a low pressure zone in the center. That’s all a fancy way of saying that the air flow you get from one of these gadgets is several times greater than what the little dinky fan would be capable of under normal circumstances. That’s the theory, anyway.

We can’t promise that all the physics are working as they should in this 3D printed version, but in the video after the break it certainly appears to be moving a considerable amount of air. It’s also quite loud, but that’s to be expected given it’s using a brushless hobby motor. To get it spinning, [Elite Worm] is using a Digispark ATtiny85 connected to a standard RC electronic speed control (ESC). The MCU reads a potentiometer mounted to the side of the fan and converts that to a PWM signal required by the ESC.

Beyond the electronics, essentially every piece of this project has been printed on a standard desktop 3D printer. An impressive accomplishment, though we probably would have gone with a commercially available propeller for safety’s sake. On the other hand, the base of the fan should nicely contain the shrapnel created should it explode at several thousand RPM. Probably.

Continue reading “This 3D Printed “Bladeless” Fan Gets It Done Cheap”

A Cyclopic LCD Case For Your Raspberry Pi Server

If you’ve got a personal website that needs hosting or a few hundred gigabytes of files that could use a centralized storage location, the Raspberry Pi’s small size and extreme energy efficiency make it a compelling server choice compared to that curbside Pentium 4 box you’ve been trying to find a home for. All you need is something to put in.

Of course there’s no shortage of Pi case designs ready to be extruded from your 3D printer, but we recently found ourselves particularly taken with this unique one designed by [Ken Segler]. It’s not only small and sleek with a dash of futuristic flair, but it includes a front-mounted two inch 240 x 320 IPS display that connects to the Pi over SPI. At the minimum that gives you a way to see all those beautiful boot messages on startup, but with a little code, it could provide you with various system statics and status messages at a glance.

While the LCD is clearly the star of the show here, the case also has a few other nice features that make it worthy of your consideration. The magnetically attached fan filter on the the top, for one. The stacked layout that puts the Pi directly above the SSD also makes for a relatively compact final product.

One thing to note though is that [Ken] is using Power-over-Ethernet, meaning there’s no spot for a dedicated power jack on the case. It’s an easy enough feature to add into your own build, but naturally not everyone’s network is suitably equipped. In that case, beyond the normal annoyances of editing STL files, it shouldn’t be too much trouble to add one in without having to literally hack your way through the printed plastic.

A PIN Pad Blasting UV Sanitizer

Retailers have instituted enhanced cleaning procedures in response to the COVID-19 pandemic, with an aim to keep frequently touched surfaces as clean as possible. Certainly one of the most commonly handled objects in the entire store is the payment terminal by the register, and the PIN pad specifically. Which is why [Josh Starnes] is working on a UV sterilizer that mounts onto a standard credit card terminal.

It’s a simple enough idea, but as is often the case, figuring out how to properly execute it is where things get tricky. [Josh] has already moved through several design iterations for his 3D printed enclosure in an attempt to make something that’s unobtrusive enough to be practical. The goal is to make something that the user won’t mistake for some kind of skimming device, which can certainly be tricky.

The skeptics in the audience will be happy to hear that [Josh] isn’t bothering with an LED UV source, either. We’ve all seen the pitfalls of trying to sanitize using UV LEDs, so this design goes old school with a small 12 volt UV bulb. That does mean it will need a dedicated power source however, which it seems like he’ll be addressing in the next phase of the project.