Vacuum Dust Collection With Self-Powered Relays

Like many people with multiple woodworking tools, [Will Stone] wanted to create a centralized dust collection system. But he quickly found that the devil was in the details, as he struggled to find an economic way to automatically kick on the vacuum when one of the tools started up. His final solution might be one of the most elegant, and surely the cheapest, we’ve ever come across.

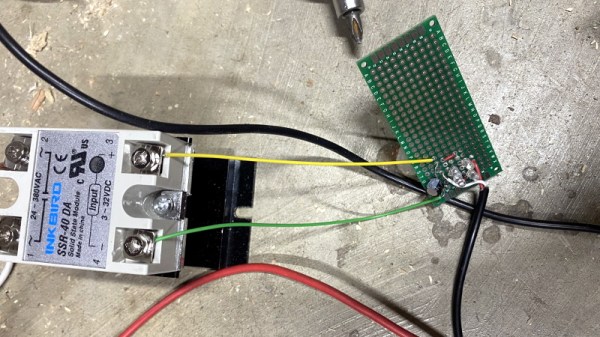
As with other DIY systems we’ve seen over the years, [Will] is using a simple inductive current sensor to detect when AC power is being drawn by one of his tools. But where the similarity stops is that there’s nothing so pedestrian as a microcontroller reading the output of the sensor. He realized that when the coils in the sensor were energized they were putting out about 7 volts AC, which should be more than enough to trigger a relay.

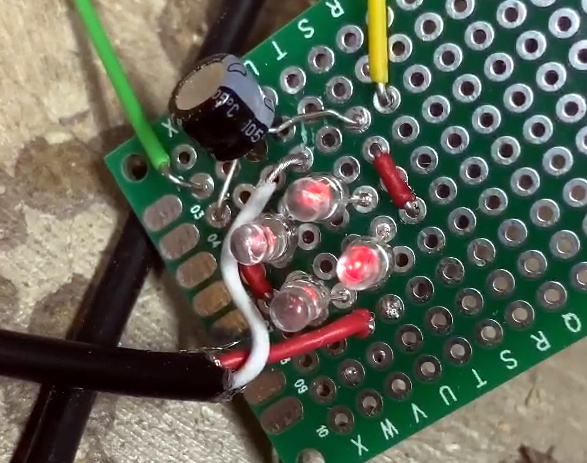
So he threw together a rectifier circuit on a piece of perfboard, using four LEDs in true hacker style. With the addition of a capacitor to smooth out the voltage, this little circuit is able to trip the 40 amp solid state relay controlling power to the vacuum using nothing more than the energy harvested from the sensor’s coil.

Using a current sensor is great when the tools are close enough to all be plugged into the same line, but that doesn’t help the folks with cordless tools or supersized shops. In that case, you might need to look into a sound-activated system.

Join The Movement With This Mini Cyberdeck

The global pandemic has given many people a lot more time at home, which has undoubtedly pushed an untold number of projects over the finish line. Unfortunately, it’s also disrupted global commerce and shipping to the point that getting parts can be a lot harder than we’d like. Which is why [facelesstech] decided to put together this exceptionally mobile cyberdeck out of things he already had laying around.

Now to be fair, his parts bin is perhaps a bit better stocked for this kind of thing than most. He’s built a couple of Raspberry Pi portables already, so the Pi Zero W, display, and battery management board were already kicking around. He just had to come up with a new 3D printed enclosure that holds it all together with a little bit of cyberpunk flair.

To that end, he’s done an excellent job of documenting the build and has released the STL files for the 3D printed components. All things considered, we’d say this is probably the most approachable cyberdeck design currently available; if you’ve been wondering what all the fuss is about with these bespoke little computers, this is an ideal project to get started with.

Keep in mind that the idea of a cyberdeck is to build something custom for yourself, so there’s no need to copy this build exactly. If you’re short on parts, you could forgo the battery powered aspect and just keep it tethered. The superfluous (but very cool) GX12 connectors could certainly be deleted as well, although at serious stylistic cost. You’ll probably need to order the specific keyboard that [facelesstech] designed the lower half of the device around, but it’s common enough that it shouldn’t be hard to track down. No matter which way you take it, this design is a great base to start from.

If you’re looking for something a bit more substantial and have the filament to burn, you might take a look at the VirtuScope to fulfill your offset screen needs.

Continue reading “Join The Movement With This Mini Cyberdeck”

Nintendo’s GBA Dev Board Could Pass For Modern DIY

When the Game Boy Advance came on the scene in 2001, it was a pretty big deal. The 32-bit handheld represented the single biggest upgrade the iconic Game Boy line had ever received, not only in terms of raw processing power, but overall design. It would set the state-of-the-art in portable gaming for years, and Nintendo was eager to get developers on board.

Which could explain why the official GBA development kit, recently shown off by [Hard4Games], looks like something that was built in a hackerspace. It’s pretty common for console development systems to look more like boxy 1990s computers than the sleek injection molded units that eventually take up residence under your television, but they don’t often come in the form of a bare PCB. It seems that Nintendo was in such a rush to get an early version of their latest handheld’s guts out to developers that they couldn’t even take the time to get a sheet metal case stamped out for it.

The development board doesn’t like later GBA games.

All of the principle parts of the final GBA are here, and as demonstrated in the video after the break, the board even plays commercially released games. Though [Hard4Games] did find that some titles from the later part of the handheld’s life had unusual graphical glitches; hinting that there are likely some low-level differences that don’t manifest themselves unless the developer was really digging deep to squeeze out all the performance they could.

The board also lacks support for Game Boy and Game Boy Color games, though this is not wholly surprising. When an older game was inserted into a GBA, the cartridge would physically depress a switch that enabled a special 8080-based coprocessor that existed solely for backwards compatibility. Adding that hardware to a development board would have made it more expensive and added no practical benefit. That said, [Hard4Games] does point out that there appears to be a unpopulated area of the board where the backwards compatibility switch could have been mounted.

Hackers have always been enamored with the Game Boy, so it’s fitting to see that the official development kit for the final entry into that storied line of handhelds looked a lot like something they could build themselves. If anyone feels inclined to build their own “deconstructed” GBA in this style, you know where to find us.

Continue reading “Nintendo’s GBA Dev Board Could Pass For Modern DIY”

CNC Scroll Saw Makes Promising First Cuts

When we talk about CNC machines, we almost invariably mean a computer controlled router. Naturally you can do other forms of automated cutting, say using a laser or a water jet, but what about adding computer control to other types of saws? [Andrew Consroe] recently put together a postmortem video about this experimental CNC scroll saw. While he never quite got it working reliably, we think his approach is absolutely fascinating and hope this isn’t the last we see of the idea.

Those who’ve used a scroll saw in the past might immediately see the challenge of this build: while a router bit or laser beam can cut in any direction, a scroll saw blade can only cut in one. If you tried to make a sharp turn on a scroll saw, you’ll just snap the fragile blade right off. To work around this limitation, [Andrew] came up with the brilliant rotary table that can be seen in the video after the break.

By combining motion of the gantry with table rotation, he’s able to keep the blade from ever making too tight a turn. Or at least, that’s the theory. While the machine works well enough with a marker mounted in place of the blade, [Andrew] says he never got it to the point it could reliably make cuts. It sounds like positioning errors would compound until the machine ended up moving the work piece in such a way that would snap the blade. Still, the concept definitely works; towards the end of the video he shows off a couple of pieces that were successfully cut on his machine before it threw the blade.

While we’ve actually seen DIY scroll saws in the past, this is the first computer controlled one to ever grace the pages of Hackaday. While some will no doubt argue that there’s no sense building one of these now that laser cutters have reached affordable prices, we absolutely love this design and how much thought went into it. At the very least, we figure this it the beefiest doodle-drawing robot ever constructed. Continue reading “CNC Scroll Saw Makes Promising First Cuts”

A Pocket Retro Computer Anyone Can Build

Not satisfied with any of the DIY retro computer kits on the market, [Leonardo Leoni] decided to make his own. Built using only the finest through-hole technology and powered by the ATmega328 microcontroller, his diminutive 8-bit computer is easy to build and even easier to develop for. Whether you’re looking to hone your BASIC skills or play some Zork on the bus, this little computer looks like a great project for anyone who has a soft spot for computing’s simpler days.

All things considered, using this tiny machine looks like it would be relatively pleasant. [Leonardo] is using a common SH1106 OLED display, and there’s a full QWERTY keyboard (with number row) done up with tactile momentary buttons. There’s very few passive components involved in the build, which is sure to be appealing to new players; especially after they’ve finished soldering all those switches to the board.

On the software side, [Leonardo] says he leaned heavily on open source projects to get his machine up and running. Beyond the hardware drivers for things like the display, he specifically calls out the Tiny Basic and Tiny Lisp Computer projects for their code. If small-scale programming isn’t your style, the machine is compatible with the Arduino IDE so you can easily throw something else on it. If you’ve ever dreamed of a QWERTY Arduboy, this might be your chance.

From the way [Leonardo] describes the computer, which he calls the Cobalt 3, we get the impression a commercial kit might be in the cards. We hope the community shows enough interest to make it happen. After all, not everyone was able to make it to Hackaday Belgrade 2018 to get their own pocket retro computer.

A Dual Screen Luggable With Integrated RTL-SDR

It’s been fascinating to watch the development of bespoke mobile computers go from a few sheets of foam board and a Raspberry Pi into hardware that looks like it’s actually been transported here from an alternate reality. Granted a Raspberry Pi is more often than not still onboard, but the overall design and construction techniques of these very personal computers has improved by leaps and bounds.

The latest of these cyberdecks, a dual screen “luggable” reminiscent of classic computers like the Compaq Portable or Kaypro, comes our way from [dapperrogue]. Powered by the Raspberry Pi 4 and featuring a scratch-built mechanical keyboard to perfectly fit the machines’s specific dimensions, this is easily one of the more practical builds we’ve seen. As visually striking as they may be, few would argue that the small offset display that seems characteristic of most decks are ideal from a usability standpoint.

While the keyboard plate was milled out on a CNC, [dapperrogue] says the design of the HDPE body panels and rear polycarbonate viewing window were simple enough they could be done by hand on a band saw. The PETG internal frame uses a Voronoi pattern that not only reduces the amount of time and material required to print it, but maximizes airflow. The fact that it looks like some kind of alien biological life form only helps the retro-futuristic aesthetics.

There’s still plenty of room inside the enclosure, which is good, as [dapperrogue] says there’s more goodies to come. Adding internal battery power is a logical next step, and now that the Pi 4 can boot to external drives, and SSD is also on the list of future upgrades.

For readers who might be getting a sense of déjà vu from this project, [dapperrogue] notes this design was inspired by the phenomenal Reviiser that [Dave Estes] released earlier this year.

Original Xbox Gets The Steam Overhaul

When Microsoft released the original Xbox, it deviated from the design of traditional game consoles in that it used several off-the-shelf computer components. The fact that Microsoft would want their game console to resemble a PC isn’t particularly surprising in hindsight, but we doubt anyone at Redmond ever imagined folks like [Ryan Walmsley] would be cramming in full-fledged computers nearly 20 years later.

[Ryan] tells us he was looking for a way to play some older games from the early 2000s, and thought it was a good opportunity to put together a quiet set-top computer. The final hardware is more than capable of running older titles, and can even be used with Steam Link to stream newer content from his primary gaming computer.

Even with a diminutive Gigabyte GA-H81N Mini ITX motherboard, things are pretty tight inside the Xbox. Fairly tight wire management was required to prevent any airflow obstructions, especially since [Ryan] decided to put the system’s 80 watt laptop-style power supply inside the case. While this made the build a bit more complicated, it does make the final product a lot cleaner and makes it feel just that much more like a proper game console.

Benchmarks show the machine has decent performance, all things considered. [Ryan] says there are some potential upgrades down the line, but as with most gaming PC builds, cost is the limiting factor. Until he’s ready to spend the cash on revamping the internals, he says that streaming newer games over the the network has been working great.

For those looking for a slightly more modern alternative to this project, we’ve also seen a gaming PC shoehorned into an Xbox 360 with similarly impressive results.