Motorized LEGO Train Gets Qi Charging In The Track

This project started, as many do, with a simple idea. [Ben Hoad] just wanted to take a static LEGO Hogwarts Express train kit and make it motorized. It was compatible with standard LEGO track pieces, so all he should have to do was figure out how to shoehorn a motor in there and be done with it. Right?

Well, you already know how things like this go. It started with adding the motor, which ended up being relatively straightforward once [Ben] used some community LEGO CAD tools to figure out which kits had the specific parts he needed to redesign the train in such a way that he’d have enough space inside for the motor without ruining the way it looked. But then the feature creep kicked in, and he found himself falling down that familiar rabbit hole.

A 3D representation of the train’s internal components.

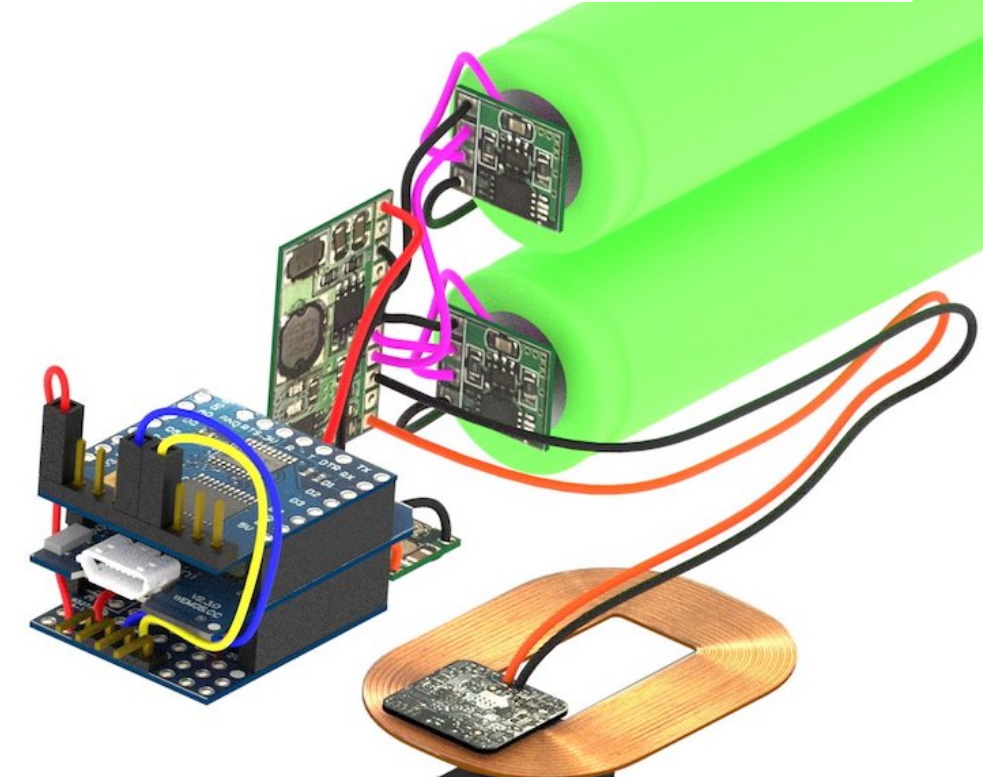
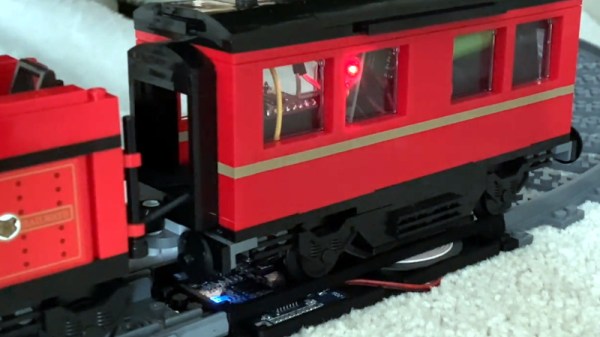
The first problem was how to reliably power the train. It turns out the rear car was more or less empty already, so that became home for two 18650 batteries (the project details say “16850” but we believe that is merely a typo). [Ben] didn’t want to have to take the thing apart every time it ran down, so he wondered if it would be possible to add wireless charging.

A Qi coil in the bottom of the train car and one in a specially designed section of track got the power flowing, but getting them lined up proved a bit finicky. So he added a Hall effect sensor to the car and a strong magnet to the track, so the train would know when the coils were lined up and automatically pump the brakes.

So now he had a motorized train that could recharge itself, but how should he turn it on and off? Well, with an ESP8266 along for the ride, he figured it would be easy to add WiFi control. With a bit of code and the Homebridge project, he was able to get the train to appear as a smart switch to Apple’s HomeKit. That allows him to start and stop the train from his smartphone, complete with a routine that returns the train to the charging station once it’s finished making the rounds. [Ben] says the next steps are to put some sanity checks in, such as shutting the motors down if the train hasn’t passed the charging station in a few minutes; a sure sign that it’s not actually moving.

All [Ben] needs to do now is implement automatic LEGO train decoupling before the plastic Hogwarts students come back from spring break.

Compact Slayer Exciter For Your High Voltage Needs

Tesla coils are incredible pieces of hardware, but they can be tricky to build. Between the spark gap, capacitors, and finely tuned coils, it’s not exactly a beginners project. Luckily, there’s hope for anyone looking for a less complex way to shoot some sparks: the Slayer Exciter. This device can be thought of as the little cousin to the Tesla coil, and can be used for many of the same high voltage experiments while being far easier to assemble.

Now [Jay Bowles] is obviously no stranger to building his own Tesla coils, but since so many of his fans wanted to see his take on this less complex option, he recently built his own Slayer Exciter. After putting on a few of his own unique touches, the end result looks very promising. It might not be able to throw sparks as far as some of the other creations featured on his YouTube channel, but it’s still impressive for something so simple.

[Jay] uses two transistors in parallel for reliability
When we say simple, we mean it. Building a bare-bones Slayer Exciter takes only takes five components: the two coils, a transistor, a diode, and a resistor. For this build, power is provided by a trio of rechargeable 9 V batteries in the base of the unit which can be easily swapped out as needed.

In the video, [Jay] does a great job explaining and illustrating how this basic circuit creates exceptionally high frequency energy. In fact, the frequency is so high that the human ear can’t hear it; unfortunate news for fans of the Tesla coil’s characteristic buzz.

Generally speaking Slayer Exciters would have the same sort of vertical coils that you’d see used on a traditional Tesla coil, but in this case, [Jay] has swapped that out for a pancake coil held in the upper level of the device. This makes for a very compact unit that would be perfect for your desk, if it wasn’t for the fact that the arcs produced by this gadget are hot enough to instantly vaporize human skin. Just something to keep in mind.

We’ve seen Slayer builds in the past, but none as well designed as this one. Incidentally, if you’re wondering about the array of neon indicator lights that [Jay] uses to visualize the electrical field, we covered that project as well.

Continue reading “Compact Slayer Exciter For Your High Voltage Needs”

Expansion Board Puts Spotify On The Amiga 500

No doubt some purists in the audience will call this one cheating, since this Amiga 500 from 1987 isn’t technically connecting to Spotify and playing the music by itself. But we also suspect those folks might be missing the point of a site called Hackaday. With all the hoops [Daniel Arvidsson] hopped through to make this happen, what else could it be if not a hack?

This one starts, like so many projects these days, with the Raspberry Pi. Don’t worry Amiga aficionados, this classic machine hasn’t been gutted and had its internals replaced with a diminutive Linux board. But thanks to an expansion card known as the A314, you could say it’s received a penguin infusion. This clever board allows an internally mounted Raspberry Pi to communicate with the Amiga 500 through shared memory, making all sorts of trickery possible.

In this case, the Raspberry Pi is actually the one connecting to the Spotify Connect service with raspotify and decoding the stream. But thanks to a few pipes and an ALSA plugin, the audio itself is actually pushed into the Amiga’s sound hardware. In the video after the break, the process is demonstrated with tunes that are befitting a computer of this vintage.

This process is similar to how one classic Apple fan got Spotify running on their Macintosh SE/30 with a similar respect for the vintage hardware. Of course if you actually want to gut your Amiga 500 and replace it with a Raspberry Pi, we’ve seen some pretty good conversions to get you started.

Continue reading “Expansion Board Puts Spotify On The Amiga 500”

3D Printed Dogbox Transmission Kicks Your Desk Into High Gear

It’s often been our experience that some of the most impressive projects are the passion builds, the ones where the builder really put in their all and obsessed over every detail. Even if they don’t always have a practical application, it’s impossible to look at the final product and not respect the accomplishment.

Case in point, this absolutely incredible 3D printed model of a sequential “dogbox” transmission created by [Indeterminate Design]. All of the STL files and a complete bill of materials are available for anyone brave enough to take on the challenge. It might never be mounted to a vehicle and driven around the track, but you can still flick through the gears and watch the complex gearing do its thing.

Even if you don’t want to necessarily build the model itself, [Indeterminate Design] takes you through the concepts behind this unique transmission and how it differs from the sort of gearboxes us lowly commuter drivers are familiar with. He’s even nice enough to explain what a dogbox is.

Put simply, this type of transmission allows the driver to simply move the gear change forward and backwards to step through the gears like in a video game. This prevents you from having to navigate an H-pattern gear shift while dealing with all the other stresses of competition driving. Watching it in action, you can certainly see the appeal.

If you prefer your printed gearboxes to be of the practical variety, we’ve certainly seen plenty of those as well. They’re perfect for next time you need to move an anvil around the shop.

Continue reading “3D Printed Dogbox Transmission Kicks Your Desk Into High Gear”

Prusa Advises On Printed Medical Devices, Releases Face Shield

Like everyone else, hackers and makers want to do something to help control the spread of COVID-19. The recent posts on Hackaday dealing with DIY and open source approaches to respirators, ventilators, and masks have been some of the most widely read and commented on in recent memory. But it’s important to remember that the majority of us aren’t medical professionals, and that even the most well-meaning efforts can end up making things worse if they aren’t done correctly.

Which is exactly what [Josef Průša] wanted to make clear about 3D printed medical equipment in his latest blog post. Like us, he’s thrilled to see all the energy the maker community is putting into brainstorming ways we can put our unique skills and capabilities to use during this global pandemic, but he also urged caution. Printing out an untested design in a material that was never intended for this sort of application could end up being more dangerous than doing nothing at all.

The nested design lends itself to mass production.

To say that he and his team are authorities in the realm of fused deposition modeling (FDM) would be something of an understatement. They know better than most what the technology is and is not capable of, and they’re of the opinion that using printed parts in respirators and other breathing devices isn’t viable until more research and testing is done

For example, how can we ensure the porous plastic parts are sterilized and not just serving as a breeding ground for bacteria? It’s hardly a new concern; the debate about printed objects in food contact applications has been going on for years.

The safest option is to only use printed parts for structural components that don’t need to be sterile. To that end, [Josef] used the post to announce a newly published design of a printable face shield for medical professionals. Starting with an existing open source design, the Prusa Research team used their experience to optimize the headband for faster and easier printing. They can produce four headbands at once on each of the printers in their farm, which will allow them to make as many as 800 shields per day without impacting their normal business operations. The bottleneck on production is actually how quickly they can cut out the clear visors with their in-house laser, not the time it takes to print the frames.

It’s easy to get excited when success stories featuring 3D printed medical devices are in the news, but that doesn’t mean you should be cranking out lifesaving devices with that roll of bargain PLA you’ve had sitting around the shop. As difficult as it may be for some of us to admit, the safest thing might be to let our spare CPU cycles do battle with COVID-19 instead.

Continue reading “Prusa Advises On Printed Medical Devices, Releases Face Shield”

An Armored Vehicle From Foam Core And Big Box Toys

Over the last several months, [Eric Strebel] has been working on a concept for an electric-powered infantry combat vehicle. We don’t think he’s been contracted by any nation’s military to design this vehicle, but as a product designer we imagine he does this sort of thing to keep himself sharp. In any event, it’s been fun to watch from the sidelines.

In the latest installment in this series of videos, [Eric] turns his earlier concept art into a functional prototype; albeit at somewhat reduced scale. Still, building any kind of vehicle from the ground up is no easy feat and it’s fascinating to watch the process.

The futuristic faceted look of the vehicle’s armor plate makes for an exceptionally time-consuming build, as he has to cut and glue each piece of foam core into place. Some of the smaller pieces seem to have the tell-tale char marks from a trip through the laser cutter, but in the video after the break you can see that the larger panels are hand cut with a razor.

The plan was originally to just make a static mock-up of the vehicle, but thanks to a pair of remote controlled trucks that [Eric] found at this local Big Box retailer, this foam fighter ended up getting an upgrade. After liberating the motors and gearboxes from the two trucks, he 3D printed axle extensions to take into account the wider track of his vehicle, and built his “tub” around it. While the R/C gear is clearly on the low end of the spectrum, the overall effect looks great as the vehicle is bounding around the yard.

Readers of Hackaday will no doubt be well aware of [Eric Strebel] and his many talents. From 3D scanning via photogrammetry to embedding electronics into flexible molded parts, you’re sure to learn something new from following this prolific maker.

Continue reading “An Armored Vehicle From Foam Core And Big Box Toys”

You’ll Flip For This Toggle Switch Handheld Game

Teacher says that every time a toggle switch clunks, a hacker gets their wings. Or something like that. All we know is that there are few things the hardware tinkerer likes more than the satisfying action of a nice flip. Which by extension means this handheld game built by [Roman Revzin] and controlled by nothing more than three toggle switches will likely be a big hit at the hackerspace.

The parts list for this game, which [Roman] calls the ToggleBoss, is about as short as it gets. There’s a NodeMCU ESP8266 development board, a common SH1106 OLED display, and a trio of suitably clunky toggle switches. Add a bit of wire, toss it all into a 3D printed enclosure, and you’re halfway to thumb flicking nirvana.

Naturally, you might be wondering about the sort of games that can be played with three latching digital inputs; after all, it’s not exactly the most conventional controller layout. But there is where ToggleBoss really shines. Instead of trying to shoehorn traditional games into an exceptionally unconventional system, [Roman] has come up with several games which really embrace the limited input offered to the user.

In a platforming game not unlike the classic Mario Bros, the positions of the physical switches are mapped to virtual walls that are raised and lowered to control a character’s movement through the level. Another game shows the player three dots which correspond to the intended switch states, which they have to match as quickly and as accurately as possible. [Roman] has released the source code to his current lineup of games, which hopefully will inspire others to try their hand at creating software for this fascinating little system.

With the availability of cheap OLED displays and powerful microcontrollers, we’ve started to see more of these bespoke gaming systems. While some will undoubtedly prefer a pocket full of Nintendo’s classics, we think there’s something special about a game system that you can truly call your own.