PVC Pipe Turned Portable Bluetooth Speaker

We’ve always felt that sections of PVC pipe from the home improvement store are a criminally underutilized construction material, and it looks like [Troy Proffitt] feels the same way. Rather than trying to entirely 3D print the enclosure for his recently completed portable Bluetooth speaker, he combined printed parts with a piece of four inch pipe from the Home Depot.

While using PVC pipe naturally means your final hardware will have a distinctly cylindrical look, it does provide compelling advantages over trying to print the entire thing. For one, printing an enclosure this large would have taken hours or potentially even days. But by limiting the printed parts to accessories like the face plate, handle, and caps, [Troy] reduced that time considerably. Of course, even if you’re not in a rush, it’s worth mentioning that a PVC pipe will be far stronger than anything your desktop FDM printer is likely to squirt out.

[Troy] provides links for all the hardware he used, such as the speakers, tweeters, and the Bluetooth audio board itself. The system is powered by an 1800 mAh 3S RC-style battery pack that he says lasts for hours, though he also links to a wall adapter that can be used if you don’t mind being tethered. Unfortunately it doesn’t look like he has any internal shots of the build, but given the relatively short parts list, we imagine it’s all fairly straightforward inside.

While this is certainly a respectable looking build considering it started life in the plumbing aisle, we have to admit that we’ve seen some portable Bluetooth speakers with fully 3D printed enclosures in the past that looked absolutely phenomenal. The tradeoff seems pretty clear: reuse existing materials to save time, print them if you don’t mind reinventing the wheel occasionally.

Building A Cyberpunk Multi-Touch Input Device

This multi-touch touch panel built by [thiagesh D] might look like it came from the retro-futuristic worlds of Blade Runner or Alien, but thanks to a detailed build video and a fairly short list of required parts, it could be your next weekend project.

The build starts with a sheet of acrylic, which has a grid pattern etched into it using nothing more exotic than a knife and a ruler. Though if you do have access to some kind of CNC router, this would be a perfect time to break it out. Bare wires are then laid inside the grooves, secured with a healthy application of CA glue, and soldered together to make one large conductive array. This is attached to a capacitive sensor module so it’ll fire off whenever somebody puts a finger on the plastic.

With RGB LED strips added to the edges, you could actually stop here and have yourself a very cool looking illuminated touch sensitive panel. But ultimately, it would just be a glorified button. There’s plenty of interesting applications for such a gadget, but it’s not going to be terribly useful attached to your computer.

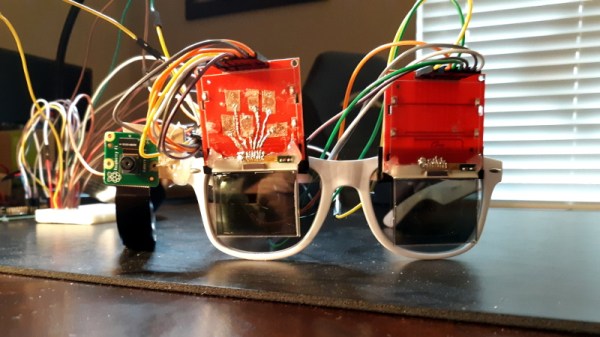
To turn this into a viable input device, [thiagesh D] is using a Raspberry Pi and its camera module to track the number and position of fingertips from the other side of the acrylic with Python and OpenCV. His code will even pick up on specific gestures, like a three finger drag which changes the colors of the LEDs accordingly in the video below. The camera’s field of view unfortunately means the box the panel gets mounted to has to be fairly deep, but if recessed into the surface of a desk, we think it could look incredible.

Custom multi-touch panels have been a favorite project of hackers for years now, and we’ve got examples going all the way back to the old black and white days. But larger and more modern incarnations like this one have the potential to change how we interface with technology on a daily basis.

Continue reading “Building A Cyberpunk Multi-Touch Input Device”

Introducing The First Cisco Certified Mixologist

You’d be hard pressed to find an IT back office that doesn’t have a few Cisco routers or switches laying around and collecting dust. We’d even bet there are a decent number of people reading this post right now that have a stack of them within arm’s reach. They’re the kind of thing most of us have no practical application for, but we still can’t bear to throw away. But it looks like [Sven Tantau] has found an ideal middle ground: rather than junk his Cisco Catalyst switches, he turned them into automatic bartenders.

Inspired by all those perfect little square openings on the front, [Sven] loaded each switch with a whopping 24 peristaltic pumps, one for each Ethernet port. To fit all his plumbing inside, the switches were naturally gutted to the point of being hollow shells of their former selves, although he does mention that their original power supplies proved useful for keeping two dozen power-hungry motors well fed.

The motors are connected to banks of relays, which in turn are thrown by an ESP32 and an Arduino Nano. [Sven] explains that he wasn’t sure if the ESP32 could fire off the relays with its 3 V output, so he decided to just use an Arduino which he already knew could handle the task. The two microcontrollers work in conjunction, with a web interface on the ESP32 ultimately sending I2C commands to the Arduino when it’s time to get the pumps spinning.

[Sven] mentions his robotic bartenders were a hit at the 2019 Chaos Communication Camp, where we know for a fact the computer-controlled alcohol was flowing freely. Of course, if you don’t intend on carrying your barbot around to hacker camps, you can afford to make it look a bit swankier.

Continue reading “Introducing The First Cisco Certified Mixologist”

When Engineering, Fine Art, And ASMR Collide

The success that [Julian Baumgartner] has found on YouTube is a perfect example of all that’s weird and wonderful about the platform. His videos, which show in utterly engrossing detail the painstaking work that goes into restoring and conserving pieces of fine art, have been boosted in popularity by YouTube’s Autonomous Sensory Meridian Response (ASMR) subculture thanks to his soft spoken narration. But his latest video came as something of a surprise to lovers of oil paintings and “tingles” alike, as it revealed that he’s also more than capable of scratch building his own equipment.

Anyone who’s been following his incredible restorations will be familiar with his heated suction table, which is used to treat various maladies a canvas may be suffering from. For example, by holding it at a sufficiently high temperature for days on end, moisture can be driven out as the piece is simultaneously smoothed and flattened by the force of the vacuum. But as [Julian] explains in the video after the break, the heated suction table he’s been using up to this point had been built years ago by his late father and was starting to show its age. After a recent failure had left him temporarily without this important tool, he decided to design and build his own fault-tolerant replacement.

The table itself is built with a material well known to the readers of Hackaday: aluminum extrusion. As [Julian] constructs the twelve legged behemoth, he extols the many virtues of working with 4040 extrusion compared to something like wood. He then moves on to plotting out and creating the control panel for the table with the sort of zeal and attention to detail that you’d expect from a literal artist. With the skeleton of the panel complete, he then begins wiring everything up.

Underneath the table’s 10 foot long surface of 6061 aluminum are 6 silicone heat pads, each rated for 1,500 watts. These are arranged into three separate “zones” for redundancy, each powered by a Crydom CKRD2420 solid state relay connected to a Autonics TC4M-14R temperature controller. Each zone also gets its own thermocouple, which [Julian] carefully bonds to the aluminum bed with thermally conductive epoxy. Finally, a Gast 0523-V4-G588NDX vacuum pump is modified so it can be activated with the flick of a switch on the control panel.

What we like most about this project is that it’s more than just a piece of equipment that [Julian] will use in his videos. He’s also released the wiring diagram and Bill of Materials for the table on his website, which combined with the comprehensive build video, means this table can be replicated by other conservators. Whether it’s restoring the fine details on Matchbox cars or recreating woodworking tools from the 18th century, we’re always excited to see people put their heart into something they’re truly passionate about.

Continue reading “When Engineering, Fine Art, And ASMR Collide”

The Righteous Quest To Crack A Canon I9900

[Starhawk] is a man with a problem. More accurately, he’s a man whose mother has a problem, but ultimately that ends up being the same thing. Her wide-format Canon printer recently stopped working after better than a decade of reliable service, and he wants to know why. Rather than spend the money on buying a new printer, he’s determined to find out if she’s been the victim of planned obsolescence by reverse engineering the Canon i9900 to see what makes it tick (or stop ticking, as the case may be).

In the absence of any obvious hardware faults, [Starhawk] has suspicions that the machine’s QY6-0055 printhead has run over some internal “odometer” and simply turned itself off. We’ve all seen similar trickery at play when trying to use third party ink cartridges in our printers, so it’s certainly not outside the realm of possibility that the Canon i9900 is designed to reject heads once they’ve seen enough usage. Perhaps the biggest clue is that the QY6-0055 has a Seiko S93C56BR EEPROM on the board that’s keeping track of…something.

Right now, [Starhawk] is devoting his energies on trying to make sense of the data he pulled from the EEPROM using his TL866A programmer. But that’s no easy feat with a sample size of just one, which is why he’s looking for help. He’s hoping that other hackers with similar printers (and ideally ones that use the same QY6-0055 head) could submit their own EEPROM dumps and the community could get to work trying to decipher what’s stored on the chips. He’s really hoping that somebody at Canon might be willing to sneak him a couple tips on what he should be looking for, but at this point we think he’ll take whatever assistance he can get.

Now to be fair, there’s really no way to know definitively if there’s some flag stored on the EEPROM that’s keeping the printer from working. It could just be good old fashioned hardware failure, which would hardly be a surprise for a piece of consumer electronics from 2005. But even if the effort to understand the Canon’s EEPROM doesn’t get him any closer to a working printer, we still think it’s a fascinating example of real-world reverse engineering that’s worth it for the experience alone.

There’s a long history of hackers doing battle with their printers, from emulating an ink cartridge with a microcontroller to reinking the ribbon of a vintage 1980s behemoth. We’re interested in seeing where this project takes [Starhawk], but no matter what happens there are likely to be some interesting discoveries made along the way.

Meet MutantC: Raspberry Pi Sidekick Complete With Sliding Screen, QWERTY

Over the years we’ve seen the Raspberry Pi crammed into almost any piece of hardware you can think of. Frankly, seeing what kind of unusual consumer gadget you can shoehorn a Pi into has become something of a meme in our circles. But the thing we see considerably less of are custom designed practical enclosures which actually play to the Pi’s strengths. Which is a shame, because as the MutantC created by [rahmanshaber] shows, there’s some incredible untapped potential there.

The MutantC features a QWERTY keyboard and sliding display, and seems more than a little inspired by early smartphone designs. You know, how they were before Apple came in and managed to convince every other manufacturer that there was no future for mobile devices with hardware keyboards. Unfortunately, hacking sessions will need to remain tethered as there’s currently no battery in the device. Though this is something [rahmanshaber] says he’s actively working on.

The custom PCB in the MutantC will work with either the Pi Zero or the full size variant, but [rahmanshaber] warns that the latest and greatest Pi 4 isn’t supported due to concerns about overheating. Beyond the Pi the parts list is pretty short, and mainly boils down to the 3D printed enclosure and the components required for the QWERTY board: 43 tactile switches and a SparkFun Pro Micro. Everything is open source, so you can have your own boards run off, print your case, and you’ll be well on the way to reliving those two-way pager glory days.

We’re excited to see where such a well documented open source project like MutantC goes from here. While the lack of an internal battery might be a show stopper for some applications, we think the overall form factor here is fantastic. Combined with the knowledge [Brian Benchoff] collected in his quest to perfect the small-scale keyboard, you’d have something very close to the mythical mobile Linux device that hackers have been dreaming of.

Continue reading “Meet MutantC: Raspberry Pi Sidekick Complete With Sliding Screen, QWERTY”

Off-World Cement Tested For The First Time

If the current Administration of the United States has their way, humans will return to the surface of the Moon far sooner than many had expected. But even if NASA can’t meet the aggressive timeline they’ve been given by the White House, it seems inevitable that there will be fresh boot prints on the lunar surface within the coming decades. Between commercial operators and international competition, we’re seeing the dawn of a New Space Race, with the ultimate goal being the long-term habitation of our nearest celestial neighbor.

Schmitt's dusty suit while retrieving samples from the Moon
An Apollo astronaut covered in lunar dust

But even with modern technology, it won’t be easy, and it certainly won’t be cheap. While commercial companies such as SpaceX have significantly reduced the cost of delivering payloads to the Moon, we’ll still need every advantage to ensure the economical viability of a lunar outpost. One approach is in situ resource utilization, where instead of transporting everything from Earth, locally sourced materials are used wherever possible. This technique would not only be useful on the Moon, but many believe it will be absolutely necessary if we’re to have any chance of sending a human mission to Mars.

One of the most interesting applications of this concept is the creation of a building material from the lunar regolith. Roughly analogous to soil here on Earth, regolith is a powdery substance made up of grains of rock and micrometeoroid fragments, and contains silicon, calcium, and iron. Mixed with water, or in some proposals sulfur, it’s believed the resulting concrete-like material could be used in much the same way it is here on Earth. Building dwellings in-place with this “lunarcrete” would be faster, cheaper, and easier than building a comparable structure on Earth and transporting it to the lunar surface.

Now, thanks to recent research performed aboard the International Space Station, we have a much better idea of what to expect when those first batches of locally-sourced concrete are mixed up on the Moon or Mars. Of course, like most things related to spaceflight, the reality has proved to be a bit more complex than expected.

Continue reading “Off-World Cement Tested For The First Time”