Arduino Drives Seventeen Stepper Motors, Carefully

It’s fair to say that building electronic gadgets is easier now than it ever has been in the past. With low-cost modular components, there’s often just a couple dozen lines of code and a few jumper wires standing between your idea and a functioning prototype. Driving stepper motors is a perfect example: you can grab a cheap controller board, hook it up to a microcontroller, and the rest is essentially just software. But recently [mechatronicsguy] wondered if even that was more hardware than was technically necessary to get the job done.

It’s not that he was intentionally looking to make things more complicated for himself, of course. His rationale was entirely economic; if you’re looking to drive a dozen or more stepper motors, even the “cheap” controllers can add up. So he started to wonder if he could skip the controller entirely and connect the stepper motor directly to the digital pins of an Arduino. Generally speaking this is a bad idea, but if you’re careful and are willing to take the risk, [mechatronicsguy] is living proof it’s possible

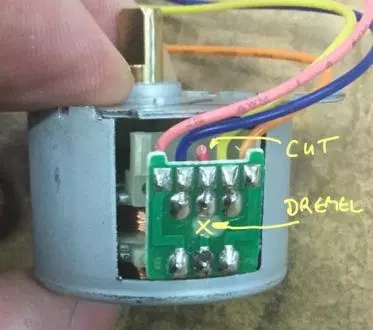
So what’s the trick to running a whopping seventeen individual stepper motors directly from the digital pins of an Arduino Mega? Well, to start with you’re not going to be running the beefy NEMA 17 motors like you might find in a 3D printer. [mechatronicsguy] is using the diminutive (and dirt cheap) 28BYJ-48, a light duty stepper used in many consumer products. Even with this relatively tiny motor, you need to crack open the case and cut a trace on the PCB to switch it from unipolar to bipolar.

Beyond that, you need to be careful. [mechatronicsguy] reports he’s had success running as many as ten of them at once, but realistically the fewer operating simultaneously the better. This is actually made easier due to the relatively poor specs of the 28BYJ-48 motor; its huge eleven degree step size means its not really susceptible to the same kind of slippage you’d get on a NEMA 17 when powered down. This means you can cut power to all but the actively moving motor and be fairly sure they’ll all stay where you left them.

With as popular as the 28BYJ-48 stepper is, there are several projects this “quick and dirty” method of interfacing could potentially work with. This small “barn door” star tracker is an obvious example, but we’ve also seen some very nice robotic arms built with these low-cost motors which could benefit from the technique.

Duck And Cover With This WiFi “Geiger Counter”

There’s perhaps no sound more recognizable than the frantic clicking of a Geiger counter. Not because this is some post-apocalyptic world in which everyone is personally acquainted with the operation of said devices, but because it’s such a common effect used in many movies, TV shows, and video games. If somebody hears that noise, even if it doesn’t really make sense in context, they know things are about to get serious.

Capitalizing on this phenomena, [Anton Haidai] has put together a quick hack which turns the ESP8266 into a “Geiger counter” for WiFi. Rather than detecting radiation, the gadget picks up on the strongest nearby WiFi signal and will start clicking in response to signal strength. As the signal gets stronger, so does the clicking. While primarily a novelty, it’s an interesting idea that could potentially be useful for things like fox hunting.

The hardware is really about as simple as it gets, just a basic buzzer attached to one of the digital pins on a NodeMCU development board. This project is more of a proof of concept, but if it were to be developed further it would be interesting to see the electronics placed into a 3D printed replica of one of the old Civil Defense Geiger counters. Perhaps even integrating an analog gauge that can bounce around in response to signal strength.

Software-wise there is the option of locking onto one single network SSID or allowing the device to find the strongest network in the area. Even if you’re not in the market for a chirping WiFi detector, the code is a good example of how you can detect signal RSSI and act on it accordingly; a neat trick which might come in handy in a future project.

If you’re more interested in the real thing, we’ve got plenty of DIY Geiger counters in the archive for you to check out. From diminutive builds that can be mounted to the top of a 9V battery to high-tech solid state versions with touch screen interfaces, you should have plenty of inspiration if you’re looking to kit yourself out before your next drive through the Chernobyl Exclusion Zone.

Continue reading “Duck And Cover With This WiFi “Geiger Counter””

Vintage Print Processor Fixed With 3D Printing

If you don’t know what a print processor is, don’t feel bad. There’s precious few people out there still running home darkrooms, and the equipment used for DIY film development is about as niche as it gets today. For those looking to put together their own darkroom in 2019, buying second hand hardware and figuring out how to fix it on your own is the name of the game, as [Austin Robert Hermann] found out when he recently purchased a Durst Printo Print Processor on eBay.

The auction said the hardware was in working order, but despite the fact that nobody would ever lie on the Internet, it ended up being in quite poor condition. Many of the gears in the machine were broken, and some were simply missing. The company no longer supports these 1990’s era machines, and the replacement parts available online were predictably expensive. [Austin] determined his best course of action was to try his hand at modeling the necessary gears and having them 3D printed; two things he had no previous experience with.

Luckily for [Austin], many of the gears in the Printo appeared to be identical. That meant he had several intact examples to base his 3D models on, and with some educated guesses, was able to determine what the missing gears would have looked like. Coming from an animation background, he ended up using Cinema 4D to model his replacement parts; which certainly wouldn’t have been our first choice, but there’s something to be said for using what you’re comfortable with. Software selection not withstanding, he was able to produce some valid STLs which he had printed locally in PLA using an online service.

Interestingly, this is a story we’ve seen play out several times already. Gears break and wear down, and for vintage hardware, that can be a serious problem. But if you’ve got a couple intact gears to go by, producing replacements even on an entry level desktop 3D printer is now a viable option to keep these classic machines running.

A Contact Lens Launcher That Knows The Weather

They say that necessity is the “Mother of Invention”, but over the years we’ve started to suspect that her cousin might be an underutilized microcontroller. How else can you explain projects like the latest from [MNMakerMan], which takes the relatively simple concept of a contact lens holder and manages to turn it into an Internet-connected electronic appliance? Not that we’re complaining, of course.

He started out with a simple 3D printed holder for his wall that would let him pull out his daily lenses, which worked well enough and gained some popularity on Thingiverse. But he wondered if there wasn’t some way he could use a servo to automate the process. While he was at it, he might as well play with some of the components he’s been meaning to get some hands-on experience with, such as those little OLED displays all the cool kids are using.

Modifying his original design to incorporate servos in the bottom, he added a central compartment that would house an ESP8266 and a simple proximity sensor made from an IR LED and photodiode. The sensor tends to be a little twitchy, so he left a potentiometer inside the device so he can fine tune it as needed.

Strictly speaking the OLED display isn’t actually required for this project, but since he had a WiFi capable microcontroller sitting there doing basically nothing all day anyway, he added in a feature that shows the weather forecast. It’s not much of a stretch to say that the first thing you’d want to see in the morning after regaining the sense of sight is a readout of what the day’s weather will be, so we think it’s a fairly logical extension of the core functionality. Bonus points if he eventually adds in a notification to remind him it’s time to order more lenses when the dispenser starts getting low.

If you don’t have any contact lenses you need dispensed, never fear. A similar concept can be used to fire off your customized swag at hacker events. Don’t have any of that either? Well in that case you can always build a candy dispenser for Halloween.

Continue reading “A Contact Lens Launcher That Knows The Weather”

Recreating Classic Model Kits With Modern Tech

It used to be that if you wanted to make a nice scale model of an airplane, you’d be building the frame out of thin balsa ribs and covering it all up with tissue paper. Which incidentally was more or less how they built most real airplanes prior to the 1930s, so it wasn’t completely unreasonable to do the same on a smaller scale. But once injection molded plastics caught on, wood and tissue model kits largely went the way of the dodo.

[Marius Taciuc] wanted to share that classic model building experience with his son, but rather than trying to hunt down balsa kits in 2019, he decided to recreate the concept with modern techniques. His model of the Supermarine Spitfire, the vanguard of the British RAF during the Second World War, recreates the look of those early model kits but substitutes 3D printed or laser cut components for the fragile balsa strips of yore. The materials might be high-tech, but as evidenced by the video after the break, building the thing is still just as time consuming as ever.

Using a laser cutter to produce the parts would be the fastest method to get your own kit put together (you could even cut the parts out of balsa in that case), but you’ll still need a 3D printer for some components such as the propeller and cowling. On the other hand, if you 3D print all the parts like [Marius] did, you can use a soldering iron to quickly and securely “weld” everything together. For anyone who might be wondering, despite the size of the final plane, all of the individual components have been sized so everything is printable on a fairly standard 200 x 200 mm print bed.

While there’s no question the finished product looks beautiful, some might be wondering if it’s really worth the considerable effort and time necessary to produce and assemble the dizzying number of components required. To that end, [Marius] says it’s more of a learning experience than anything. Sure he could have bought a simplified plastic Spitfire model and assembled it with his son in an afternoon, but would they have really learned anything about its real-world counterpart? By assembling the plane piece by piece, it gives them a chance to really examine the nuances of this legendary aircraft.

We don’t often see much from the modeling world here on Hackaday, but not for lack of interest. We’ve always been in awe of the lengths modelers will go to get that perfect scale look, from the incredible technology packed into tiny fighter planes to large scale reproductions of iconic engines. If you’ve got some awesome model making tips that you think the Hackaday readership might be interested in, don’t be shy.

Continue reading “Recreating Classic Model Kits With Modern Tech”

Building An Army Of ESP32 Air Quality Sensors

The ESP8266 and its heavyweight sibling the ESP32 are fantastic boards to develop with as they allow you to quickly and easily get a project online. Just tack a few sensors and some LEDs on them, and you’re well on the way to producing your own “Internet of Things”. The real challenge is utilizing the incredible capabilities these boards offer us to do something meaningful.

Judging by what he’s got so far, we think [Samuel Klit] is well on his way. He’s using the ESP32 and some off-the-shelf modular components to create an Internet-connected air quality monitoring station. But he’s not just building one or two of them, he’s building enough so they can be distributed and collect data over a wide area. Who knows, perhaps you’ll be building one next.

[Samuel] is using the CCS811 sensor which can pick up potentially harmful Volatile Organic Compounds (VOCs) and determine carbon dioxide concentrations, as well as a BMP280 sensor to read ambient temperature and atmospheric pressure. There’s also an SD card reader for local data storage, a 1602 LCD display that provides a basic user interface, and the electronics required to support the 18650 Li-Ion batteries which power the unit for up to 12 hours on a charge. Everything’s held in a professional looking enclosure that we’ll be sure to add to our next AliExpress order.

Collecting data is one thing, but what do you do with it once you’ve got it? To that end, each node runs a web interface that not only allows you to view current hardware status and download the locally stored data, but also provides an easy to understand visual representation of the environmental conditions. To get around the limited storage space for web assets on the chip, [Samuel] is calling out to Chart.js to inject some slick graphics into the web interface on-demand. The web interface is a particularly nice touch, and an excellent use of the power and capabilities offered by the ESP32.

We’ve previously seen air quality sensors added to Taxi cabs in Peru, the homes surrounding Barcelona’s Plaza del Sol, and of course [Radu Motisan] has done incredible work towards the goal of creating city-wide environmental monitoring networks. With increasingly capable technologies, it looks like citizens are studying the world around them in greater numbers than ever before.

Continue reading “Building An Army Of ESP32 Air Quality Sensors”

WOPR: Building Hardware Worth Sharing

It wouldn’t be much of a stretch to assume that anyone reading Hackaday regularly has at least progressed to the point where they can connect an LED to a microcontroller and get it to blink without setting anything on fire. We won’t even chastise you for not doing it with a 555 timer. It’s also not a stretch to say if you can successfully put together the “Hello World” of modern electronics on a breadboard, you’re well on the way to adding a few more LEDs, some sensors, and a couple buttons to that microcontroller and producing something that might come dangerously close to a useful gadget. Hardware hacking sneaks up on you like that.

Here’s where it gets tricky: how many of us are still stuck at that point? Don’t be shy, there’s no shame in it. A large chunk of the “completed” projects that grace these pages are still on breadboards, and if we had to pass on every project that still had a full-on development board like the Arduino or Wemos D1 at its heart…well, let’s just say it wouldn’t be pretty.

Of course, if you’re just building something as a personal project, there’s often little advantage to having a PCB spun up or building a custom enclosure. But what happens when you want to build more than one? If you’ve got an idea worth putting into production, you’ve got to approach the problem with a bit more finesse. Especially if you’re looking to turn a profit on the venture.

At the recent WOPR Summit in Atlantic City, there were a pair of presentations which dealt specifically with taking your hardware designs to the next level. Russell Handorf and Mike Kershaw hosted an epic four hour workshop called Strategies for your Projects: Concept to Prototype and El Kentaro gave a fascinating talk about his design process called Being Q: Designing Hacking Gadgets which together tackled both the practical and somewhat more philosophical aspects of building hardware for an audience larger than just yourself.

Continue reading “WOPR: Building Hardware Worth Sharing”