Social Media Jacket Puts Your Likes On Your Sleeve

The great irony of the social media revolution is that it’s not very social at all. Users browse through people’s pictures in the middle of the night while laying in bed, and tap out their approval with all the emotion of clearing their spam folder. Many boast of hundreds or thousands of “friends”, but if push came to shove, they probably couldn’t remember when they had last seen even a fraction of those people in the real world. Assuming they’ve even met them before in the first place. It’s the dystopian future we were all warned about, albeit a lot more colorful than we expected.

But what if we took social media tropes like “Likes” and “Follows”, and applied them to the real world? That’s precisely what [Tuang] set out to do with the “Social Touch Suit”, a piece of wearable technology which requires a person actually make physical contact with the wearer to perform social engagements. There’s even a hefty dose of RGB LEDs to recreate the flashy and colorful experience of today’s social media services.

Every social action requires that a specific and deliberate physical interaction be performed, which have largely been designed to mimic normal human contact. A pat on the shoulder signifies you want to follow the wearer, and adding them as a friend is as easy as giving a firm handshake. These interactions bring more weight to the decisions users make. For example, if somebody wants to remove you as a friend, they’ll need to muster up the courage to look you in the eye while they hit the button on your chest.

The jacket uses an Arduino to handle the low level functions, and a Raspberry Pi to not only provide the slick visuals of the touch screen display, but record video from the front and rear integrated cameras. That way you’ve even got video of the person who liked or disliked you. As you might expect, there’s a considerable energy requirement for this much hardware, but with a 5200 mAh LiPo battery in the pocket [Tuang] says she’s able to get a run time of 3 to 4 hours.

Considering how much gadgetry is packed into it, the whole thing looks remarkably wearable. We wouldn’t say it’s a practical piece of outerwear when fully decked out, but most of the electronic components can be removed if you feel like going low-key. [Tuang] also points out that for a garment to be functional it really needs to be washable as well, so being able to easily strip off the sensitive components was always an important part of the design in her mind.

The technology to sensors wearable and flexible is still largely in its infancy, but we’ve very excited to see where it goes. If projects like these inspire you, be sure to check out the presentation [Kitty Yeung] gave at the Hackaday Supercon where she talks about her vision for bespoke wearable technology. Continue reading “Social Media Jacket Puts Your Likes On Your Sleeve”


Hitchhiking To The Moon For Fun And Profit

On February 22nd, a Falcon rocket lifted off from Cape Canaveral carrying the Indonesian communications satellite Nusantara Satu. While the satellite was the primary payload for the mission, as is common on the Falcon 9, the rocket had a couple of stowaways. These secondary payloads are generally experiments or spacecraft which are too small or light to warrant a rocket of their own such as CubeSats. But despite flying in the economy seats, one of the secondary payloads on this particular launch has a date with destiny: Israel’s Beresheet, the first privately-funded mission to attempt landing on the Moon.

But unlike the Apollo missions, which took only three days to reach our nearest celestial neighbor, Beresheet is taking a considerably more leisurely course. It will take over a month for the spacecraft to reach the Moon, and it will be a few weeks after that before it finally makes a powered descent towards the Sea of Serenity, not far from where Apollo 17 landed 47 years ago. That assumes everything goes perfectly; tack a few extra weeks onto that estimate if the vehicle runs into any hiccups on the way.

At first glance, this might seem odd. If the trip only took a few days with 1960’s technology, it seems a modern rocket like the Falcon 9 should be able to make better time. But in reality, the pace is dictated by budgetary constraints on both the vehicle itself and the booster that carried it into space. While one could argue that the orbital maneuvers involved in this “scenic route” towards the Moon are more complicated than the direct trajectory employed by the manned Apollo missions, it does hold promise for a whole new class of lunar spacecraft. If you’re not in any particular hurry, and you’re trying to save some cash, your Moon mission might be better off taking the long way around.

Continue reading “Hitchhiking To The Moon For Fun And Profit”

Forbes Says The Raspberry Pi Is Big Business

Not that it’s something the average Hackaday reader is unaware of, but the Raspberry Pi is a rather popular device. While we don’t have hard numbers to back it up (extra credit for anyone who wishes to crunch the numbers), it certainly seems a day doesn’t go by that there isn’t a Raspberry Pi story on the front page. But given that a small, cheap, relatively powerful, Linux computer was something the hacking community had dreamed of for years, it’s hardly surprising.

But how popular is the Raspberry Pi among people who don’t necessarily spend their free time reading weird black-background websites? Well, according to a recent article in Forbes, the Pi has been spotted putting in an honest days work all over the world. From factories to garbage trucks, everyone’s favorite Linux computer has come a long a way from its humble beginnings. How does it feel knowing a $35 computer has a longer resume than you do?

Unfortunately, the Forbes article doesn’t have the sort of deep technical details we’re used to around these parts. The fact that the article opens by describing the Raspberry Pi as a “stripped-down circuit board covered with metal pins and squares” should tell you all you need to know about the overlap between Forbes and Hackaday readers, but we think author [Parmy Olson] still tells an story interesting regardless.

So where has the Pi been seen punching a clock? At Sony, for a start. The consumer electronics giant has been installing Pis in several of their factories to monitor various pieces of equipment. They record everything from temperature to vibration and send that to a centralized server using an in-house developed protocol. Some of the Pis are even equipped with cameras which feed into computer vision systems to keep an eye out for anything unusual.

[Parmy] also describes how the Raspberry Pi is being used in Africa to monitor the level of trash inside of garbage bins and automatically dispatch a truck to come pick it up for collection. In Europe, they’re being used to monitor the health of fueling stations for hydrogen powered vehicles. All over the world, businesses are realizing they can build their own monitoring systems for as little as 1/10th the cost of turn-key systems; with managers occasionally paying for the diminutive Linux computers out of their own pocket.

The impact the Pi has had on the hardware world is difficult to overstate. It’s redefined the status quo for single board computers, and with the platform continuing to evolve, there’s no sign its incredible journey is slowing down anytime soon.

[Thanks to Itay for the tip.]

Custom Calculator Rolls D20 So You Don’t Have To

There are a number of sticking points that can keep new players away from complex tabletop games such as Dungeons & Dragons. Some people are intimidated by the math involved, and of course others just can’t find enough friends who are willing to sit down and play D&D with them in 2019. While this gadget created by [Caleb Everett] won’t help you get more open minded friends, it will take some of the mental gymnastics out of adding up dice rolls.

In its current form the device saves you from the hassle of not only having to roll various combinations of physical dice, but adding up all the faces after the fact as well. In the future [Caleb] plans on adding more advanced software features which will allow for tricks not possible with real dice, such as increasing the likelihood of rolling numbers which haven’t been seen in awhile. Now that the hardware is put together, he’s free to dig into the software side of things and really get creative.

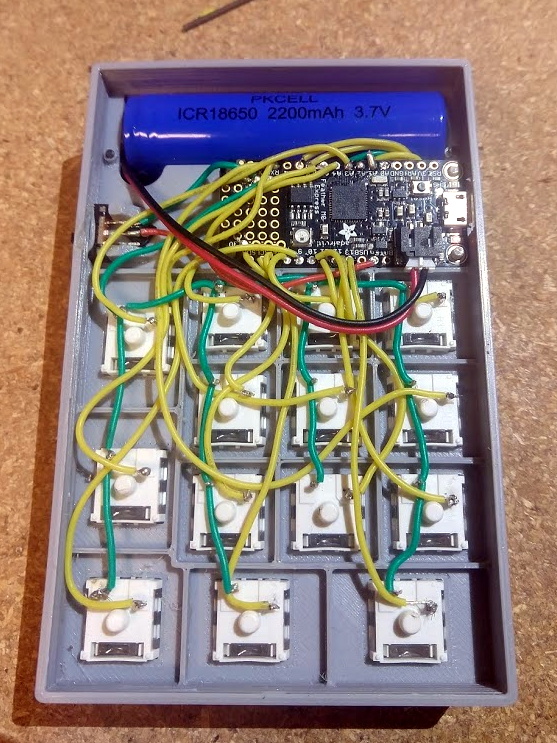
Inside the 3D printed case of his calculator there’s a Adafruit Feather M0 Express, a 128 x 32 OLED display, and a 2200 mAh lithium ion battery that lets him go mobile. The keys, which are Cherry MX clones, are wired directly to the digital pins of the Feather board as [Caleb] found that easier to wrap his head around than doing a matrix. This ended up working out as he had enough pins, but does stifle future expansion a bit.

Even if you aren’t into the sort of tabletop gaming which would benefit from an automatic dice roller and tabulator, we think [Caleb] has come up with a very neat form factor for similar pocket sized gadgets. It reminds us of the Handlink from Quantum Leap; before the prop department swapped it out for a jumble of gummy bears later on in the series, anyway. Since he’s shared the link to the OnShape project, you can even tweak the design a bit without having to suffer through modifying the STLs.

Many of the electronic dice we’ve seen in the past have tried to emulate the size and appearance of traditional dice, so it’s interesting to see this approach which goes in the opposite direction entirely. Critics might say that at some point you’d be better off just using a software application for your smartphone, but we’re not in the business of complaining when people produce interesting pieces of hardware.

Printable Filament Spool Hub Skips The Bearings

When you really start fine-tuning your 3D printer, you might start to notice that even the smallest things can have a noticeable impact on your prints. An open window can cause enough of a draft to make your print peel up from the bed, and the slightly askew diameter of that bargain basement filament can mess up your extrusion rate. It can be a deep rabbit hole to fall down if you’re not careful.

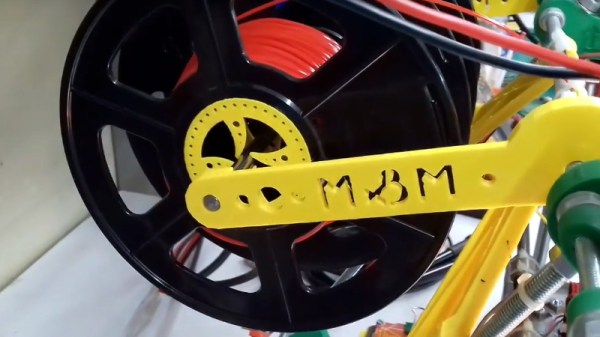
One element that’s often overlooked is the filament spool; if it’s not rotating smoothly, the drag it puts on both the extruder and movement of the print head can cause difficult to diagnose issues. For his custom built printer, [Marius Taciuc] developed a very clever printable gadget that helps the filament roll spin using nothing but the properties of the PLA itself. While the design might need a bit of tweaking to work on your own printer, the files he’s shared should get you most of the way there.

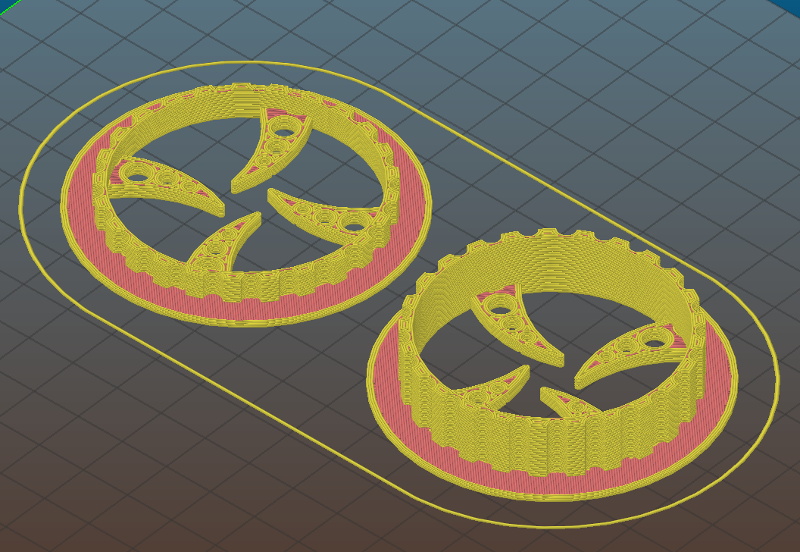
All you need to do is print out the hubs which fit your particular filament spools (naturally, they aren’t all a standard size), and snap them on. The four “claws” of the hub lightly contact a piece of 8 mm rod enough to support the spool while limiting the surface area as much as possible. The natural elasticity of PLA helps dampen the moment that would result if you just hung the hub-less spool on the rod.

The STL files [Marius] has provided for his low-friction hubs should work fine for anyone who’s interested in trying out his design, but you’ll need to come up with your own method of mounting the 8 mm rod in a convenient place. The arms he’s included are specifically designed for his customized Prusa Mendel, which is pretty far removed from contemporary desktop 3D printer design. Something to consider might be a piece of 8 mm rod suspended over the printer, with enough space that you could put a couple spools on for quick access to different colors or materials.

Hackers have been trying to solve the spool friction issue for years, and as you might expect we’ve seen some very clever designs in the past. But we especially like how simple [Marius] has made this design, and the fact that you don’t need to source bearings to build it. If you’re thinking of giving this new design a shot, be sure to leave a comment so we know how it worked out for you.

Continue reading “Printable Filament Spool Hub Skips The Bearings”

RetroPie NES Clock Tells You When It’s Game Time

We’ve all seen the 3D printed replicas of classic game consoles which house a Raspberry Pi; in fact, there’s a pretty good chance some of the people reading this post have one of their own. They’re a great way to add some classic gaming emulation to your entertainment center, especially compared to the bare PCB chic of just having a Pi hanging off your TV’s HDMI port.

[Victor Heid] loved the look of these miniature consoles, but wanted to challenge himself to design something that was also multi-functional and unique. So he decided to create an NES-inspired case for the Raspberry Pi 3 A+ that doubles as a LED matrix clock with a decidedly retro feel. Frankly, even if it was just a clock we would have been impressed with the final product; but the fact that it’s also a fully functional RetroPie build really goes above and beyond.

It should be obvious just looking at the completed product that [Victor] put a lot of effort into sanding and finishing the 3D printed case. But we don’t have to imagine the process, since he was kind enough to thoroughly detail the steps and materials he used. As you might have guessed, the short version is a lot of filler and a lot of time; but it’s worth looking at the complete write-up if you’ve ever considered trying to make your own printed parts look less…printed. His method of applying the lettering on the front of case using a laser printer, some Mod Podge, and a healthy dose of patience is also something you might want to file away for a future project.

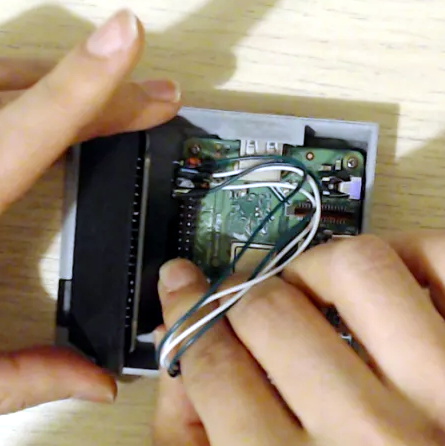
The electronics for this project are exceptionally simple, as [Victor] used the Pimoroni Scroll pHAT HD rather than trying to roll his own LED matrix in such a limited space. So it was just a matter of connecting up the wires to the Pi’s GPIO header and getting the various bits of software talking to each other, which he also details for anyone who might be interested.

It’s been a few months since the Raspberry Pi 3 A+ was unveiled, and we’re finally starting to see projects that make use of the new board’s reduced footprint. The ability of hardware like the A+, combined with the lackluster attempts by manufactures to produce official “mini” systems, seems to have set the stage for hackers to once again outshine commercial offerings. Not that we’re complaining, of course.

This Super Realistic LED Candle Is Smoking Hot

Over the last few years, LED candles have become increasingly common; and for good reason. From a distance a decent LED candle is a pretty convincing facsimile for the real thing, providing a low flickering glow without that annoying risk of burning your house down. But there’s something to be said for the experience of a real candle; such as that puff of fragrant smoke you get when you blow one out.

Which is why [Keith] set out on an epic three year quest to build the most realistic LED candle possible, with a specific focus on the features that commercial offerings lack. So not only does it use real wax as a diffuser for the LEDs, but you’re able to “light” it with an actual match. It even ejects a realistic bit of smoke when its microphone detects you’ve blown into it. Ironically, its ability to generate smoke means it doesn’t completely remove the possibility of it setting your house on fire if left unattended, but we suppose that’s the price you pay for authenticity.

As you might have gathered by now, [Keith] is pretty serious about this stuff, and has gone to great lengths to document his candle’s long development process. If you’d care to build a similar candle, his written documentation as well as the video after the break will certainly get you on the right track. He’s even broken the design down into “milestones” of increasing complexity, so for example if you don’t care about the smoking aspect of the candle you can just skip that part of the build.

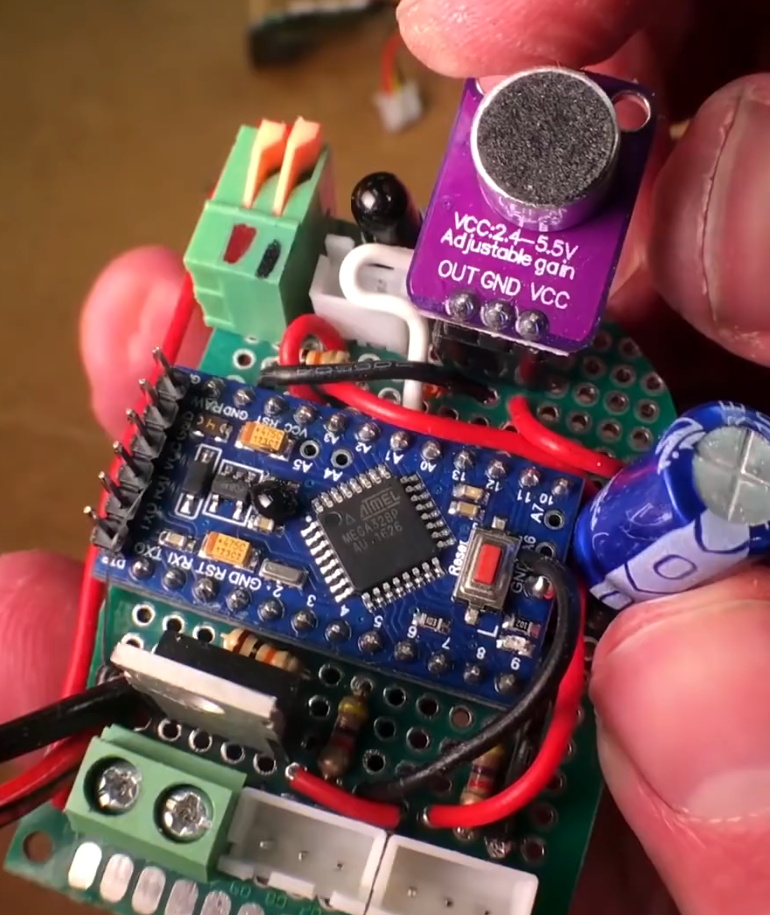
So what did [Keith] put into his ultimate LED candle? In the most basic form, the electronics consist of a Arduino Pro Mini and a chunk of RGB WS2812B strip holding six LEDs. Add in an IR sensor if you want the candle to be able to detect the presence of a match, and a microphone if you want to be able to blow into the candle to turn it off. Things only get tricky if you want to go full smoke, and let’s be honest, you want to go full smoke.

To safely produce a puff of fragrant smoke, [Keith] is using a coil of 28 gauge wire wrapped around the wick of a “Tiki Torch”, and a beefy enough power supply and MOSFET to get it nice and hot. The wick is injected with his own blend of vegetable glycerin and aromatic oil, and when the coil is fired up it produces an impressive amount of light gray smoke that carries the scent of whatever oil you add. Even if you’re not currently on the hunt for the ultimate electronic candle, it’s a neat little implementation that could be used come Halloween.

You might be surprised to learn that LED candles are a rather popular project within the hacking community. From the exceptionally simple to the exceedingly complex, we’ve seen an impressive array of electronic candles over the years. Perfect for setting the mood when listening to the smooth sounds of the latest Hackaday podcast episode. Continue reading “This Super Realistic LED Candle Is Smoking Hot”