Aluminum Foil Heatsink Keeps LEDs In Check

In your kitchen is very likely a roll of aluminum foil, like most people you probably use it to line pans or wrap food for baking. If you heard somebody used aluminum foil in the cooling of items, you could be forgiven for thinking they were referring to wrapping leftovers and tossing them in the refrigerator. But rather than preserving Mom’s famous meatloaf, [Michael Dunn] is using that classic kitchen staple to protect his LED strips.

Cheap LED strips are becoming extremely popular and have been popping up in more and more projects, but they have a pretty serious flaw: heat dissipation. Left on their own they can get hot enough to cook themselves, which is sort of a problem when you’re looking to replace as much of your home lighting with them like [Michael] is.

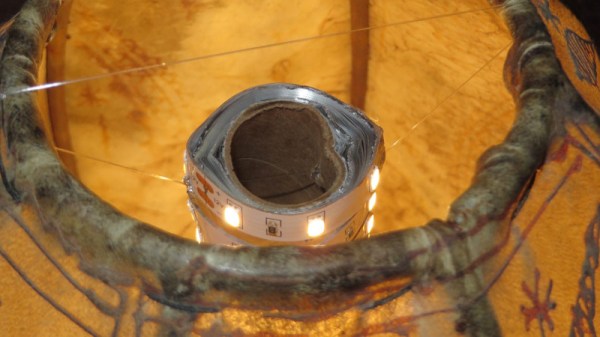
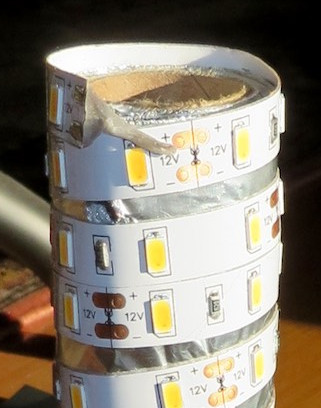
Heat was of particular concern as he was looking to retrofit a delicate shade with his beloved LED strips. Since he wanted a column of LEDs inside the unique shape of the shade, he reasoned that some kind of heat-conductive tubular structure could be used as both a mandrel to wrap the LEDs around and a way to dissipate heat. Like most of us, his first thought was copper pipe. But unfortunately the only copper pipe he had handy was of too small a diameter.

The tube of foil on the other hand was the perfect diameter, and while aluminum isn’t as good a conductor of heat as copper, it’s certainly no slouch either. Early tests weren’t that great when the tube was laying on the bench, but once it stood vertically convection got the air moving and cooled the LEDs down to where [Michael] was comfortable enough to put them inside the shade. Though he does have some lingering doubts about leaving the cardboard tube in such a toasty environment.

Going back through the archives, we’ve seen some absolutely fantastic projects utilizing LED strips in the past, some of which have come up with their own creative ways of beating the heat.

Resurrecting Dead LED Lightbulbs

If you’ve gone down the lighting isle of a store recently, you’ve no doubt noticed we are firmly in the age of the LED light bulb. Incandescent bulbs are kept in small stock for those who still have the odd-ball use case, there’s usually a handful of CFL bulbs for those who don’t mind filling their house with explosive vials of hot mercury, but mostly its all LED now. Which is as it should be: LED lighting is clearly the superior choice in terms of energy efficiency, lifetime, and environmental impact.

Unfortunately, a lot of the LED bulbs you’ll see on the rack are of pretty poor quality. In an effort to drive cost down corners get cut, and bulbs which should run for decades end up blowing after a couple of months. After yet another one failed on him, [Kerry Wong] decided to do a teardown to examine the failure in detail.

The failed LED driver.

He notes that most of the LEDs seem to fail in the same way, flickering after they are switched on until they just stop lighting up entirely. This hints at an overheating issue, and [Kerry] opines that aesthetic and cost considerations have pushed heat dissipation to the back burner in terms of design. It also doesn’t help that many of these bulbs are sitting in insulated recessed fixtures in the ceiling, making it even harder to keep them cool.

Once he separates the actual LEDs from the driver circuitry, he is able to determine that the emitters themselves still work fine. Rather than toss the whole thing in the trash, it’s possible to reuse the LEDs with a new power source, which is quickly demonstrated by showing off a shop light he built from “dead” LED light bulbs.

[Kerry Wong] isn’t the only one to put his LED bulbs under the knife. We’ve covered a number of teardowns which explore the cutting edge of home lighting; for better or for worse.

Continue reading “Resurrecting Dead LED Lightbulbs”

A Gloriously Impractical Electromechanical Display

For this year’s office holiday party, [Gavan Fantom] wanted to do something really special. Coworkers were messing with LEDs to come up with displays and decorations, but they lack that old-school feel of mechanical displays. He wanted to create something that had retro look of moving elements, but didn’t want to just recreate the traditional flip mechanism we’ve all seen over and over.

The mechanism to drive a single “pixel”.

What [Gavan] came up with is breathtakingly impractical 8×8 display that sounds as cool as it looks. Each “pixel” in the display is a 3D printed screw mechanism rotated by a hobby servo. As the pixel is rotated in its case, it becomes progressively more visible to the observer. The opacity of the pixel can even be adjusted by varying the degree of rotation, allowing for rudimentary display of grayscale images.

Each element in the display is made up of seven 3D printed parts and two nails, which the mechanism slides on to move forward and backward. An 8×8 display needs 64 elements, which means the entire display needs 64 servos, 128 nails, and a whopping 448 3D-printed parts. Even with two printers attacking the production in parallel, the printing alone took over two weeks to complete.

The display is powered by a Raspberry Pi and three “Mini Maestro” controllers which can each handle 24 servos. [Gavan] found some sample code in Python to pass commands to the Maestro servo controllers, which he used as a template when writing his own software. The Python script opens image files, converts them to grayscale, and then maps the value of each pixel to rotation of the corresponding servo. He says the software is a little rough and that there’s still some calibration to be done, but we think the results are phenomenal so far.

Mechanical displays are a favorite of hackers, due in no small part to the awesome noises they make while in operation. While we’ve seen some very creative approaches to this type of display before, what [Gavan] has created here is certainly in a league of its own.

Continue reading “A Gloriously Impractical Electromechanical Display”

Geocache Locator Is The Gift That Keeps On Giving

Depending on how you look at things, the holidays could be seen as either an excuse to spend money or an excuse to get creative. We imagine many Hackaday readers would rather head to their workbench than the mall when it comes time for gift giving, and [Sean Hodgins] is no different. He came up with the idea of hiding geocaches around his nephew’s neighborhood and building him a locator device to find them. The locator itself is intended to grow with his nephew, allowing him to reprogram it or use its parts for something completely different down the road.

The main components tucked inside of the 3D printed case of the locator are an Adafruit Trinket, a GPS receiver, and a compass module. The Adafruit NeoPixel Ring is of course front and center, serving as the device’s display. To power the device there’s an old battery, a LiPo charger circuit, and a 5V converter.

One of the goals for the project was that it could be constructed out of things [Sean] already had laying around, so some concessions had to be made. The Trinket ended up having too few pins, the compass lacks an accelerometer, and the switches and buttons are a bit clunky for the build. But in the end it comes together well enough to get the job done, and at least he was able to clear some stuff out of his parts bins.

To allow its owner to disassemble and potentially rebuild it into something else later, no soldered joints were used in the construction of the locator. Everything is done with jumper wires, which lead to some interesting problem solving such as using a strip of pin header as a bus bar of sorts. A bit of heat shrink over the bundle holds everything together and prevents shorts.

Location-aware gadgets happen to be an extremely popular gift choice among the hacker crowd. We’ve covered everything from devices cobbled together from trash to hardware which could pass for a commercial product.

Continue reading “Geocache Locator Is The Gift That Keeps On Giving”

Frankendrones: Toy Quads With A Hobby Grade Boost

If you’re not involved in the world of remote controlled vehicles, you may not know there’s a difference between “toy” and “hobby” grade hardware. For those in the RC community, a toy is the kind of thing you’ll find at a big box store: cheap, works OK, but lacking in features and build quality. On the other hand, hobby hardware is generally considered to be of higher quality and performance, as well as being more modular. At the risk of oversimplification: if you bought it ready to go from a store it’s probably a toy, and if you built it from parts it would generally be considered hobby grade.

But with the rock bottom prices of toy quadcopters, that line in the sand is having a harder time than ever holding some in the community back. The mashup of toy and hobby grade components is giving rise to the concept of “frankendrones” that combine the low cost of toy hardware with key upgrades from the hobby realm. Quadcopter blogger [garagedrone] has posted a roundup of modifications made to the Bayangtoys X16, a $99 quadcopter which is becoming popular in the scene.

Some of the modifications are easy enough for anyone to do. Swapping out the original propellers for ones meant for the DJI Phantom 3 increases performance and doesn’t even require tools. If you want to go a bit further down the rabbit hole, you can cut off the X16’s battery connector and replace it with a standard XT60. That lets you use standard 3S LiPo batteries, which are cheaper and higher capacity than the proprietary ones the toy shipped with.

If you have a 3D printer, there are also a number of upgraded parts you can print which will bolt right onto the X16. Payload adapters, landing gear, and GoPro mounts are all just a few clicks (and some filament) away. This library of 3D printable parts is made possible in part because the X16’s frame is itself a clone of another toy quadcopter, the popular Syma X8C. So anything listed as compatible with the Syma X8C should work with the X16 (and vice versa).

Finally, if you really want to take the X16 to the next level, you can swap out the flight controller with an open source and better supported hobby grade model. Some of these flight controllers and associated new receivers can end up costing about half as much as the X16 did to begin with, but the vast improvement in performance and capability should more than make up for the cost.

We’ve covered previous efforts to increase the performance of low cost quadcopters in the past, as well as builds that put frugality front and center. It seems that no matter what your budget is a screaming angel of death is available if you want it.

Thanks to [Calvin] for the tip.

Continue reading “Frankendrones: Toy Quads With A Hobby Grade Boost”

3D Printing The Final Frontier

While down here there’s room for debate about the suitability of 3D printing for anything more serious than rapid prototyping, few would say the same once you’ve slipped the surly bonds of Earth. With 3D printing, astronauts would have the ability to produce objects and tools on-demand from a supply of inert raw building materials. Instead of trying to pack every conceivable spare part for a mission to Mars, replacements (assuming a little forward thinking on the part of the spacecraft designers) can be made to order out of the stock of raw plastic or metal kept on-board. The implications of such technology for deep space travel or off-world settlement simply cannot be overstated.

In the more immediate future, 3D printing can be used to rapidly develop and deploy unmanned spacecraft. Tiny satellites (referred to as CubeSats) could be printed, assembled, and deployed by astronauts already in orbit. Innovations such as these could allow science missions to be planned and executed in months instead of years, and at a vastly reduced cost.

Continue reading “3D Printing The Final Frontier”

Machined Lightsaber Pen For A More Civilized Age

In an increasingly paperless society, writing implements are becoming an obsolete technology for many of us. Certainly not the kind of thing the average person would think to spend more than a couple bucks on, to say nothing of machining one out of a solid piece of aluminum bar stock. But clearly [Bob] is not most people. He recently dropped us a line about a video he uploaded to his aptly-named YouTube channel “Making Stuff”, where he goes through the steps required to turn raw materials into a writing instrument worthy of a Jedi.

Starting with a piece of aluminum chucked up in the lathe, [Bob] cuts out the iconic ribbed profile of Luke’s saber and fills in the gaps with nothing more exotic than a black Sharpie. He then moves on to the more complex shape of the emitter, and then flips the handle over in the lathe and hollows it out so a brass tube can be inserted.

Turning down the acrylic “blade”

Somewhat surprisingly, it seems more effort ends up being put into the acrylic “blade” than the aluminum handle itself. A chunk of acrylic is drilled and tapped so that it can be mounted in the chuck, and then turned down into a long cylinder. A tip is then cut in the end, the length of the blade is hollowed out, and finally it gets polished up to a nice shine.

The build is completed by inserting a standard ink pen cartridge down the center of the now completed saber. Surely the pen aficionados will lament that he didn’t attempt to build his own ink cartridge as well, but we think he gets a pass considering the rest of it was made from scratch.

If even a glorious writing instrument such as this isn’t enough to get you to re-learn how to write your name, fear not. Whether you’re making music or capturing flags, we’ve played home to numerous other saber projects; eye-safe or otherwise.

Continue reading “Machined Lightsaber Pen For A More Civilized Age”