If you’ve been hanging around 3D printing communities, or reading the various 3D printing posts that have popped up here on Hackaday, you’ve almost certainly heard of OctoPrint. Created and maintained by Gina Häußge, OctoPrint allows you to turn an old computer (or more commonly a small ARM board like the Raspberry Pi or BeagleBone) into a network-accessible control panel for your 3D printer. Thanks to a thriving collection of community developed plugins, it can even control other hardware such as lights, enclosure heaters, smart plugs, or anything else you can think to hook onto the GPIO pins of your chosen ARM board. The project has become so popular that the new Prusa i3 MK3 has a header on the control board specifically for connecting a Pi Zero W running OctoPrint.
Even still, I never personally “got” OctoPrint. I was happy enough with my single printer connected to my computer and controlled directly from my slicer over USB. The majority of the things I print are of my own design, so when setting up the printer it only seemed logical that I would have it connected to the machine I’d be doing my designing on. If I’m sitting at my computer, I just need to rotate my chair to the right and I’m at my printer. What do I need to control the thing over WiFi for?
But things got tricky when I wanted to set up a second printer to help with speeding up larger projects. I couldn’t control them both from the same machine, and while I could print from SD on the second printer if I really had to, the idea seemed painfully antiquated. It would be like when Scotty tried talking into the computer’s mouse in “Voyage Home”. Whether I “got it” or not, I was about to dive headfirst into the world of OctoPrint.
I have a confession to make: ever since the first time I read about them online, I’ve been desperate to find an ATM skimmer in the wild. It’s the same kind of morbid curiosity that keeps us from turning away from a car accident, you don’t want to be witness to anyone getting hurt, but there’s still that desire to see the potential for danger up close. While admittedly my interest is largely selfish (I already know on which shelf I would display it), there would still be tangible benefits to the community should an ATM skimmer cross my path. Obviously I would remove it from the machine and prevent others from falling prey to it, and the inevitable teardown would make interesting content for the good readers of Hackaday. It’s a win for everyone, surely fate should be on my side in this quest.
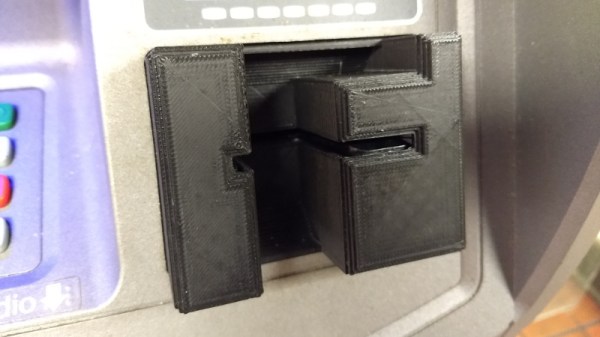
So when my fingers brushed against that unmistakable knobby feel of 3D printed plastic as I went to insert my card at a local ATM, my heart skipped a beat. After all these years, my dream had come true. Nobody should ever be so excited about potentially being a victim of fraud, but there I was, grinning like an idiot in the farmer’s market. Like any hunter I quickly snapped a picture of my quarry for posterity, and then attempted to free it from the host machine.
But things did not go as expected. I spend most of my free time writing blog posts for Hackaday, so it’s safe to say that physical strength is not an attribute I possess in great quantity, but even still it seemed odd I couldn’t get the skimmer detached. I yanked it in every direction, tried to spin it, did everything short of kicking it; but absolutely no movement. In fact, I noticed that when pulling on the skimmer the whole face plate of the ATM bulged out a bit. I realized this thing wasn’t just glued onto the machine, it must have actually been installed inside of it.
I was heartbroken to leave my prize behind, but at the very least I would be able to alert the responsible party. The contact info for the ATM’s owner was written on the machine, so I emailed them the picture as well as all the relevant information in hopes that they could come check the machine out before anyone got ripped off.
After 56 years, [Jeff Cotten]’s rotating Christmas tree stand had decided enough was enough. While its sturdy cast aluminum frame was ready for another half-century of merriment, the internal mechanism that sent power up through the rotating base had failed and started tripping the circuit breaker. The problem itself seemed easy enough to fix, but the nearly 60 year old failed component was naturally unobtanium.
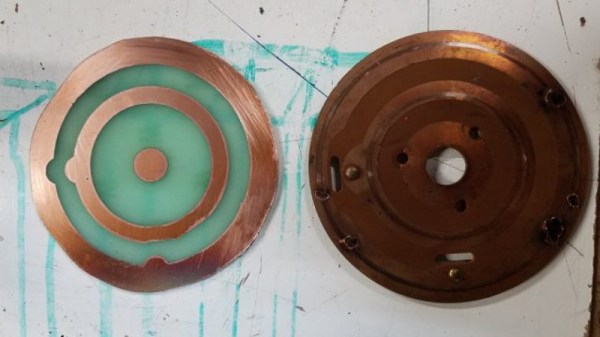
The mechanism inside the stand is fairly simple: two metal “wipes” make contact with concentric circle traces on a round PCB. Unfortunately, over the years the stand warped a bit and the wipe made contact with the PCB where it wasn’t intended do. This caused an arc, destroying the PCB.
The first step in recreating the PCB was measuring the wipes and the distance between them. This allowed [Jeff] to determine how thick the traces needed to be, and how much space should be between them. He was then able to take that data and plug it into Inkscape to come up with a design for his replacement board.
To make the PCB itself, he first coated a piece of copper clad board with black spray paint. Using the laser cutter at the makerspace, he was then able to blast away the paint, leaving behind the two concentric circles. A quick dip in acid, a bit of polishing with toothpaste, and he had a replacement board that was close enough to bolt up in place of the original hardware.
There’s a natural order to the world of game console hacking: every time a manufacturer releases a new game console they work in security measures that prevent the end user from running anything but commercially released games, and in turn every hacker worth his or her salt tries to break through. The end goal, despite what the manufacturers may have you believe, is not to run “bootleg” games, but rather to enable what is colloquially referred to as “homebrew”. That is to say, enabling the novel concept of actually running software of your choice on the hardware you paid for.
At 34C3, noted console hackers [Plutoo], [Derrek], and [Naehrwert] have demonstrated unsigned code running on Nintendo’s latest and greatest and while they are keeping the actual exploit to themselves for now, they’ve promised that a platform for launching homebrew is coming shortly for those who are on firmware version 3.0.0. From the sound of it, after 9 months on the market, Switch owners will finally have complete access to the hardware they purchased.
The key to running the team’s own code was through a WebKit exploit that was already months old by the time the Switch was released. Loading up an arbitrary webpage was the tricky part, as the Switch generally uses its web browser for accessing official sources (like the online game store). But hidden away in the help menus of Tetris, the developers helpfully put a link to their website which the Switch will dutifully open if you select it. From there it’s just a matter of network redirection to get the Switch loading a webpage from your computer rather than the Internet.
It’s easier to ask for forgiveness than permission.
But as the more security-minded of our readers may have guessed already, that just gets you into the browser’s sandbox. The team now had to figure out a way to break out and get full control of the hardware. Through a series of clever hacks the team was able to learn more about the Switch’s internal layout and operating system, slowly working their way up the ladder.
A particularly interesting hack was used to get around a part of the Switch’s OS that is designed to check which services code is allowed to access. It turns out that if code doesn’t provide this function with its own process ID (PID), the system defaults to PID 0 because the variable is not initialized. In other words, if you don’t ask the operating system which functions you have access to, you will get access to them all. This is a classic programming mistake, and a developer at Nintendo HQ is likely getting a very stern talking to right about now.
But not everything was so easy. When trying to get access to the boot loader, the team sniffed the eMMC bus and timed the commands to determine when it was checking the encryption keys. They were then able to assemble a “glitcher” which fiddled with the CPU’s power using FPGA controlled MOFSETs during this critical time in an attempt to confuse the system.
The rabbit hole is pretty deep on this one, so we’d recommend you set aside an hour to watch the entire presentation to see the long road it took to go from a browser bug to running their first complete demo. It’s as much a testament to the skill of [Plutoo], [Derrek], and [Naehrwert] as it is the lengths at which Nintendo went to keep people out.
There’s something about impressing strangers on the Internet that brings out the best in us. Honestly, we wouldn’t be able to run this site otherwise. A perfect example of this phenomenon is the annual Reddit Secret Santa, where users are challenged to come up with thoughtful gifts for somebody they’ve never even met before.
Hardware packed into the lid so the box itself remains empty.
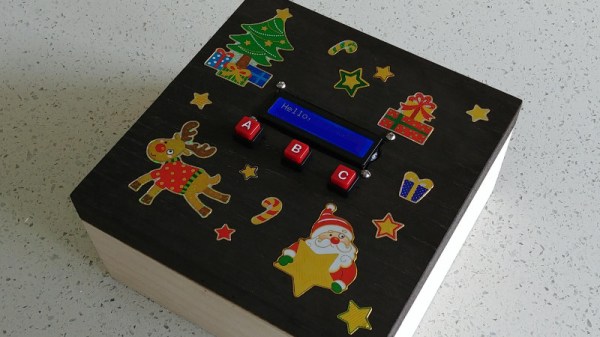
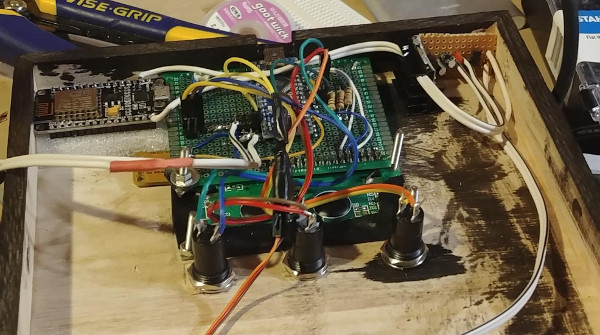
There’s quite a bit of hardware hidden under the hood of this bedazzled gift box. The primary functions of the box are handled by an Arduino Nano; which runs the trivia game and provides user interaction via a 16×2 LCD, three push buttons, and a buzzer. Once the trivia game is complete, a servo is used to unlock the box and allow the recipient access to the physical gifts.
But that’s not the only trick this box has hidden inside. Once the main trivia game is complete, a ESP8266 kicks into action and advertises an access point the user can connect to. This starts the second level of challenges and gifts, which includes a code breaking challenge and gifted software licenses.
The project wasn’t all smooth sailing though. [Harrison] admits that his skills are still developing, and there were a few lessons learned during this project he is unlikely to forget in the future. Some Magic Smoke managed to escape when he connected his 5V Arduino directly to the 3.3V ESP8266, but at least it was a fairly cheap mistake and he had spares on hand to get the project completed anyway.
While it might not be as exciting as the Saturn V rocket itself, the Apollo Guidance Computer (AGC) was one of the most important developments of the entire Apollo program. While comically underwhelming compared to modern hardware, the AGC was nothing short of revolutionary when it was developed in the 1960’s. Before the AGC, the smallest computers were about the size of a refrigerator and consumed hundreds of watts; both big problems if you’re trying to pack them into a relatively tiny space capsule with limited resources. Not only did the AGC get humanity to the Moon and back, but it also redefined the state of the art for microcomputers, paving the way for the desktop systems of the 1970’s.
That said, the design and operation of the AGC is downright bizarre to modern eyes; it comes from a time of limitations we can hardly fathom. With this in mind, [Michael Steil] and [Christian Hessmann] put together “The Ultimate Apollo Guidance Computer Talk” for 34C3.
This hour-long presentation walks viewers through every aspect of not only the AGC itself, but how it interacted with the Saturn V rocket and the overall lunar mission. Even if you aren’t enough of a vintage computing aficionado to appreciate the complexities of core rope memory, the presentation gives a fascinating look at the gritty details of one of humanity’s greatest achievements.
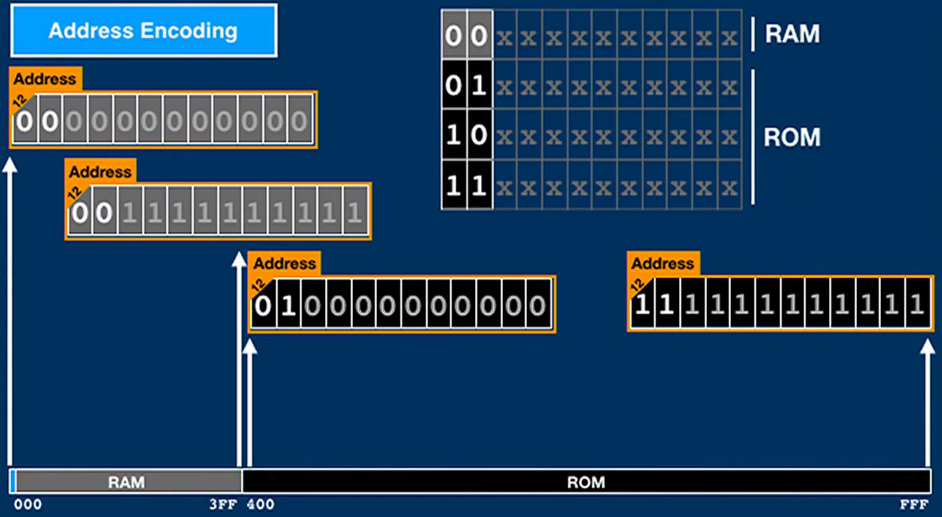
Though very slick and easy to understand graphics, [Michael] and [Christian] break down the alien world of the AGC. Even if a lot of this part of the presentation goes over your head, just listen for the sounds of laughter or applause from the audience: that’s when you’re looking at something really off-the-wall.
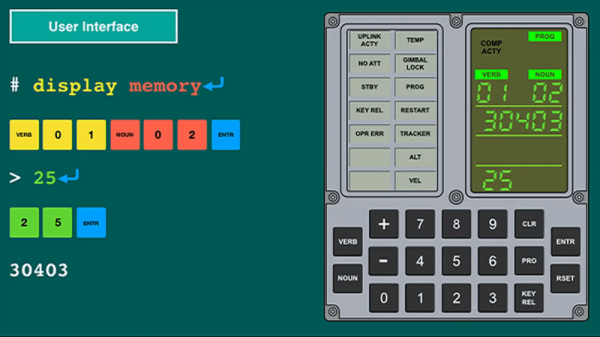
Of particular note during this presentation is the explanation of how the astronauts actually interacted with the AGC. The AGC’s display and keyboard (referred to as DSKY) may seem rather obtuse even to those who used to hack on a VT100, but [Michael] and [Christian] explain how it’s not quite as complex as it seems. Comparing the input and output of the DSKY with what we would see on a more contemporary command line interface, the presentation makes the case that it’s actually a very straightforward way of talking to the computer.
There’s also a complete breakdown of the different phases of the Apollo mission from launch to landing, explaining what the AGC would be doing at any given time. The DSKY is overlaid on actual footage from the Apollo missions, giving a unique perspective as to what the astronauts would see on their computer during iconic moments such as stage separation or lunar touchdown.
Due to the graphic nature of this post, small children and the elderly may want to leave the room. One of the hottest toys this holiday season has been gutted like a fish so that we may better understand the nature of its existence. Or maybe just what kind of sensors and motors the craftsmen over at WowWee managed to cram into a “robot” with an MSRP of only $15 USD.
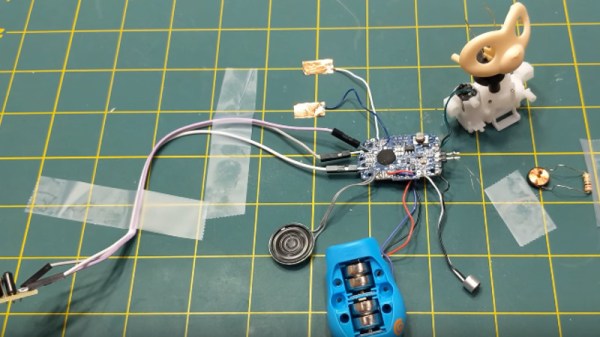
[Josh Levine] mercilessly tears a Fingerling Monkey limb from limb on his blog, and points out some interesting design decisions made. While some elements of the toy are rather clever, there’s a few head-scratchers to be had inside the Fingerling. It’s interesting to see the final results of a decision process that had to balance the relatively rough life such a toy will live with the ever crucial cost of production.
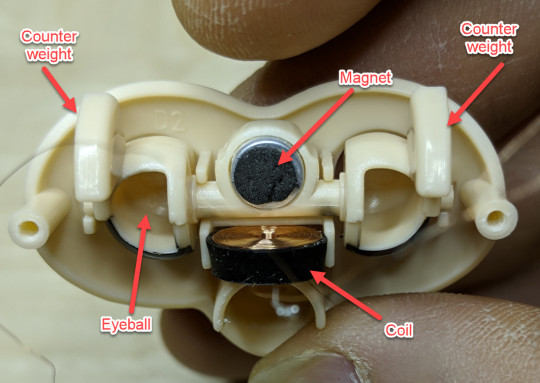
The eyelids are particularly well thought out, operated by charging a coil under a magnet which is embedded in the plastic. Opening and closing the eyelids without a separate motor or gearbox is not only easier and cheaper, but prevents the possibility of damage if a child attempts to force open the eyes or otherwise manipulate the mechanism.
Other cost saving measures include the use of foil tape as a capacitive sensor, and simple ball-filled tilt sensors to detect orientation rather than an expensive accelerometer.
Interestingly, other parts of the toy seem overengineered in comparison. A cam and limit switch are used to detect when the Fingerling’s head has turned to its maximum angle, when it would have been cheaper and easier to simply detect motor stall current.