Forget Smart Watch; Build A Smart Hat

Smart watches are pretty common today, but how many people do you know with a smart hat? [Oliver] built Wilson which he bills as “the IoT hat.” We wonder if the name was inspired by the Home Improvement character of the same name who only appeared as a hat above the fence line. You can see a video of the project, below.

The project is pretty straightforward for hardware. An LED strip, an Arduino, and a Bluetooth module. Oh. And a hat. The software, as you might expect, is a bit more complex. It allows you to display SMS messages to your hat.

Continue reading “Forget Smart Watch; Build A Smart Hat”

Even With AC, Hazmat Suit Isn’t Really Cool

We’ll admit that the coolness factor of an air conditioned faux spacesuit made out of a hazmat suit will largely depend on where you wear it. At your next chess club meeting, maybe a hit. On a blind date, probably not. [Saveitforparts] apparently doesn’t mind and the combination of very warm weather and the donation of an expired hazmat suit, spurred his imagination as you can see in the video below.

A battery pack, a blower, and a box full of frozen water bottles completes the ensemble. Wireless temperature sensors show the outside temperature as well as temperature inside different parts of the suit. Does it work? We guess it must, but the roar of the fan is deafening and we have doubts about the frozen water cooling system. On the other hand, if you’re shooting a low budget science fiction thriller, this might be just the thing.

Even [Saveitforparts] admits this isn’t really practical and, as we suspected, he decided to get out of it as the condensing water started to run down his legs. Turns out astronauts and tank drivers use an undergarment made with small tubes of flowing water to stay cool.

This project reminded us of the positive pressure suit we saw a bit ago. Not to mention the one that went full body.

Continue reading “Even With AC, Hazmat Suit Isn’t Really Cool”

Arduino Nano Memory Upgrade With No Soldering

Ok, we’ll come clean. [Design Build Destroy] didn’t really add any memory to his Arduino Nano. But he did get about 1.5K more program space when compared to the stock setup. The trick? On some Nano boards and clones, the bootloader is set to use a large block of reserved memory, but Optiboot only requires a fraction of that reserved memory. By reprogramming the bootloader and changing the configuration fuses, you can reclaim that unused memory.

Of course, you can’t easily overwrite the bootloader and fuses over the serial port to prevent you from bricking your device. The video below shows how to connect another Arduino to do the programming. You could also use any dedicated AVR programmer you happen to have. Oddly, the Uno already uses Optiboot with the same processors, and is set correctly and the video shows the differences in the configuration between the two in their default state.

Of course, depending on where you get your Nano devices and their age, you may already have this set up at which point you won’t gain anything, but you should be able to easily tell if you need to go through the steps or not. The same trick will probably work with any older Arduino boards you have laying around if Optiboot supports them. What can you do with the extra memory? Maybe speech recognition?

Continue reading “Arduino Nano Memory Upgrade With No Soldering”

Raspberry Pi Hat Adds SDR With High Speed Memory Access

An SDR add-on for the Raspberry Pi isn’t a new idea, but the open source cariboulite project looks like a great entry into the field. Even if you aren’t interested in radio, you might find the project’s use of a special high-bandwidth memory interface to the Pi interesting.

The interface in question is the poorly-documented SMI or Secondary Memory Interface. [Caribou Labs] helpfully provides links to others that did the work to figure out the interface along with code and a white paper. The result? Depending on the Pi, the SDR can exchange data at up to 500 Mbps with the processor. The SDR actually uses less than that, at about 128 Mbps. Still, it would be hard to ship that much data across using conventional means.

On the radio side, the SDR covers 389.5 to 510 MHz and 779 to 1,020 MHz. There’s also a wide tuning channel from 30 MHz to 6 GHz, with some exclusions. The board can transmit at about 14 dBm, depending on frequency and the receive noise figure is under 4.5 dB for the lower bands and less than 8 dB above 3,500 MHz. Of course, some Pis already have a radio, but not with this kind of capability. We’ve also seen SMI used to drive many LEDs.

19 Coils Make Charging Wireless

Wireless charging is conceptually simple. Two coils form anĀ ad hoc transformer with the primary in the charger and the secondary in the charging device. However, if you’ve ever had a wireless charging device, you know that reality can be a bit more challenging since the device must be positioned just so on the charger. Xiaomi has a multi-coil charger that can charge multiple devices and is tolerant of their positioning on the charger. How does it work? [Charger Lab] tears one apart and finds 19 coils and a lot of heat management crammed into the device.

The first part of the post is a terse consumer review of the device, looking at its dimensions and features. But the second part is when the cover comes off. The graphite heat shield looks decidedly like an accidental spill of something, but we’re sure that’s just how it appears. The coils are packed in tight in three layers. We have to wonder about their mutual interactions, and we assume that only some of them are active at any given time. The teardown shows a lot of the components and even pulls datasheets on many components, but doesn’t really go into the theory of operation.

Still, this is an unusual device to see from the inside. It is impressive to see so much power and thermal management in such a tiny package. We wonder that we don’t see more wireless charging in do-it-yourself projects. We do see some, of course. Not to mention grafting a charging receiver to an existing cell phone.

Apollo Shift Register Is Discrete

We’re unabashed fans of [Ken Shirriff] here at Hackaday, and his latest post about an Apollo-era transistorized shift register doesn’t disappoint. Of course, nowadays a 16-bit shift register is nothing special. But in 1965, this piece of Apollo test hardware weighed five pounds and likely cost at least one engineer’s salary in the day, if not more.

The incredible complexity of the the Apollo spacecraft required NASA to develop a sophisticated digital system that would allow remote operators to execute tests and examine results from control rooms miles away from the launch pad.

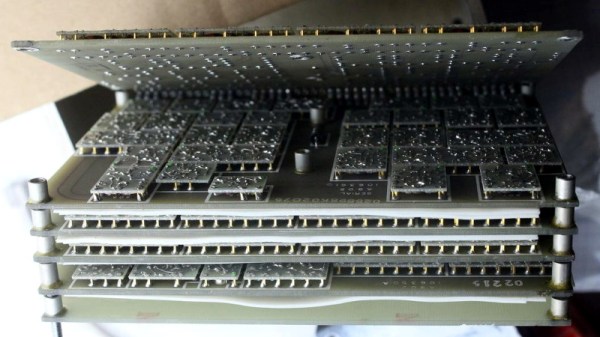
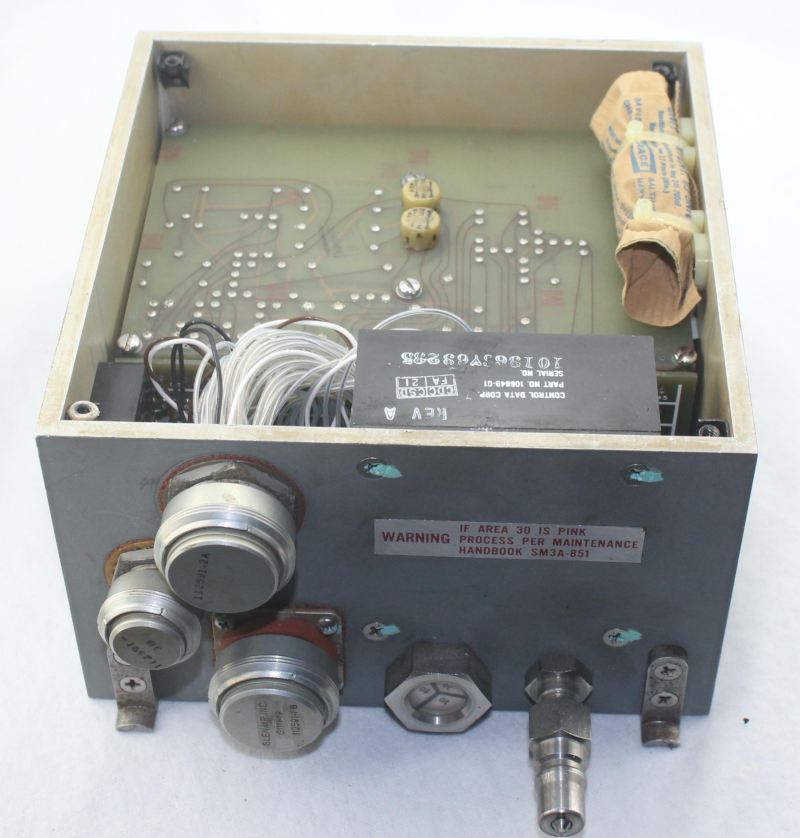
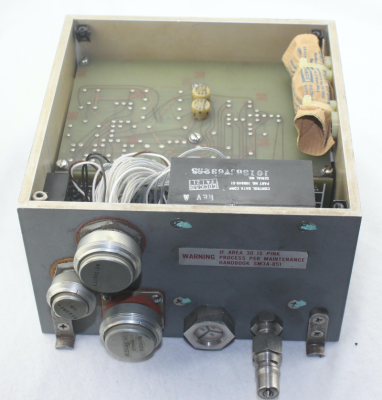
This “Computer Buffer Unit” was used to hold commands for the main computer since a remote operator could not use the DSKY to enter commands directly. Externally the box looks like a piece of military hardware, and on the inside has six circuit boards stacked like the pages of a book. To combat Florida’s notoriously damp conditions, the enclosure included a desiccant bag and a way to fill the device with nitrogen. A humidity indicator warned when it was time to change the bag.

There is a lot more in the post, so if you are interested in unusual construction techniques that were probably the precursor to integrated circuits, diode transistor logic, or just think old space hardware is cool, you’ll enjoy a peek inside this unusual piece of gear. Be sure to check out some of [Ken]’s previous examinations, fromĀ tiny circuits to big computers.

3D Printing Food University Style

While refitting a 3D printer for food printing isn’t really a new idea, we liked the detailed summary that appeared from a team from the University of Birmingham which converted an i3 clone printer to use a syringe extruder.

The syringe in question was meant for veterinarian use and is made of metal. The paper suggests that the metal is a better thermal conductor, but it was’t clear to us if they included a heating element for the syringe. In the pictures, though, it does appear to have some insulation around it. In any case, we imagine a metal syringe is easier to keep clean, which is important if you are depositing something edible.

Continue reading “3D Printing Food University Style”