Wheel Of Fortune Gets Infinite Puzzles On NES

Wheel of Fortune is a television game show, born in the distant year of 1975. Like many popular television properties of the era, it spawned a series of videogames on various platforms. Like many a hacker, [Chris] had been loading up the retro NES title on his Raspberry Pi when he realized that, due to the limitations of the cartridge format, he was playing the same puzzles over and over again. There was nothing for it, but to load a hex editor and get to work.

[Chris’s] initial investigation involved loading up the ROM in a hex editor and simply searching for ASCII strings of common puzzles in the game. Initial results were positive, turning up several scraps of plaintext. Eventually, it became apparent that the puzzles were stored in ASCII, but with certain most-significant-bits changed in order to mark the line breaks and ends of puzzles. [Chris] termed the format wheelscii, and developed an encoder that could turn new puzzles into the same format.

After some preliminary experimentation involving corrupting the puzzles and testing various edge cases, [Chris] decided to implement a complete fix. Puzzles were sourced from the Wheel of Fortune Puzzle Compendium, which should have plenty of fresh content for all but the most addicted viewers. A script was then created that would stuff 1000 fresh puzzles into the ROM at load time to minimize the chances of seeing duplicate puzzles.

ROM hacks are always fun, and this is a particularly good example of how simple tools can be used to make entertaining modifications to 30-year-old software. For another take, check out this hack that lets the Mario Bros. play together.


Henry The Hoover Gets A Weapons Upgrade

In this day and age of unprecedented military expenditure, we’re used to seeing weapons upgrades across all manner of war fighting hardware – tanks, helicopters, attack aircraft, you name it. We’re somewhat less accustomed to seeing the same on a domestic appliance. Regardless, we now have Henry the Hoover packing some serious heat.

Originally a mere vacuum cleaner, Henry was given movement through two motors and gearboxes sourced from a children’s ride on vehicle. A tank was created out of copper pipe to store the flammable gas (which appears to be butane, as used in cigarette lighters), and discharge is controlled with a solenoid valve. Ignition is then handled by a pair of electric ignitors fired by relay. It’s all controlled over a standard hobby radio controller, so you can stand at a safe distance while flambeeing your rug.

It’s a dangerous project, but one that is particularly fun when Henry’s dazed and amused countenance is taken into account. But then again, you might like your flamethrowers wrist mounted, instead. Video after the break.

Continue reading “Henry The Hoover Gets A Weapons Upgrade” →

Germinate Seeds With The Help Of 3D Printing

Microgreens, also known as vegetable confetti, are all the rage in fancy restaurants around the globe. Raised from a variety of different vegetable seeds, they’re harvested just past the sprout period, but before they would qualify as baby greens – usually 10-14 days after planting. There’s a variety of ways to grow microgreens, and [Mr Ben] has developed a 3D printed rig to help.

The rig consists of two parts – a seed tray and a water tray underneath. The seed tray consists of a grid to house the broccoli seeds to be grown, with small holes in each grid pocket to allow drainage. They’re sized just under the minimum seed size to avoid the seeds falling through, and also provide a path for root growth. Beneath the seed tray, the water tray provides the required hydration for plant growth, and helps train the roots downward.

[Mr Ben] notes there are some possible improvements to the design. He suggests PETG would be the ideal filament to use for the prints, as it is foodsafe unlike PLA and ABS. Additionally, precautions could be taken to better seal the water tray to avoid it becoming a breeding ground for insects.

Overall, it’s a tidy project that makes growing these otherwise delicate and expensive greens much neater and tidier. There’s also plenty of scope out there to automate plant care, too. Video after the break.

Continue reading “Germinate Seeds With The Help Of 3D Printing” →

An Englishman And 48 Gameboys Walk Into A Bar…

The original Nintendo Gameboy is perhaps one of the most revered platforms for the music known as chiptune. Primarily, artists will use the console with software like LSDJ or Nanoloop to produce their compositions. Some artists will even use two consoles when performing live. However, that’s all fairly quaint as far as [LOOK MUM NO COMPUTER] is concerned.

Back in 2016, a rig was constructed with three Gameboys. With each console having 3 oscillators and a noise channel, this gave plenty of scope. There was even a facility to detune the oscillators for a fatter sound.

Yet there remains a universal human philosophy – more is always better. In this vein, the plan is to create a monster machine consisting of 48 Gameboy consoles. This offers a somewhat maddening 144 oscillators and 48 noise channels to play with. The plan is to produce a massive synthesizer capable of producing incredibly thick, dense tones with up to six note polyphony.

The hardware side of things is at once simple and ingenious. Buttons on the consoles are connected together for remote control using ribbon cables and transistors. System clocks for the consoles are provided by a LTC1799 oscillator chip, which allows the clock to be modulated for audio effects. Initial tests with up to six Gameboys running from a single clock source have been remarkably successful.

Any mad scientist could see the genius involved in this project, and we can’t wait to see the full rig in operation. If you’re just getting started with Gameboy music, check out this primer on modding your Gameboy for hi-fi sound. Video after the break.

Continue reading “An Englishman And 48 Gameboys Walk Into A Bar…” →

Homebrew Battery Discharger

Rechargable batteries are great – they save money and hassle when using portable devices. It’s pretty common to want to recharge a battery, but less common to intentionally discharge one. Regardless, [Pawel Spychalski] is working on a device to do just that – in a controlled fashion, of course.

[Pawel] himself notes that the device isn’t something the average person would necessarily need, but it does have its applications. There are times when working with various battery chemistries that it is desired to have them held at a certain state of charge. Also, such devices can be used to measure the capacity of batteries by timing how long they take to discharge when placed under a given load.

The build is one that takes advantage of the available parts of the modern hacker’s junkbox. An Arduino is used with an N-channel MOSFET to switch a resistive load. That load consists of load resistors designed for automotive use, to allow cars originally designed for filament bulbs to use LED indicator lights without the flash frequency speeding up. The resistors are 10 ohms and rated at 50 W, so they’re just about right for ganging up to discharge small LiPo batteries in a short period of time.

[Pawel] has tested the basic concept, and has things working. Next on the agenda is to find a way to get rid of the excess heat, as the current design has the resistors reaching temperatures of 158 °F (70 °C) in just a few minutes. Use some of that power to drive a fan?

Perhaps you’re working with lead acid batteries, though – in which chase, you might want to consider blasting away the sulphates?

72 Tranducers For Acoustic Levitation

Levitation has a way of arousing curiousity and wonder wherever it appears. There’s a multitude of ways to do it, each with their own strengths and weaknesses and ideal use cases. [Julius Kramer] tried his hand at acoustic levitation, and decided to share his build.

The build relies on an astounding number of ultrasonic transducers – 72, in fact. The device operates at 40 kHz to be well above the human range of hearing. 36 each are placed in the top and bottom shells of the device’s 3D printed chassis. Through careful construction, the transducers are placed an integer multiple of half the wavelength apart. This allows the device to create a standing wave, with several low-energy nodes in which small objects can be levitated. In this case, [Julius] uses small scraps of styrofoam, but notes that water droplets can also be used if one is careful to avoid spilling any on the electronics.

The transducers are energised with a square wave generated by an Arduino Nano. This allows the possibility of the frequency and phase of the wave to be altered, which can help tune the device and allow some movement in the vertical axis. Unfortunately, movement in the other axes isn’t possible as the transducers appear to be connected in parallel. However, this could be a good upgrade in a later revision.

This project shows that a device relying on incredibly precise measurement and control can now be constructed at home with a 3D printer and some off the shelf electronics.

Now that you’ve whet your whistle, perhaps you’d like to tackle laser levitation?

[Thanks to Baldpower for the tip!]


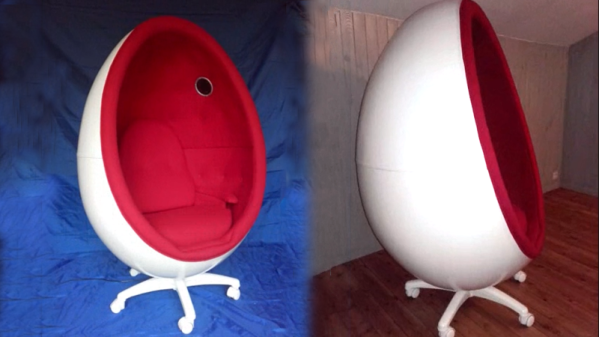
DIY Ovalia Chair Serves Your Futuristic Fantasies

The 1960s were a heady time, with both society and the language of design undergoing rapid changes over a short period. Back in 1968, Henrik Thor-Larsen exhibited his Ovalia egg chair for the first time, at the Scandinavian Furniture Fair. With original examples now antiques, and with even replicas being prohibitively expensive, it might just be worth considering building your own if you need to have one. Thankfully, [Talon Pascal] leads the way.

It’s a replica that’s built with accessible DIY tools and techniques. The frame is built up from plywood parts, cut out with a jigsaw. These are then assembled with glue and screws, forming two halves of the full-sized egg assembly. The exterior is then covered with thin strips of wood, as opposed to the fiberglass construction of the original. This is smoothed out with a judicious application of wood putty and plenty of sanding. The interior is then lined with foam before the chair is upholstered with red fabric. We’re not sure exactly how the trim ring is fitted, but it gives the chair a nice clean finished edge and rounds out the project nicely. There are even embedded speakers so you can chill out with some tunes in your ovaloid sanctuary.

It just goes to show that there’s value in the old adage – if you can’t buy it, build it! Perhaps, however, you’re outfitting the office – in which case, would something from the Porsche range suffice?