Modified F Clamp Is Wheely Good

Sometimes, a job is heavy, messy, or unwieldy, and having an extra pair of hands to help out makes the job more than twice as easy. However, help isn’t always easy to find. Faced with this problem, [create] came up with an ingenious solution to help move long and heavy objects without outside assistance.

Simple, and effective.

The build starts with a regular F-clamp  – a familiar tool to the home woodworker. The clamp is old and worn, making it the perfect candidate for some experimentation. First off, the handle is given a good sanding to avoid the likelihood of painful splinters. Then, the top bar is drilled and tapped, and some threaded rod fitted to act as an axle. A polyurethane wheel from a children’s scooter is then fitted, and held in place with a dome nut.

The final product is a wheel that can be clamped to just about anything, making it easier to move. [create] demonstrates using the wheelclamp to move a long piece of lumber, but we fully expect to see these on the shelf of Home Depot in 12 months for moving furniture around the house. With a few modifications to avoid marring furniture, these clamps could be a removalist’s dream.

While you’re busy hacking your tools, check out these useful bar clamps, too. Video after the break.
Continue reading “Modified F Clamp Is Wheely Good” →

Crawling PCB ‘Bot Is Flexible Where It Counts

20 years ago, PCB production was expensive and required a multitude of phone calls and emails to a fab with significant minimum order restrictions. Now, it’s cheap and accessible online, which in addition to curtailing the home etching market has created significant new possibilities for home projects. Now that flexible PCBs are also readily available, it’s possible to experiment with some cool concepts – and that’s precisely what [Carl] has been doing.

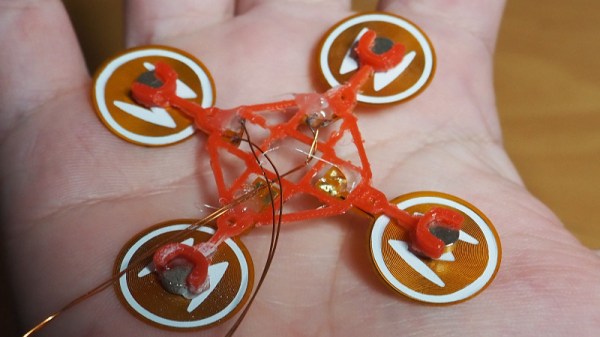
The aim is to build a walking robot that uses actuators made from flexible PCBs. The flexible PCB is printed with a coil, capable of generating a small magnetic field. This then interacts with a strong permanent magnet, causing the flexible PCB to move when energised.

Initial attempts with four actuators mounted to a 3D printed frame were unsuccessful, but [Carl] has persevered. With a focus on weight saving, the MK II prototype has shown some promise, gently twitching its way across a desk in testing. Future steps will involve building an untethered version. This will replace the 3D printed chassis with a standard fibreglass PCB acting as both control board and the main chassis to minimise weight, similar to PCB quadcopter designs we’ve seen in the past.

We can’t wait to see the next revision, and if you’ve been working on your own walking robots, make sure you let us know.

Hydrogen Powered Nerf Blaster Is Dangerously Awesome

Nerf blasters have been around for decades now, exciting children and concerning parents alike. Most are powered by springs or compressed air, and are the ideal holiday toy for putting delicate family heirlooms at risk. Not content to settle for the usual foam-flinging sidearm, [Peter Sripol] decided to take things up a notch.

The build starts with a MEGA CYCLONESHOCK blaster, which uses the larger red NERF darts as ammunition. Water tanks are rigged to the outside, fitted with stainless steel electrodes. The original spring & plunger firing  assembly is then removed, to make room for a firing chamber made out of copper pipe. A small taser-like device is used as an igniter. When the charging switch is pressed, current is passed through the electrodes in the water, which splits the water into hydrogen and oxygen gas. This is then passed to the firing chamber, where it can be ignited by the taser module, activated by the trigger.

Despite some issues with the blaster occasionally destroying darts due to what appears to be overpressure, it is capable of higher shot velocities than the stock blaster. For all its complexity, performance is somewhat hit and miss, but the cool factor of a handheld hydrogen bubbler is hard to ignore. [Peter] does note however that the combination of explosive gases and dangerous catalyst chemicals make this one build that’s probably best left to adults.

If this NERF hack isn’t dangerous enough, you might prefer these Taser darts instead. Video after the break.

[Thanks to Baldpower for the tip!]

Continue reading “Hydrogen Powered Nerf Blaster Is Dangerously Awesome” →

Stove Alarm Keeps The Kitchen Safe

Gas cooktops have several benefits, being able to deliver heat near-instantly, while also being highly responsive when changing temperature. However, there are risks involved with both open flames and the potential of leaving the gas on with the burner unlit. After a couple of close calls, [Bob] developed a simple solution to this safety issue.

The round PCB sits neatly behind the knobs, affixed with double-sided tape.

Most commercial products in this space work by detecting the heat from the cooktop, however this does not help in the case of an unlit burner being left on. [Bob]’s solution was to develop a small round PCB that sits behind the oven knobs. Magnets are placed on the knobs, which hold a reed switch open when the knob is in the off position. When the knob is turned on, the reed switch closes, powering a small microcontroller which beeps at regular intervals to indicate the burner is on.

It’s a tidy solution to a common problem, which could help many people – especially the elderly or the forgetful. It integrates neatly into existing cooktops without requiring major modification, and [Bob] has made the plans available if you wish to roll your own.

On the other end of the scale, you might want an alarm on your freezer, too.

Advent Calendar – ‘Tis The CNSeason

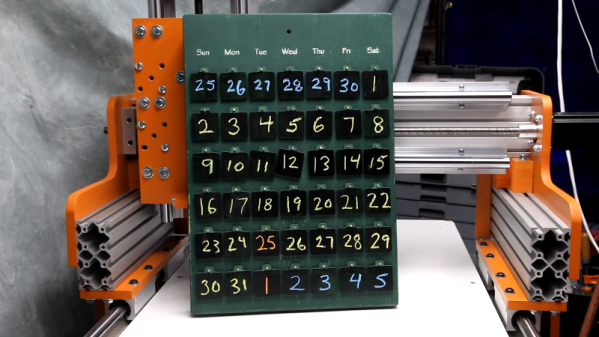
CNC machines are powerful tools when used correctly, but it’s often necessary to test a new machine before getting into serious production work. This advent calendar is a great festive project that was designed to put a CNC through its paces.

The calendar is made primarily from wood. This is an excellent choice for test machining projects, as it is softer and less likely to cause tool or machine damage when compared to steel or aluminum. The calendar base was first milled out using end mills, while a 30-degree V-bit was used to engrave the days of the week. Brass brazing rod was then used to create hangers for the calendar tags.

Thanks to the clever use of chalkboard paint and removable tags, the calendar can be reconfigured to work for any given year and month combination — just in case you wish to have an advent calendar year round. Overall, it’s a good low-intensity machining project that would also be a fun craft project for kids.

As it’s that time of year, you might like this blinky advent calendar, too. Video after the break.

[Thanks to Michael for the tip!]

Continue reading “Advent Calendar – ‘Tis The CNSeason” →

Racing The Beam On A Thin Client, In FPGAs

A few years back, a company by the name of Pano Logic launched a line of FPGA-based thin clients. Sadly, the market didn’t eventuate, and the majority of this stock ended up on eBay, to eventually be snapped up by eager hackers. [Tom] is one of those very hackers, and decided to try some raytracing experiments with the hardware.

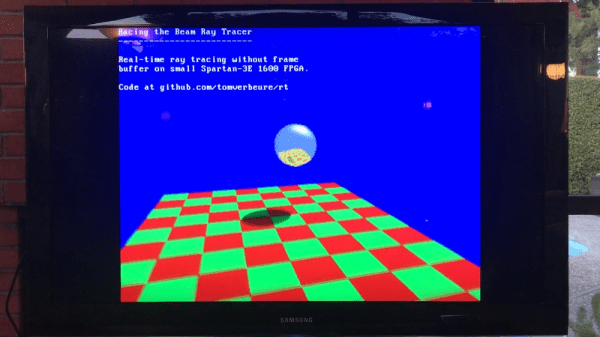
[Tom] has one of the earlier Pano Logic clients, with VGA output and a Xilinx Spartan-3E 1600 FPGA under the hood. Due to limited RAM in the FPGA, and wanting to avoid coding a custom DRAM controller for the memory on the board, there just wasn’t room for a framebuffer. Instead, it was decided that the raytracer would instead “race the beam” – calculating each pixel on the fly, beating the monitor’s refresh rate.

This approach means that resource management is key, and [Tom] notes that even seemingly minor changes to the raytracing environment require inordinately large increases in calculation. Simply adding a shadow and directional light increased core logic utilisation from 66% to 92%!

While the project may not be scalable, [Tom] was able to implement the classic reflective sphere, which bounces upon a checkered plane and even added some camera motion to liven things up through an onboard CPU core. It’s a real nuts-and-bolts walkthrough of how to work with limited resources on an FPGA platform. Code is available on Github if you fancy taking a further peek under the hood.

If you’re new to FPGAs yourself, why not check out our FPGA bootcamp?

Apple II Megademo Is Countin’ Cycles And Takin’ Names

The demoscene is an active place to this day, with enthusiasts around the world continuing to push the envelope as far as the capabilities of machines are concerned. [Deater], along with a skilled team, produced this Apple II Megademo which won first place at Demosplash 2018.

The demo starts with an intentional tease, with an emulated C64 BASIC startup screen which splits to reveal the title card. White-on-blue text isn’t the easiest on the Apple II, due to palette limitations, but it’s necessary for the joke to work. The following scenes make heavy use of mode-switching techniques in the middle of drawing the screen. Single screens are made up of various sections in LORES, HIRES, and even text modes. The term “cycle-counting” refers to the fact that the demo is written to operate in a cycle-exact fashion. This is necessary to achieve the mode-switching effects and to make the most of the limited resources of the Apple II.

It’s a demo that, like many others, does the right things in the wrong way to achieve its impressive results, and is a worthy competition winner. [Deater] has kindly provided an FAQ and source code for those who wish to study it further.

If you’ve written a mindblowing demo yourself, be sure to notify the tips line. Video after the break.

Continue reading “Apple II Megademo Is Countin’ Cycles And Takin’ Names” →