A VLC media window with a live feed of a soccer field. Players are just starting to come off the sideline to play.

Rickrolling The World Cup

Sometimes, hacking requires a certain amount of restraint, especially when you find a system woefully unsecured. It would be so easy to play some pranks, but [bobdahacker] chose not to rickroll the entire FIFA World Cup.

The fun starts after [bobdahacker] signed up for a free FIFA agent profile. After a simple ID verification process, he had a login for the FIFA Agent platform, but they used the same account system across the whole organization in Microsoft Entra. When he tried to access the FIFA Football Data Platform system, it returned an error saying he had no assigned role to allow access. This was on the client side though, so he was able to bypass the error as the server didn’t block accounts without assigned roles.

Once inside, he found he was able to access not just the data, but had full control of the RTMP ingest URLs of all the FIFA matches. For those of us less conversant in streaming media protocols, “Those RTMP ingest URLs are the literal pipe from the stadium cameras to FIFA’s broadcast distribution chain. Camera -> RTMP ingest -> MediaKind -> broadcast partners -> your TV.” He could’ve shut off the feeds or injected whatever alternate stream he wanted, but instead chose to try contacting FIFA, their streaming contractor, and various law enforcement agencies since the World Cup was already underway when he made the discovery.

“Competitions, Matches, Teams, Tools, Exchange Platform, Analysis Dashboard, Commentator Information System, FIFA AI Pro, Admin” were also in the open. Live match scores could be changed, player bios, and any number of other stats could be modified. We’ll let you imagine the possibilities of what mischief could occur.

While rickrolling the world would be funny, a rickroll throwie will be a bit more circumspect. If you’re more interested in soccer/football than security hacks, we hope you enjoy this LEGO soccer tank or these robot soccer players and avoid any soccer ball-sized meteorites or legal troubles for your soccer-related invention.

Dynamic RAM From First Principles

Before the past year, many of us took computer memory for granted. It was one of the lower-cost parts of a PC build and was usually available in whatever quantity one desired. As its cost has skyrocketed, a lot of PC builders and other users of computers in general are taking a deeper look at memory, how much is really needed, and what its functions truly are. [Igor] is working on a drum sequencer project which needs a small amount of memory, and has built this dynamic RAM from discrete components.

The first video goes into the construction of the memory array and how its addressed. It’s only eight bytes total, and using fairly large electrolytic capacitors to store data means that a gigabyte of this memory would take up well over a thousand acres, but it’s still enough memory for [Igor]’s needs. In addition to the capacitor, each bit uses a pair of diodes to determine if a read or write is occuring, and a set of transistors on the read and write busses to perform those actions. Worth noting here is that dynamic RAM like this needs to be refreshed because the capacitors lose charge over time, but these large capacitors can hold charge sometimes overnight, as [Igor] has confirmed experimentally.

There’s a followup video to the construction of these modules as well, where [Igor] demonstrates a number of ways this module can be used, from controlling LED arrays, 7-segment displays, and then installs it into his drum machine. With 64 bits available it’s capable of creating up to eight beats with eight samples available per beat. Although there are complete machines available for all of this, we appreciate his goal of not buying any pre-manufactured hardware and instead constructing it all from the ground up. There are analog drum machine options available in this same style as well.

Continue reading “Dynamic RAM From First Principles”

Lightcomposer

LightComposer – Reach Out And Touch Your Lighting

While there is a time and place for wirelessly controlled devices, sometimes you want something you can just reach out and touch to interact with, no apps to install or devices to configure. In this case [John] wanted a lamp that was just that. Drawing inspiration from the rotary phone, he created the LightComposer.

This small lamp, just a bit smaller than a hockey puck, uses a 3D printed enclosure and a straightforward PCB. It’s a very accessible project to recreate. The 3D prints are well thought out including a TPU ring on the bottom to keep the lamp from sliding around. The light source comes from 32 SK6812 LEDs, which are very similar to NeoPixels. An ATmega328P microcontroller powers the project and can easily be programmed using the Arduino IDE. A rotary encoder in the center, coupled to the top diffuser, lets you control LED brightness and color by turning it. The firmware also includes some fun hidden light-effect modes.

Head over to [John]’s site for all the files needed to make your own LightComposer, or links to buy a premade one. What devices have you made that use a straightforward physical user interface in lieu of an app? Be sure to check some of the other lamp builds we’ve featured before.

Investigating Annealing As Fix For Poor CF Adhesion In 3D Prints

After recently publishing a few videos covering research into the poor adhesion between chopped carbon fiber (CCF) and the thermoplastic filaments as used with FDM 3D printing, some of the feedback received by [I built a thing] included the idea that the missing step to make CCF additives work was post-print annealing. Naturally this claim had to be investigated, both through the resulting physical characteristics as well as on a microscopic level in the same scanning electron microscope (SEM) as before.

Post-annealing SEM scan, showing clear voids. (Credit: I built a thing, Youtube)

Theories as to why annealing the parts would help here seem to focus on increased bonding and filling of voids in the printed CCF-infused material, while there are the typical worries with annealing such as parts warping and shrinking to also take into account as potential downsides of this treatment.

For the sample materials PETG and PETG-CF, as well as PLA and PLA-CF filaments are used, with each filament type featuring an annealed and not annealed version. These were then tested for tensile strength, stiffness and failure type, as well as dimensional accuracy and warping, before being examined under the SEM. A total of 160 samples were used, with 20 samples per material and annealing state.

Perhaps the biggest surprise here was how much PETG benefits from annealing, making it much more resilient to breaking, whereas neither PLA nor PLA-CF seemed to see much benefit. Shocking was how much worse PETG-CF performs than PETG, with the former being worse than both PLA and PLA-CF here.

In terms of dimensional accuracy, annealing caused a Z direction expansion while shrinking the samples in the  other directions. The CCF addition here actually prevented much of the shrinking and expansion, showing the first clear benefit of this additive. Yet despite annealing at right above the glass transition temperature as is proper, this would seem to be the limit of this approach in terms of practical benefits.

Compared to the previous research that focused on PLA-CF, PETG-CF would seem to make the case even more strongly that there’s no real purpose to CCF additives, especially since you can already account for parts shrinkage during annealing before printing. That there’s no improvement to the CCF and thermoplastic interface adhesion is also no mystery, considering the science behind how e.g. thermoset materials create bonds with CF.

Continue reading “Investigating Annealing As Fix For Poor CF Adhesion In 3D Prints”

Breaking Into A Prison Tablet

Usually the term ‘jailbreaking’ isn’t meant to be taken quite that literally, but in the case of the US prison tablet that [Hugh Jeffreys] got sent, it’s really quite apt. Unlike the typical transparent prison electronics, this tablet is hermetically sealed inside an opaque plastic case, with the Windows 10 install firmly locked-down and not allowing anything more to be done with it than access some prison-provided services via the browser in kiosk mode.

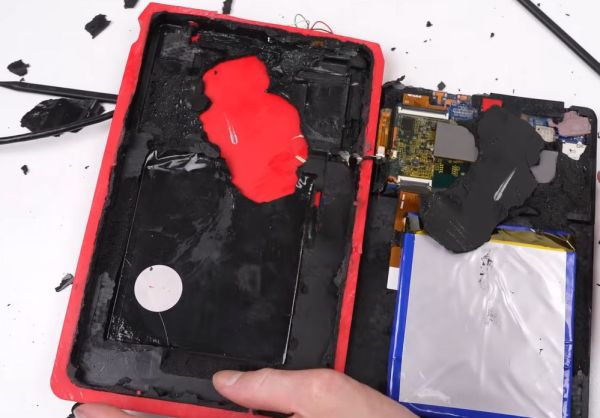
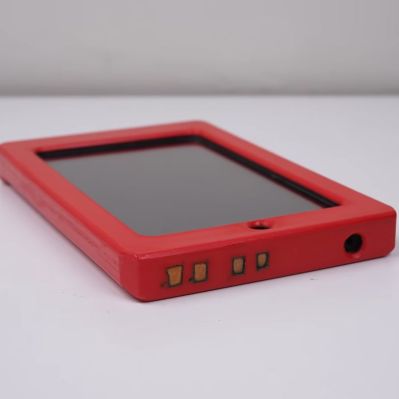
The first challenge was to see whether it could be booted at all, with just four metal pads visible on the side of the case. These turn out to correspond to USB pins, but the tablet only briefly tries to turn on with a charger connected. This means that a teardown is required, which ended up involving a hacksaw due to the sealed case.

Inside the case is the Windows tablet with the back cover removed, presumably for easy access to extend its USB port. All of this is embedded in foam and more gunk that makes disassembly rather messy. With the case opened it becomes clear that the likely reason why this tablet was junked was due to a bad third-party charger board, as using the tablet’s own USB port it charges happily and even turns on.

From there it’s a bit of a fight with the locked-down Windows installation, but as it’s just a Windows 10 Home installation, there’s no drive encryption or such to get in the way. This allows for the device to be fully jailbroken, revealing its specifications as an Iview Optimus-C-8001, powered by an Intel Atom Z8350 at 1.44 GHz with a blistering 2 GB of RAM. The Windows installation was from 2018, with apparently no updates since.

Despite the very high school arts-and-crafts appearance of the case itself, the tablet itself isn’t too shabby considering the limited hardware specifications. Although getting the case off is a bit of a pain, it’s not a bad catch if you can find one of these puppies in the e-waste bin.

Continue reading “Breaking Into A Prison Tablet”

Graphics Upgrade For Nintendo Entertainment System

Modern video game consoles rarely have expansion ports, but in the 80s and 90s it was practically guaranteed. With the speed that hardware was advancing it made sense to build in some way to expand a system’s capabilities throughout its lifespan, like the memory port in the Nintendo 64 or the Sega CD and 32X attachments for the Sega Genesis. Some were ultimately unused as well, like the port under the Super Nintendo or, arguably, the interesting way that [decrazyo] figured out how to add graphics capabilities to the original Nintendo Entertainment System.

The basis of this upgrade is the fact that the Picture Processing Unit (PPU) on the NES has four pins that are grounded. These four pins tell the NES to display the background color if the pixel is transparent. Since they’re normally grounded, this means the NES can only display a limited background image, but there’s no reason these pins must be grounded. By using a second PPU configured to output graphics information and wiring it to these four pins on the first PPU, the NES can be given all kinds of new abilities, such as adding parallax effects to backgrounds, rendering more sprites, and showing more colors in the backgrounds.

Of course, the hardware requirements for this will require a donor NES to get the second PPU as well as the necessary memory chip for it, and we don’t recommend tearing apart perfectly good retro consoles for experimentation if it can be avoided. Presumably, you could use this open-source NES hardware alternative instead. But for those with the parts and the gumption, creating a demo or adding graphics features to homebrew games using this second graphics chip is within reach.

Continue reading “Graphics Upgrade For Nintendo Entertainment System”

MSYS2 And The No-Fuss Way To Get More GNU Into Your Windows

As great and streamlined as the Windows desktop experience is, one area where it’s at best disappointing and at worst rage-inducing is when it comes to its command line interface (CLI) offerings. In Windows 9x/ME this could be excused by the fact that it was essentially just a dressed-up MS-DOS CLI experience, but on Windows NT-based OSes no such excuse exists.

Yet even after Microsoft finally acknowledged the shortcomings of the cmd.exe shell by 2006, they then proceeded to go their own way with PowerShell, industry standards be damned. Especially for those of us who have no beef with the UNIX/BSD/Linux CLI experience and the joys of shell scripting, this insistence was disappointing. Simultaneously, everyone from OS X/MacOS to Haiku were happily offering a familiar CLI environment alongside POSIX compatibility.

Although Windows NT OSes were POSIX compliant, they never offered a suitable shell along with it, nor any of the other things you’d expect in a modern-day BSD, Haiku or Linux CLI environment. In a recent article by my esteemed colleague Al Williams, these sore points were somewhat addressed as far as basic CLI tools go, but the issue goes obviously much deeper than just the basic userland tools. Which is where MSYS2 comes into the picture.

Continue reading “MSYS2 And The No-Fuss Way To Get More GNU Into Your Windows”