Magnetic Attraction Of Microduino MCookie Modules

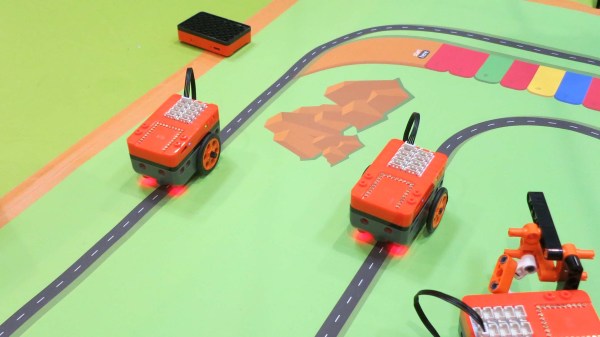
We’ve seen countless different robot kits promoted for STEM education, every one of which can perform the robotic “Hello World” task of line following. Many were in attendance at Maker Faire Bay Area 2019 toiling in their endless loops. Walking past one such display by Microduino, Inc. our attention was caught by a demonstration of their mCookie modules in action: installing a peripheral module took less than a second with a “click” of magnets finding each other.
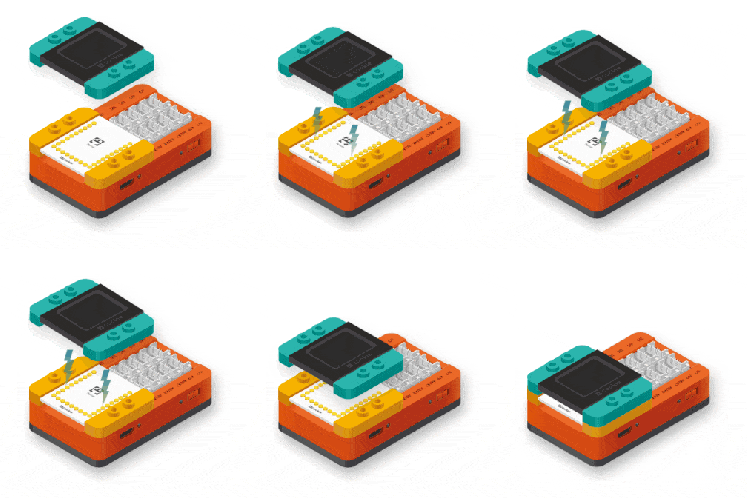
Many Arduino projects draw from an ecosystem of Arduino shields. Following that established path, Microduino had offered tiny Arduino-compatible boards and peripherals which connected with pins and headers just like their full-sized counterparts. Unfortunately their tiny size also meant their risk of pin misalignment and corresponding damage would be higher as well. mCookie addresses this challenge by using pogo pins for electrical contacts, and magnets to ensure proper alignment. Now even children with not-quite-there-yet dexterity can assemble these modules, opening up a market to a younger audience.

Spring loaded electric connections are a popular choice for programming jigs, and we’ve seen them combined with magnets for ideas like modular keyboards, and there are also LittleBits for building simple circuits. When packaged with bright colorful LEGO-compatible plastic mounts, we have the foundation of an interesting option for introductory electronics and programming. Microduino’s focus at Maker Faire was promoting their Itty Bitty Buggy, which at $60 USD is a significantly more affordable entry point to intelligent LEGO creations than LEGO’s own $300 USD Mindstorm EV3. It’ll be interesting to see if these nifty mCookie modules will help Microduino differentiate themselves from other LEGO compatible electronic kits following a similar playbook.

Is 4 GB The Limit For The Raspberry Pi 4?

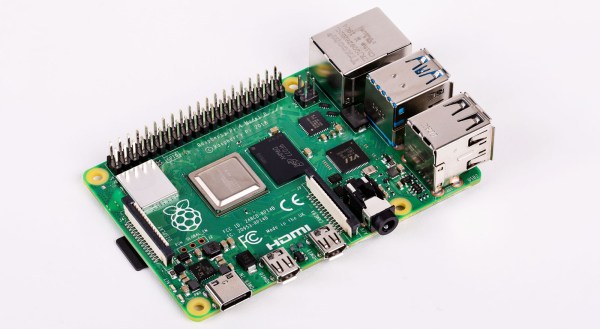
So you’ve rushed off to your favourite dealer in Raspberry Pi goodies and secured your shiny new Raspberry Pi 4. Maybe you’re anxiously waiting for the postie, or perhaps if you’re lucky enough to live near Cambridge you simply strolled into the Pi shop and bought one over the counter. You’ve got the best of the lot, the 4 GB model, and there’s nothing like the feeling of having the newest toy before everyone else does.

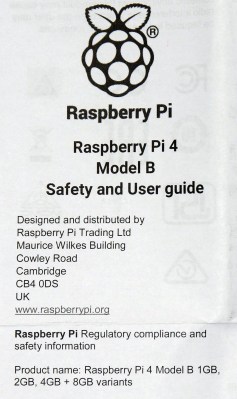
A scan of the Pi 4 user guide, with a tantalising 8GB at the bottom.

You open the box, pull out the Pi, and get busy. The instruction leaflet flutters to the floor, ignored and forgotten. If you’re our tipster [Eric van Zandvoort] though, you read it, notice something unexpected, and send a scan to your friends at Hackaday. Because there at the top, in the regulatory compliance information that nobody reads, is the following text:

Product name: Raspberry Pi 4 Model B 1 GB, 2 GB, 4 GB + 8 GB variants.

It’s not the lack of an Oxford comma that caught his eye, but the tantalising mention of an 8 GB Raspberry Pi 4. Could we one day see an extra model in the range with twice the memory? It would be nice to think so.

There are a couple of inevitable reactions when a new product comes out. First, everyone who has just bought the previous one will be upset, and second there will always be a group of people who say “Ah, don’t buy this one, wait for the super-duper upgrade model!” We’d like to suggest to anyone tempted into the latter group that this news should be no reason not to buy a Raspberry Pi 4 at the moment, because the prospect of an 8 GB variant should come as a shock to nobody.

It makes absolute sense that the Pi people will have equipped their SoC with as much address space as they can get into it, and equally as much sense that they will have fitted the final products with whatever memory chips keep it within their target price point. If you cast your mind back you’ll know that this isn’t the first time this has happened, early boards were shipped with 256 MB of RAM but later upgraded to 512 MB as the economics made it possible. Those with extreme knowledge of Pi trivia will also know that the original Model A was announced with 128 MB and released with 256 MB for the same reason.

There’s another question, would 8 GB make that much difference? The answer depends upon what you are doing with your Pi 4, but it’s worth remembering that this is no high-end workstation but a single-board computer with a stripped-down Linux distro for experimenters. You may be disappointed if you are pushing the limits of computational endeavour, but the majority of users will not be taxing Raspbian on the 4 GB model even if they install Chromium and open up all their favourite bloated social media sites. Perhaps we’ve become conditioned by the excessive demands of Windows on an x86 platform and forgotten just how powerful our computers really are. After all, as the apocryphal Bill Gates quote has it, “640k should be enough for anyone“, right?

We can look forward to an 8 GB Pi 4 then at some point in the future. We’d put our money on next year, since 2020 is a leap year and 2020-02-29 will be the Pi’s 2nd 8th birthday, it wouldn’t stretch the imagination to speculate around that date. But don’t bet on it, save your money for buying a 4 GB Pi 4 right now.

The Future Of Space Is Tiny

While recent commercial competition has dropped the cost of reaching orbit to a point that many would have deemed impossible just a decade ago, it’s still incredibly expensive. We’ve moved on from the days where space was solely the domain of world superpowers into an era where multi-billion dollar companies can join on on the fun, but the technological leaps required to reduce it much further are still largely relegated to the drawing board. For the time being, thing’s are as good as they’re going to get.

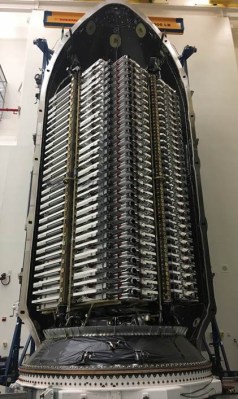
Starlink satellites ready for launch

If we can’t count on the per pound cost of an orbital launch to keep dropping over the next few years, the next best option would logically be to design spacecraft that are smaller and lighter. Thankfully, that part is fairly easy. The smartphone revolution means we can already pack an incredible amount sensors and processing power into something that can fit in the palm of your hand. But there’s a catch: the Tsiolkovsky rocket equation.

Often referred to as simply the “rocket equation”, it allows you to calculate (among other things) the ratio of a vehicle’s useful cargo to its total mass. For an orbital rocket, this figure is very small. Even with a modern launcher like the Falcon 9, the payload makes up less than 5% of the liftoff weight. In other words, the laws of physics demand that orbital rockets are huge.

Unfortunately, the cost of operating such a rocket doesn’t scale with how much mass it’s carrying. No matter how light the payload is, SpaceX is going to want around $60,000,000 USD to launch the Falcon 9. But what if you packed it full of dozens, or even hundreds, of smaller satellites? If they all belong to the same operator, then it’s an extremely cost-effective way to fly. On the other hand, if all those “passengers” belong to different groups that split the cost of the launch, each individual operator could be looking at a hundredfold price reduction.

SpaceX has already packed 60 of their small and light Starlink satellites into a single launch, but even those craft are massive compared to what other groups are working on. We’re seeing the dawn of a new era of spacecraft that are even smaller than CubeSats. These tiny spacecraft offer exciting new possibilities, but also introduce unique engineering challenges.

Continue reading “The Future Of Space Is Tiny”

Snoopy Come Home: The Search For Apollo 10

When it comes to the quest for artifacts from the Space Race of the 1960s, few items are more sought after than flown hardware. Oh sure, there have been stories of small samples of the 382 kg of moon rocks and dust that were returned at the cost of something like $25 billion making it into the hands of private collectors, and chunks of the moon may be the ultimate collector’s item, but really, at the end of the day it’s just rock and dust. The serious space junkie wants hardware – the actual pieces of human engineering that helped bring an epic adventure to fruition, and the closer to the moon the artifact got, the more desirable it is.

Sadly, of the 3,000,000 kg launch weight of a Saturn V rocket, only the 5,600 kg command module ever returned to Earth intact. The rest was left along the way, mostly either burned up in the atmosphere or left on the surface of the Moon. While some of these artifacts are recoverable – Jeff Bezos himself devoted a portion of his sizable fortune to salvage one of the 65 F1 engines that were deposited into the Atlantic ocean – those left on the Moon are, for now, unrecoverable, and in most cases they are twisted heaps of wreckage that was intentionally crashed into the lunar surface.

But at least one artifact escaped this ignominious fate, silently orbiting the sun for the last 50 years. This lonely outpost of the space program, the ascent stage from the Apollo 10 Lunar Module, appears to have been located by a team of amateur astronomers, and if indeed the spacecraft, dubbed “Snoopy” by its crew, is still out there, it raises the intriguing possibility of scoring the ultimate Apollo artifact by recovering it and bringing it back home.

Continue reading “Snoopy Come Home: The Search For Apollo 10”

The Practical Approach To Keeping Your Laser In Focus

You could be forgiven for thinking that laser cutters and engravers are purely two dimensional affairs. After all, when compared to something like your average desktop 3D printer, most don’t have much in the way of a Z axis: the head moves around at a fixed height over the workpiece. It’s not as if they need a leadscrew to push the photons down to the surface.

But it’s actually a bit more complicated than that. As [Martin Raynsford] explains in a recent post on his blog, getting peak performance out of your laser cutter requires the same sort of careful adjustment of the Z axis that you’d expect with a 3D printer. Unfortunately, the development of automated methods for adjusting this critical variable on lasers hasn’t benefited from the same kind of attention that’s been given to the problem on their three dimensional counterparts.

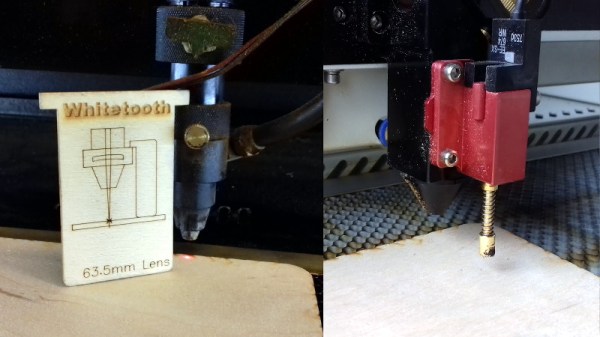
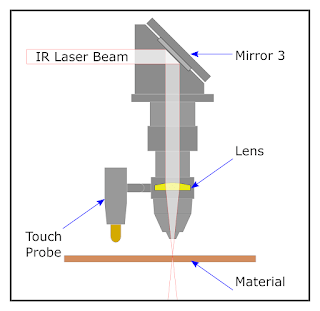
Ultimately, it’s a matter of focus. The laser is at its most powerful when its energy is concentrated into the smallest dot possible. That means there’s a “sweet spot” in front of the lens where cutting and engraving will be the most efficient; anything closer or farther away than that won’t be as effective. As an example, [Martin] says that distance is exactly 50.3 mm on his machine.

The problem comes when you start cutting materials of different thicknesses. Just a few extra millimeters between the laser and your target material can have a big difference on how well it cuts or engraves. So the trick is maintaining that perfect distance every time you fire up the laser. But how?

One way to automate this process is a touch probe, which works much the same as it does on a 3D printer. The probe is used to find where the top of the material is, and the ideal distance can be calculated from that point. But in his experience, [Martin] has found these systems leave something to be desired. Not only do they add unnecessary weight to the head of the laser, but the smoke residue that collects on the touch probe seems to invariably mar whatever surface you’re working on with its greasy taps.

In his experience, [Martin] says the best solution is actually the simplest. Just cut yourself a little height tool that’s precisely as long as your laser’s focal length. Before each job, stick the tool in between the laser head and the target to make sure you’re at the optimal height.

On entry level lasers, adjusting the Z height is likely to involve turning some screws by hand. But you can always add a motorized Z table to speed things up a bit. Of course, you’ll still need to make sure your X and Y alignment is correct. Luckily, [Martin] has some tips for that as well.

Abusing A CPU’s Adders To Optimize Bit Counting

If you like nitpicking around C code and generated assembly language — and we’ll admit that we do — you shouldn’t miss [Scaramanga’s] analysis of what’s known as Kernighan’s trick. If you haven’t heard of the trick, it’s a pretty efficient way of counting bits.

Like the Wheatstone bridge and a lot of other things, the Kernighan trick is misnamed. Brian Kernighan made it famous, but it was actually first published in 1960 and again in 1964 before he wrote about it in 1988. The naive way to count bits would be to scan through each bit position noting how many one bits you encounter, but the problem is, that takes a loop for each bit. A 64-bit word, then, takes 64 loops no matter what it contains. You can do slightly better by removing each bit you find and stopping when the word goes to zero, but that still could take 64 cycles if the last bit you test is set.

Continue reading “Abusing A CPU’s Adders To Optimize Bit Counting”

A Faithful Replica Of An Early Computer Trainer

Turn the clock back six decades or so and imagine you’re in the nascent computer business. You know your product has immense value, but only to a limited customer base with the means to afford such devices and the ability to understand them and put them to use. You know that the market will eventually saturate unless you can create a self-sustaining computer culture. But how does one accomplish such a thing in 1961?

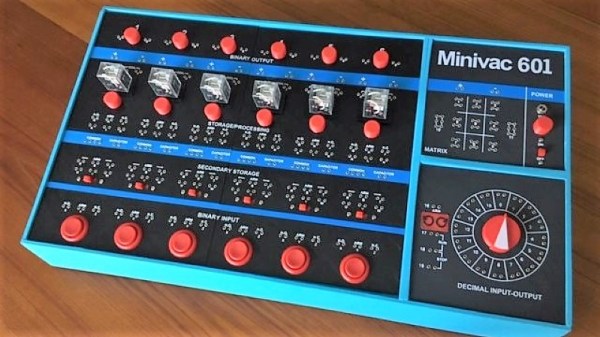
Enter the Minivac 601. The brainchild of no less a computer luminary than Claude Shannon, the father of information theory, the Minivac 601 was ostensibly a toy in the vein of the “100-in-1” electronics kits that would appear later. It used electromechanical circuits to teach basic logic, and now [Mike Gardi] has created a replica of the original Minivac 601.

Both the original and the replica use relays as logic switches, which can be wired in various configurations through jumpers. [Mike]’s version is as faithful to the original as possible with modern parts, and gets an extra authenticity boost through the use of 3D-printed panels and a laser-cut wood frame to recreate the look of the original. Sadly, the unique motorized rotary switch, used for both input and output on the original, has yet to be fully implemented on the replica. But everything else is spot on, and the vintage look is great. Extra points to [Mike] for laboriously recreating the original programming terminals with solder lugs and brass eyelets.

We love seeing this retro replica, and appreciate the chance to reflect on the genius of its inventor. Our profile of Claude Shannon is a great place to start learning about his other contributions to computer science. We’ve also got a deeper dive into information theory for the curious.

Thanks to [Granz] for the tip.