A Hacky Automatic Camera Slider Using No Motors

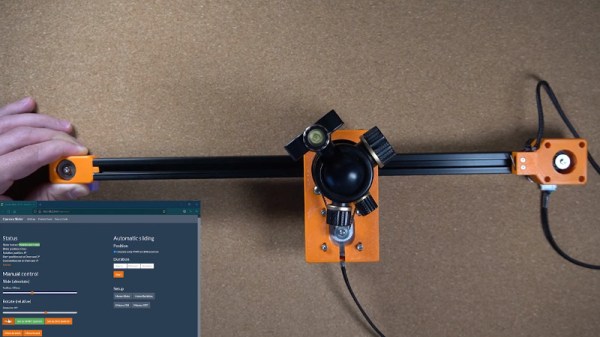
Camera sliders are a great way to get smooth, continuous panning shots. You can buy off the shelf or build yourself a motorized model pretty easily these days. However, [Shivam Dehinwal] came up with a hack that’s even simpler again.

The design uses a 3D-printed base which mounts the camera on top. Four wheels are installed underneath to allow the base to roll on smooth surfaces.

Inside the base, there’s a slot to install a Komelon Touch Lock measuring tape, with the tape’s auto-retract mechanism used to create the sliding function. Pressing the center disc on the measuring tape brakes the tape retract mechanism. The harder you press, the more it slows down.

In the slider, this is achieved with a screw-in puck that contacts the tape measure’s brake. Tighten the puck down, and the tape measure retracts very slowly, moving the slider at a crawl. Leave the puck loose, and the tape measure retracts more quickly for faster panning shots.

It’s a neat way to build a camera slider, of which we’ve seen many before in the past. It never needs batteries and adjustment is as easy as turning a screw. Sometimes the simple ways have their charms. Video after the break.

Continue reading “A Hacky Automatic Camera Slider Using No Motors”

Motorized Camera Mount Was Once A 3D Printer

If you plan on building your own motorized camera mount, a 3D printer can definitely be of help. But in this case, [dslrdiy] didn’t use it for printing out parts — finding himself with little use for an old printer built from scrap back in the day, he decided to repurpose it and turn it into a remote controlled DSLR camera mount that’s capable of panning, tilting, and sliding.

The main goal was to not only salvage the stepper motors and controller board, in this case an Arduino Mega 2560 with RAMPS board, but also to keep the original firmware itself in use. For this to work, [dslrdiy] redesigned the mechanical parts that would allow him to perform the different camera movements using regular G-Code instructions operating the X, Y, and Z axes to pan, tilt, and slide respectively.

The G-Code instructions themselves are sent via UART by an accompanying control box housing an ESP32. This allows the camera mount to operated by either via joystick and buttons, or via serial Bluetooth connection, for example from a phone. The ESP32 system also allows to set predefined positions to move to, along with speed and other motor tweaks. You can see it all demonstrated in the video after the break.

While there’s simpler solutions for camera mounts out there, this is certainly an interesting approach. It also shows just how far desktop 3D printers have come if we already find the older generations repurposed like this. For more of [dslrdiy]’s work with 3D printers and cameras, check out his customizable lens caps.

Continue reading “Motorized Camera Mount Was Once A 3D Printer”

The project's hardware, including the ESP32 camera module, stuffed into the GoPro-intended waterproof shell. The camera portion of the ESP32 module sticks out exactly where the GoPro's camera would be. To the left, a hacked ESP32-CAM module is shown.

Hackaday Prize 2022: Solar-Harvesting ESP32 Camera Is Waterproof, Repeatable

[alberto nunez] shows off his sleek build of a solar-harvesting ESP32 camera – waterproof, somewhat energy-efficient, and able to be built by more-or-less anyone. For that, he’s chosen fairly jellybean components – an ESP32-CAM module with a matching protoboard, a small solar cell, a LiFePO4 battery, and a waterproofed GoPro shell that all of these parts neatly fit into.

A BQ25504 energy harvesting chip is used to ensure the ‘solar’ part of the project can meaningfully contribute to the project’s power budget, with energy otherwise mainly provided by the LiFePo4 battery. Since this battery’s nominal voltage is 3.2 V, it can be wired straight to ESP32’s power input and there’s no need for a regulator – thus, that one got mercilessly desoldered. [alberto] has also modded the board using a FET to gate power to the ESP32-CAM module’s camera, with all of these hacks bringing the board’s deep sleep current from 2.8 mA to 0.8 mA. Not great for a low-power device, but not terrible for something you can build so easily. Plus, it’s waterproof, dust-resistant, and quite robust!

These ESP32 camera modules are seriously nifty – we see them put to good use on the regular. Whether you need to detect motion in your Halloween project, decode your water meter readings, or perhaps merely a security camera, it’s worth having a few in your toolbox. Maybe even pick up a programming helper for these while you’re at it!

Digital “Toy” Camera, Made For Tilt-Shift And Other Analog-Like Experimenting

Like many others, [volzo] loves playing with photography in a playful and experimental way. Oddball lenses, vintage elements, and building from kits is what that world looks like. But that kind of stuff is really the domain of film cameras, or at least it was until [volzo] created his Digital Toy Camera design. The result? A self-built, lomography-friendly digital camera that allows for all kinds of weird and wonderful attachments and photo shenanigans.

3D-printed mounts and magnetic attachment makes swapping parts a breeze.

To make a DIY digital camera that allowed that kind of play, the first problem [volzo] had to solve was deciding on an image sensor. It turns out that sourcing image sensors as an individual is a pretty cumbersome process, and even if successful, one still needs to write a driver and create things from the ground up. So, the guts of [volzo]’s creations use the Raspberry Pi and camera sensor ecosystem and M12 lenses, a decision that allows him to focus on the rest of the camera.

3D printing, a bit of CNC machining, and some clever design yields a “toy” camera: simple, inexpensive, and enabling one to take a playful and experimental approach to photography. The design files are available on GitHub, and there are some neat elements to the design. Magnetic mounts allow for easy swapping of lens assemblies, and a M12 x 0.75 tap cuts perfect threads into 3D-printed pieces for M12 lenses.

Heat-set inserts also provide robust fastening that can hold up to disassembly and re-assembly (and don’t miss that our own [Joshua Vasquez] has shared how best to design for and use heat-set inserts.)

[volzo] has a fantastic video to accompany his project; give it a watch (embedded below, under the page break) and see if you don’t come away with some inspiration of your own.

Continue reading “Digital “Toy” Camera, Made For Tilt-Shift And Other Analog-Like Experimenting”

Game Boy Repurposed Solely As A Camera

As much as we all love the Game Boy Camera, it’s really just an add-on to the popular handheld console. Twitter user [@thegameboycam] decided to build a dedicated camera platform using the hardware, and the result was the Game Boy DSLR.

Camera pedants will note that it’s not really a DSLR, but that’s not really the point. It’s a Game Boy with the camera accessory built into a proper camera-like housing. There’s a CS/C mount for the lens, and it’s got a custom shell with leatherette, just like the cameras of last century. It’s also got a cold shoe, and a 1/4″ screw thread for tripod mounting. Oh, and strap lugs! So you can really rock that old-school aesthetic with your tweed suit on.

More practical modern features include a 1800 mAh battery that charges over USB Type C and a backlit IPS display. The screen has been turned through 90 degrees, and the cartridge port and buttons are relocated to create a more traditional camera-like form factor. If you really want, though, you can still play it like a regular Game Boy. Just swap out the modified camera cart with the lens mount for a regular Game Boy Camera or another game cartridge.

It’s a fun hack that scores big on style points. No longer can you be the cool kid just by rocking a Game Boy with a big ol’ lens hanging off the back. Now you gotta compete with this!

Our tipsline is waiting for when you’ve got the next big thing in Game Boy Camera hacks. Video after the break.

Continue reading “Game Boy Repurposed Solely As A Camera”

ESP32 Camera Slider Build Keeps Things In Perspective

We’ve seen a lot of camera slider builds here at Hackaday, and for good reason: having one really lets you take your project documentation, especially videos, to the next level. It’s one of those force multiplier builds — after you’ve completed it, it can help you make all your future projects just that much better. But we’re also no strangers to seeing these projects become overly complex, which can often make it difficult for others to replicate.

But that’s not the case here. The motorized camera slider that [Sasa Karanovic] recently sent our way does exactly what you’d expect, and little else. That’s not meant as a dig — sometimes the best approach is to keep it simple. Unless you’re a professional photographer or videographer, it’s unlikely you need a complicated motion rig. This design is perfect for the hacker or maker who wants to spruce up their project videos, but doesn’t want to spend months fiddling with the design. Continue reading “ESP32 Camera Slider Build Keeps Things In Perspective”

Scratch-Built Industrial Camera’s Modular Design Really Stacks Up

The news here isn’t so much that [Guarav Singh] built this high-quality industrial digital camera from scratch, but it’s in the way it was accomplished. That plus the amount of information that’s packed into the write-up, of course. And the excellent photography.

Modularity was one of [Guarav]’s design goals, with the intention of being able to swap out the sensor as the technology changes. To that end, [Guarav] came up with a stack of three PCBs. The middle board of the stack contains a Lattice FPGA chip along with two 16-MB RAMs and the FPGA config flash. The sensor board lies on one side of the FBGA board, while the USB 3.0 board is on the other. Each six-layer board is a masterpiece of high-density design, and the engineering that went into interfacing them and getting everything squeezed into a 3D-printed case with an integrated aluminum C-mount ring is pretty impressive.

[Guarav]’s write-up goes into a great deal of detail on processing the sensor data on the FPGA. Also, there’s quite a bit of practical information on implementing MIPI (Mobile Industry Processor Interface) and the CSI (Camera Serial Interface) specification. We’ve delved into this world before, but this project is a great hands-on explanation that might really help move your MIPI project along.

Thanks for the tip, [STR-alorman].