As if the war in Ukraine weren’t bad enough right here on Earth, it threatens knock-on effects that could be felt as far away as Mars. One victim of the deteriorating relationships between nations is the next phase of the ExoMars project, a joint ESA-Roscosmos mission that includes the Rosalind Franklin rover. The long-delayed mission was most recently set for launch in October 2022, but the ESA says that hitting the narrow launch window is now “very unlikely.” That’s a shame, since the orbital dynamics of Earth and Mars will mean that it’ll be 2024 before another Hohmann Transfer window opens. There are also going to be repercussions throughout the launch industry due to Russia pulling the Soyuz launch team out of the ESA’s spaceport in Guiana. And things have to be mighty tense aboard the ISS right about now, since the station requires periodic orbital boosting with Russian Progress rockets.
Retro Serial Terminal Uses Modern Chips To Get CP/M Machine Talking
The hobbyists of the early days of the home computer era worked wonders with the comparatively primitive chips of the day, and what couldn’t be accomplished with a Z80 or a 6502 was often relegated to complex designs based on logic chips and discrete components. One wonders what these hackers could have accomplished with the modern components we take for granted.
Perhaps it would be something like this minimal serial terminal for the current crop of homebrew retrocomputers. The board is by [Augusto Baffa] and is used in his Baffa-2 homebrew microcomputer, an RC2014-esque Z80 machine that runs CP/M. This terminal board is one of many peripheral boards that plug into the Baffa-2’s backplane, but it’s one of the few that seems to have taken the shortcut of using modern microcontrollers to get its job done. The board sports a pair of ATmega328s; one handles serial communication with the Baffa-2 backplane, while the other takes care of running the VGA interface. The card also has a PS/2 keyboard interface, and supports VT-100 ANSI escapes. The video below shows it in action with a 17″ LCD monitor in the old 4:3 aspect ratio.
We like the way this terminal card gets the job done simply and easily, and we really like the look of the Baffa-2 itself. We also spied an IMSAI 8080 and an Altair 8800 in the background of the video. We’d love to know more about those.
Continue reading “Retro Serial Terminal Uses Modern Chips To Get CP/M Machine Talking”
Putting The ‘Go’ In Frisbee Golf With A Robot Launcher
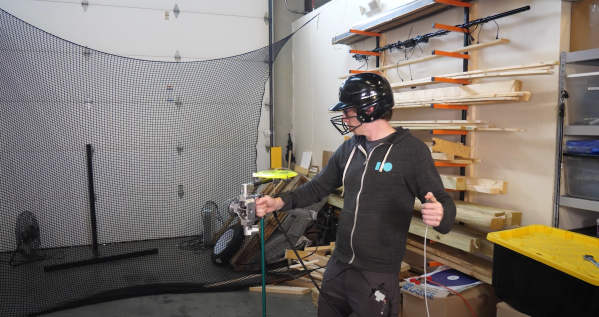
If you’ve gone to a local city park lately, you might have noticed strange metal baskets on poles with chains dangling free. These baskets are spread out throughout the park seemingly at random. For the uninitiated, Frisbee golf (sometimes known as disc golf) is a confusing concept. You might not think it, but Frisbee golf can be a very big deal to some people. [Stuff Made Here] is back with a disc launcher that he hopes will put all the disc golfers to shame.
It’s no secret that we here at Hackaday are big fans of [Stuff Made Here], or [Shane] (he has his own tag after all), and for obvious reasons — the CAD design process, the careful machining and testing, and the extremely high bar that [Shane] sets for his projects. This one is no different, and it is a tale of iteration and scaling. He started out with a simple goal: break the speed record for a thrown Frisbee.
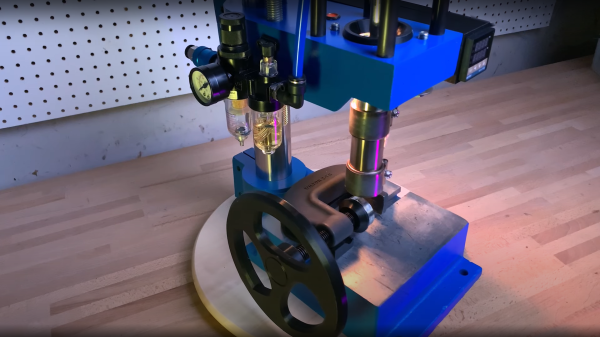
An initial design was decided upon based on high-pressure air pushing a piston to throw the Frisbee off of an arm. Initially, the arm was way too slow as the airflow was severely restricted due to air solenoids and pressure regulators. After fixing all those problems by fabricating his own solenoid and adding a secondary tank with no regulator, the arm started really moving. However, [Shane] wanted it to be able to be arm-mounted, so making sure the torque wouldn’t melt his arm bones was an important priority.
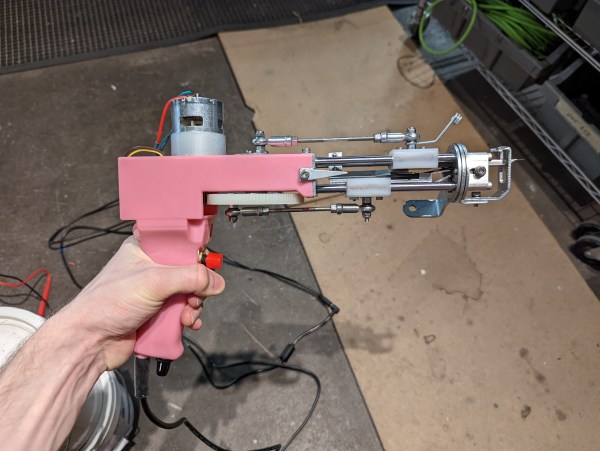
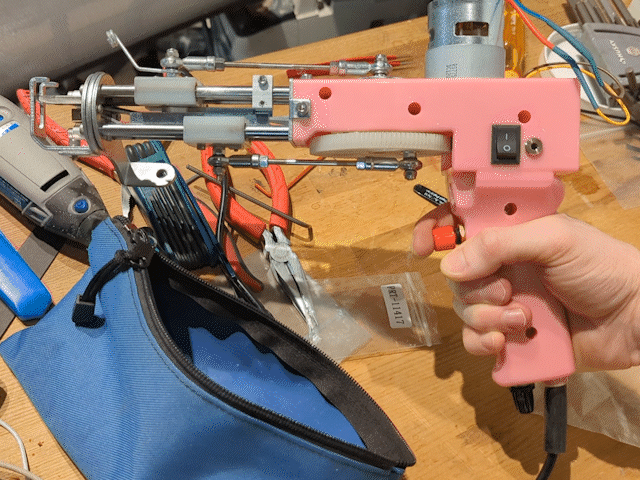
A counterbalance was added to cancel it out, but that ended up causing additional problems down the road, so the throwing arm had to be made as light as possible. The gripper mechanism had to be redesigned again and again as each time the speed was increased, a new problem arose. Turns out that small plastic discs being accelerated at many G’s tend to deform and slip out of their holders, no matter how well engineered. So [Shane] switched to a clever new design to pull the Frisbee along rather than push. It was too dangerous to really be handheld, and the only tests while he was wearing it were at very low amounts of pressure and power.
Testing it in a wide-open field at full power showed promise and while he had plenty of speed, he wasn’t able to beat the distance record. Breaking the distance record is much harder as Frisbees aren’t really designed with the sheer acceleration that [Shane] is subjecting them to, and they want to flip. Additionally, the Frisbees are lacking the spin that would keep them more stable, and what we do as humans is quite difficult to reproduce. Maybe a larger-scale version of this disc launcher could be made that accepts Frisbees?
It’s incredible to watch this contraption come together as each part needs to be designed and machined first by [Shane]. Video after the break.
Continue reading “Putting The ‘Go’ In Frisbee Golf With A Robot Launcher”
Vintage Meter Repair? It’s Easier With X-Rays
Here’s an interesting and detailed teardown and repair of a Keithley 2001 7.5 Digit multimeter that is positively dripping with detail. It’s also not every day that we get to see someone using x-ray imaging to evaluate the extent of PCB damage caused by failed electrolytic capacitors.

Sadly, this particular model is especially subject to that exact vintage electronics issue: electrolytic capacitor failure and leakage. These failures can lead to destroyed traces, and this particular unit had a number of them (in addition to a few destroyed diodes, just for good measure.) That’s where the x-ray machine comes in handy, because some of the damage is hidden inside the multi-layer PCBs.
[Shahriar], perhaps best known as [The Signal Path], narrates the entire process of fixing up the high-quality benchtop multimeter in a video, embedded below (or you can skip directly to the x-ray machine being broken out.) [Shahriar] was able to repair the device, thanks in part to it being in relatively good shape, and having the right tools available. Older electronics are not always so cooperative; the older a device is, the more likely one is to run into physical and logical standards that no longer exist.
Continue reading “Vintage Meter Repair? It’s Easier With X-Rays”
How To Solder To Aluminum, Easily
[Ted Yapo] shared a method of easily and conveniently soldering to aluminum, which depends on a little prep work to end up only slightly more complex than soldering to copper. A typical way to make a reliable electrical connection to aluminum is to use a screw and a wire, but [Ted] shows that it can also be done with the help of an abrasive and mineral oil.
Aluminum doesn’t solder well, and that’s because of the oxide layer that rapidly forms on the surface. [Ted]’s solution is to scour the aluminum with some mineral oil. The goal is to scrape away the oxide layer on the aluminum’s surface, while the mineral oil’s coating action prevents a new oxide layer from immediately re-forming.
After this prep, [Ted] uses a hot soldering iron and a blob of solder, heating it until it sticks. A fair bit of heat is usually needed, because aluminum is a great heat conductor and tends to be lot thicker than a typical copper ground plane. But once the aluminum is successfully tinned, just about anything can be soldered to it in a familiar way.
[Ted] does caution that mineral oil can ignite around 260 °C (500 °F), so a plan should be in place when using this method, just in case the small amount of oil catches fire.
This looks like a simple technique worth remembering, and it seems easier than soldering by chemically depositing copper onto aluminum.
DIY Injection Molder Built From A Cheap Pneumatic Press
[Kurt Schaefer] was watching YouTube videos of people making molds for injection molding purposes using what he considered to be the toy 3018 CNC machines, and looking at the results, decided he needed a piece of the action. However, once you have molds, the next obvious issue to address is lack of access to an injection molding machine. But these things are expensive. As luck would have it, you can get a nice-looking pneumatic press for less than $350, and with a little more money spent, [Kurt] found he could convert it into a functional injection molding machine (video, embedded below), and get some half-decent results out of it.
After ordering the press on eBay, what eventually arrived was quite a mess, having clearly been inadequately packed for its weight, and had sustained some damage in transit. Despite this, it seemed the functional bits were fine, so [Kurt] decided to press on with the build. The first obvious change is the requirement of a heated chamber to deal with the feedstock material. Using an off-the-shelf injection molding chamber by buster beagle 3D, only a few standoffs and a support bracket needed machining in order to complete the mechanics. A common PID controller available from the usual suppliers, with some heat bands wrapped around the chamber, dealt with the injection temperature requirements, and some 3D printed enclosures wrapped it all up neatly.
After some initial wobbles, and a couple of hacks to the design, [Kurt] got some pretty good results out of this simple setup, and it appears to be pretty tune-able and repeatable, which will help maintain the quality of those results. In short, a neat hack of easy to get parts, and perhaps a welcome addition to a hackerspace near you?
3D printed parts are available on the Thingiverse page, as well as a Fusion360 CAD model. The shopping list for parts can be found in the video description, if you want to have a go at reproducing this.
We’ve seen a few DIY injection molding attempts over the years, like this slick plastic molding setup. Here’s one with 3D-printed molds, and if you just need something the right shape, you could just injection mold with a hot glue.
Continue reading “DIY Injection Molder Built From A Cheap Pneumatic Press”
Robotic Tufting Gun Fires Off CNC Textiles
Often used to make rugs, tufting is a process wherein a hollow needle is used to cram thread or yarn into fabric in some kind of pattern. This can be done by hand, with a gun, or with big machines. Some machines are set up to punch the same pattern quickly over and over again, and these are difficult to retool for a new pattern. Others are made to poke arbitrary patterns and change easily, but these machines move more slowly.
This robotic tufting system by [Owen Trueblood] is of the slow and arbitrary type. It will consist of a modified tufting gun strapped to a robot arm for CNC textile art. Tufting guns are manufactured with simple controls — a power switch, a knob to set the speed, and a trigger button to do the tufting. Once it’s affixed to the robot arm, [Owen] wants to remote control the thing.
The gun’s motor driver is nothing fancy, just a 555 using PWM to control a half H-bridge based on input from the speed control potentiometer. [Owen] replaced the motor controller with an Arduino and added an I/O port. The latter is a 3.5 mm stereo audio jack wired to GND and two of the Arduino’s pins. One is a digital input to power the gun, and the other is used as an analog speed controller based on input voltage. [Owen] is just getting started, and we’re excited to keep tabs on this project as the gun goes robotic.
This isn’t the first time we’ve seen robots do textiles — here’s a 6-axis robot arm that weaves carbon fiber.


