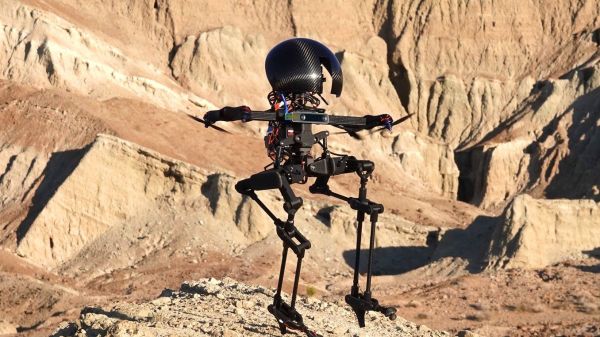
Decoding SMD Part Markings

You’ve probably encountered this before — you have a circuit board that is poorly documented, and want to know the part number of a tiny SMD chip. Retro computer enthusiast [JohnK] recently tweeted about one such database that he recently found, entitled The Ultimate SMD Marking Codes Database. This data base is only a couple of years old judging from the Wayback Machine, but seems to be fairly exhaustive and can be found referenced in quite a few electronics forums.

Unlike their larger SMD siblings, these chips in question are so small that there is no room to print the entire part number on the device. Instead, the standard practice is for manufacturers use an abbreviated code of just a few characters. These codes are only unique to each part or package, and aren’t necessarily unique across an entire product line. And just because it is standard practice does not imply the marking codes themselves follow any standard whatsoever. This seemingly hodgepodge system works just fine for the development, procurement and manufacturing phases of a product’s lifecycle. It’s during the repair, refurbishment, or just hacking for fun phases where these codes can leave you scratching your head.

Several sites like the one [JohnK] found have been around for years, and adding yet another database to your toolbox is a good thing. But none of them will ever be exhaustive. There’s a good reason for that — maintaining such a database would be a herculean task. Just finding the part marking information for a known chip can be difficult. Some manufacturers put it clearly in the data sheet, and some refer you to other documentation which may or may not be readily available. And some manufacturers ask you to contact them for this information — presumably because it is dynamic changes from time to time. Continue reading “Decoding SMD Part Markings”

Vintage Computer Festival East Reboots This Weekend

We don’t have to tell the average Hackaday reader that the last two years have represented a serious dry spell for the type of in-person events that our community has always taken for granted. Sure virtual hacker cons have their advantages, but there’s nothing quite like meeting up face to face to talk shop with like-minded folks and checking out everyone’s latest passion project.

Luckily for classic computer aficionados, especially those on the East Coast of the United States, the long wait is about to end. After being forced to go virtual last year, Vintage Computer Festival East will once again be opening their doors to the public from October 8th to the 10th at the InfoAge Science & History Center in Wall, New Jersey. Attendees will need to wear a mask to gain access to the former Camp Evans Signal Corps R&D laboratory, but that’s a small price to pay considering the impressive list of exhibits, presentations, and classes being offered.

In fact, it’s shaping up to be the biggest and best VCF East yet. The Friday classes cover a wide range of topics from CRT repair to implementing a basic video controller with a FPGA, and the list of speakers include early computer luminaries such as Michael Tomczyk, the Product Manager for the VIC-20, and Adventure International founder Scott Adams. A little birdie even tells us that if you bring your copy of Back into the Storm, our very own Bil Herd will be sign it for you after his talk on the history of the Commodore wraps up Saturday evening.

If you’d rather get hands-on you can always take a walk over to the Computer Deconstruction Laboratory, InfoAge’s on-site hackerspace. Glitch Works will be on hand with several popular kits such as the XT-IDE, an 8-bit ISA adapter that lets you connect (relatively) modern drives to classic machines, and the R6501Q/R6511Q Single Board Computer. A bit rusty with the iron and would rather start on something a little easier? Not to worry. Neil Cherry, a staple of the Hackaday comment section since before we switched to color pictures, will be instructing hackers young and old in the ways of the flux during his all-day soldering classes.

Of course, no VCF trip is truly complete until you’ve searched for treasure in the consignment room. The space has been expanded for 2021, and considering how long folks have had to clean out their attics and garages thanks to the pandemic, we’re expecting a bumper crop of interesting hardware to wade through. If the turnout for the VCF Swap Meet in April was any indication, we’d suggest bringing some extra cash with you.

As a proud sponsor of the 2021 Vintage Computer Festival East, Hackaday will naturally be bringing you a first-hand account of the overall event as well as a deeper look into some of the incredible exhibits on display in the very near future. But words and pictures on a page can only go so far. If you’ve grown tired of virtual events and are looking to peek your head out, we can guarantee a trip to InfoAge this weekend will be well worth the gas money for anyone within driving distance.

Furter Burner Cooks The Wieners Just So

Sometimes you’re hungry for two sausages, and not a sausage more. [Wesley] designed his Furter Burner to handle precisely these situations, and it looks to cook up a pair of wieners a treat. (Video, embedded below.)

The process starts with a couple of wooden stunt wieners, and some foam board, with which [Wesley] roughs out a design. From there, a CAD design is drawn up and parts routed out of compressed board to troubleshoot the assembly further. Later moving on to a plywood version, having a wooden prototype quickly reveals plenty of things to improve, from adding handles to the grill surface to air holes to allow combustion.

The design goes through a couple of further iterations in metal before completion. The final result is impressive—resulting in a twin-wiener cooker that burns coals, complete with skewers for easy sausage handling and bearing [Wesley’s] own logo.

The video shows off the benefits of the iterative design process. It also demonstrates why it often makes sense to rough out designs in cheaper materials before going to the heavy stuff, particularly in a case like [Wesley]’s where the metal parts can only be cut off-site. Refining the design in-house first saves a lot of mucking around.

We’ve seen [Wesley]’s work before, too – like this impressive workshop storage solution.

Continue reading “Furter Burner Cooks The Wieners Just So”

Art of 3D printer in the middle of printing a Hackaday Jolly Wrencher logo

3D Printering: Corrugated Plastic For Cheaper & Easier Enclosures

Clear acrylic panels have long been a mainstay of 3D printer enclosure designs, but they can also add significant cost in terms of money, shipping, weight, and hassle. An alternative material worth looking at is corrugated plastic (also known by its trade name coroplast) which is cheap, light, an excellent insulator, and easy to work with. Many enclosure designs can be refitted to use it instead of acrylic, so let’s take a closer look at what it has to offer.

What’s Wrong With Acrylic?

It’s not just the purchase price that makes acrylic a spendy option. Acrylic is fairly heavy, and shipping pieces the size of enclosure panels can be expensive. Also, cutting acrylic without special tools can be a challenge because it cracks easily if mishandled. Acrylic cuts beautifully in a laser cutter, but most laser cutters accessible to a hobbyist are not big enough to make enclosure-sized panels. If you are stuck with needing to cut acrylic by hand, here are some tips on how to get by with the tools you have.

It is best to source acrylic from a local shop that can also cut it to size with the right tools for a reasonable price, but it is still far from being a cheap material. There’s another option: corrugated plastic has quite a few properties that make it worth considering, especially for a hobbyist.

Continue reading “3D Printering: Corrugated Plastic For Cheaper & Easier Enclosures”

Building A Multi-Ton Power Loader For Fun

Exoskeletons, power suits, and iron suits in science fiction have served as the inspiration for many engineers and engineering projects over the years. This is certainly the case at [Hacksmith Industries], where Hackaday alum [James Hobson] has been building a massive mechanical exoskeleton since January 2019, inspired by the P-5000 Power Loader from the Alien movies. (Video, embedded below.)

Unlike the movie version, the [Hacksmith] power loader is not bipedal but built on top of the chassis of a small tracked skid-steer loader. Its existing hydraulic power unit also feeds all the upper body hydraulic cylinders. The upper body maintains the basic look of the movie version and was built from plasma-cut steel sections that fit together with a tab and slot system before being welded. Each arm has five degrees of freedom, controlled by proportional hydraulic valves. The power loader is controlled by an industrial grade control system based on the Raspberry Pi, running ROS.

Every single actuator is capable of applying enough force to kill, so safety is an important consideration in the design. It has emergency stop buttons mounted in several locations, including on a wireless remote. The ROS controller monitors the position of every cylinder using string potentiometers for closed-loop control, and to trigger the emergency stop if an actuator goes out of bounds. The power loader can be controlled by the onboard pilot using a pair of simulator flight controller joysticks, or remotely using a PS4 controller.

[Hacksmith Industries] is clear about the fact that they are building multi-ton power loaded for fun and entertainment, not because it’s necessarily practical or a commercially viable product. However, other exoskeletons have proven that they are a viable solution for reducing fatigue and risk of injury for industrial workers, and carrying heavy loads in rough terrain.

Continue reading “Building A Multi-Ton Power Loader For Fun”

An Atari ST running a campground reservation system

Atari ST Still Manages Campground Reservations After 36 Years

“Don’t fix it if it ain’t broke”. That’s what we guess [Frans Bos] has been thinking for the past few decades, as he kept using his Atari ST to run a booking system for the family campground. (Video, embedded below.)

Although its case has yellowed a bit, the trusty old machine is still running 24/7 from April to October, as it has done every year since 1985. In the video [Frans] demonstrates the computer and its custom campground booking system to [Victor Bart].

To be exact, we’re looking at an Atari 1040STF, which runs on a 68000 CPU and has one full megabyte of RAM: in fact it was one of the first affordable machines with that much memory. Output is through a monochrome display, which is tiny compared to the modern TFT standing next to it, but was apparently much better than the monitor included with a typical DOS machine back in the day.

Since no campground management software was available when he bought the computer, [Frans] wrote his own, complete with a graphical map showing the location of each campsite. Reservations can be made, modified and printed with just a few keystrokes. The only concession to the modern world is the addition of a USB drive; we can imagine it was becoming difficult to store and exchange data using floppy disks in 2021.

We love seeing ancient hardware being actively used in the modern world: whether it’s floppy disks inside a Boeing 747 or an Amiga running a school’s HVAC system. Thanks to [Tinkerer] for the tip.

Continue reading “Atari ST Still Manages Campground Reservations After 36 Years”

A breadboard full of chips

BreadBin Is An 8-bit TTL CPU On A Breadboard, In A Bread Bin

Building a CPU out of logic gates is a great way to learn about the inner workings of microprocessors, and we’ve seen several impressive projects in this area. [c0pperdragon] set himself the task of designing a very capable 8-bit CPU using just 74HC type logic chips on a large plug-in breadboard. To emphasize the “bread” theme, he put the whole thing inside an actual bread bin and named the accompanying software BERND after an anthropomorphic loaf from a German TV channel.

Getting a reliable breadboard big enough for the task at hand required some engineering by itself: cheap breadboards often have trouble making a reliable contact at each and every pin, while the length of the ground path and lack of shielding cause trouble for high-speed circuits. [c0pperdragon] therefore bought high-quality breadboards and soldered the ground wires together to get a proper low-resistance path. A ground plane made of aluminium foil should also help to prevent signal integrity issues.

A breadboard computer inside a wooden bread binThe total circuit is incredibly compact for a complete CPU, using just 33 chips. This includes 64 KB of flash to store programs as well as a 555 timer to generate a clock signal. I/Os are limited to simple eight-bit input and output buses, but a sixteen-bit address bus gives it plenty of space to add ROM, RAM or fancier interfaces.

The aforementioned BERND program is an emulator that allows the BreadBin to run code written for the 65C816 processor, the 16-bit CPU used in the Super Nintendo and the Apple IIGS. This makes it easy to re-use programs developed for [c0pperdragon]’s earlier OS816 system, which uses an actual 65C816 chip.

This has to be one of the cleanest breadboard CPU designs we’ve seen so far, certainly a lot cleaner than this one. If you’d like to watch a detailed guide to building an 8-bit CPU on a breadboard, we recommend this project.