Join us on Wednesday, March 2 at noon Pacific for the Logic Simulation Hack Chat with Al Williams!
Many of us probably remember — some fondly, some less so — our first encounter with a truth table. The little grid of ones and zeros seemed simple enough, but it held real power in its tabular representation of the output of a logic circuit for a given set of inputs. It’s what makes more complex logic circuits possible, but only up to a point — add enough gates, flip flops, and counters, and keeping track of what’s high and what’s low becomes problematic with just pencil and paper.
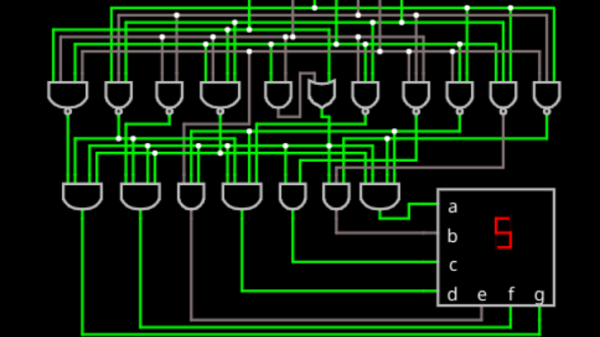
If you’ve reached the point where keeping your digital design in your head doesn’t work anymore, or if you never could keep your NANDs and NORs straight, then you’re ready for a digital logic simulator. Applications like Falstad and LogiSim let you build a design using everything from discrete logic gates to complete assemblies like adders, counters, and even arithmetic logic units. Add in some passives like capacitors and inductors, and a logic simulator may be the only tool you need to bring a design to life in the virtual world before ever touching a breadboard.
 To help us figure out where logic simulators fit in our design processes, Hackaday Staff Writer Al Williams will hop onto the Hack Chat with us. Al ran a very successful FPGA Bootcamp series back in 2018, which included a review of digital logic using Falstad. He’ll expand on that in this Hack Chat, so come along with your questions and comments. You won’t want to miss this one!
Our Hack Chats are live community events in the Hackaday.io Hack Chat group messaging. This week we’ll be sitting down on Wednesday, March 2 at 12:00 PM Pacific time. If time zones have you tied up, we have a handy time zone converter.
Continue reading “Logic Simulation Hack Chat With Al Williams”