Disguising The PS5 With A Custom Wood And Carbon Fiber Enclosure

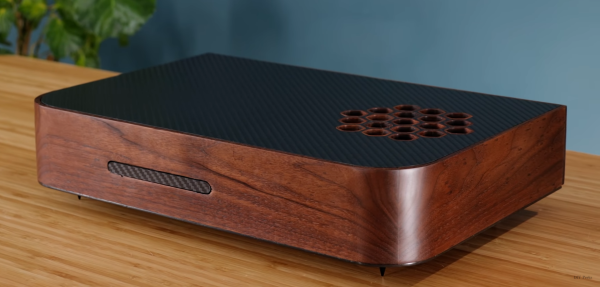
The PlayStation 5 has a very distinctive enclosure that some love and others hate. Its design certainly does not lend itself to lying on its side, even though this is a more practical orientation for putting on a shelf in a TV console. [Matt] from [DIY Perks] decided to address this and built a custom wood and carbon fiber PS5 enclosure that looks good in any orientation.

He started by disassembling his PS5 and taking out only the main electronics unit, fan, and power supply. These were mounted on a carbon fiber baseplate using hexagonal threaded standoffs. The sides of the enclosure were constructed from dark walnut, with holes cut in the front and back for connectors and airflow. A long recess was cut in the front hole and covered with an ingenious carbon fiber cover which opens if you press it at one end and acts as the power button if you press it at the other end.

Matt paid close attention to the airflow routing of the original enclosure and copied it to the new one. Like the original, he used adhesive foam strips to direct the air through the heat sinks. The top cover is also carbon fiber, with an elegant honeycomb hole pattern with wood inserts for the air intake.

This is not [Matt]’s first custom PS5 enclosure. The other was a significantly more flashy brass incarnation of the original. Other custom enclosure he’s made include a wood PC case and a brass encased USB-C monitor. Continue reading “Disguising The PS5 With A Custom Wood And Carbon Fiber Enclosure”

NeoPill Is The NeoPixel Emulator You’ve Always Wanted

NeoPixels and other addressable LED strings are a technology that have made vibrant, glowing LED projects accessible to all. Of course, it’s nice to be able to simulate your new glowy project in software before you actually set up your LED strings in practice. [Randy Elwin]’s NeoPill simulator can help with that!

The NeoPill consists of an STM32F103 development board, into which one simply hooks up a NeoPixel data line. The microcontroller then decodes the data using a combination of its onboard timers and SPI hardware. This data is then passed to a PC over the onboard USB serial connection, where it’s decoded by a custom Python app. The app takes the data and displays the pixels on screen, so you can verify they operate as expected before you hook up a single real LED.

It’s a great tool, one that costs very little and yet does the job well. It can even be used with LEDs in circuit to verify if problems are related to the data output or the hardware itself. [Randy] demonstrates the software working with strings of up to 256 LEDs at once; we’d love to see how far it can be pushed before breaking. Code is available on Github for those keen to get their own NeoPill operational.

It’s not the only NeoPixel simulator out there, but it is the first one we’ve seen that can be used to debug actual signals from real hardware, and that’s an incredibly useful thing to have in your toolbelt. Video after the break.

Continue reading “NeoPill Is The NeoPixel Emulator You’ve Always Wanted”

High Voltage Gives Metal Balls A Mind Of Their Own

Have you ever seen something that’s so fascinating you’re sure there has to be some kind of practical application for it, but you just can’t figure out what? That’s how we feel when watching tiny ball bearings assemble themselves into alien-like structures under the influence of high voltage in the latest Plasma Channel video from [Jay Bowles].

Now to be clear, [Jay] isn’t trying to take credit for the idea. He explains that researchers at Stanford University first documented the phenomenon back in 2015, and that his goal was to recreate their initial results as a baseline and go from there. The process is pretty simple: put small metal ball bearings into a tray of oil, apply high voltage, and watch them self-assemble into “wires” that branch out in search of the ground terminal like a plant’s roots looking for water. With the encouragement of his 500,000 volt Van de Graaff generator, the ball bearings leaped into action and created structures just like in the Stanford study.

With the basic pieces now in place, [Jay] starts to push the envelope. He experiments with various oils to see how their viscosity impacts the ball’s ability to assemble, finding that olive oil seems to be the ideal candidate (at least of those he’s tried so far). He also switches up the size and shape of the tray, to try and find how far the balls can realistically stretch out on their own.

In the end we’re no closer to finding a practical application for this wild effect than the good folks at Stanford were back in 2015, but at least we got to watch the little fellows do their thing in glorious 4K and with the exceptional production value we’ve come to expect from Plasma Channel. That said, [Jay] does hint at his ongoing efforts to turn the structures into works of art by “freezing” them with clear resin, so keep your eyes out for that.

Continue reading “High Voltage Gives Metal Balls A Mind Of Their Own”

Ptychography Shows Atoms At Amazing Resolution

Cornell University enhanced electron microscopy using a technique known as ptychography in 2018. At the time, it allowed an electron microscope to resolve things three times smaller than previously possible. But that wasn’t enough. The team has now doubled that resolution by improving on their previous work.

The team says that the images are so precise that the only blurring is due to the thermal motion of the atoms themselves. This could mean that you won’t see a further improvement in resolution in the future.

Continue reading “Ptychography Shows Atoms At Amazing Resolution”

Putting LEDs In Motorcyle Tail Light Shows How Trivial Becomes Tough

[Maarten Tromp]’s replacement of his motorcycle’s tail light with LED equivalents is a great example of something that every hacker learns sooner or later: interfacing to and working around existing parts can turn a trivial-seeming task into a much bigger job than expected. The more one has to work within the constraints of an existing system, the more opportunities there are for roadblocks and surprise issues to stall progress, and this project is a great example of that.

[Maarten]’s 1999 Honda ST1100 Pan European motorcycle had no aftermarket options for an LED rear light assembly, and he wasn’t too keen on just installing a generic module to replace the original. Instead, he resolved to purchase and disassemble a used factory assembly, and replace the incandescent lamps with some equivalent LEDs. Replacing bulbs with LEDs sounds easy, but doing the job right took [Maarten] almost two weeks in the end.

Problems started early with simple things like how to open up the light assembly itself. The unit isn’t user-serviceable and isn’t intended to be opened, and the parts are sealed shut with a waxy substance. Fortunately, heat does the trick. Another early hitch was the curved base of the light assembly, which made mounting flat perfboard or veroboard a challenge. In the end, [Maarten] settled on a triangular grid of high-brightness LEDs,  driven with LM317 regulators configured as constant-current supplies, mounted on some protoboard cut to fit the unique curve of the assembly. The result accepts the wide voltage range of the motorcycle’s battery (from 10.5 V to 14.5 V) and can still function even if some individual LEDs stop working.

The project has one more example of how working around existing hardware can be a pain. [Maarten] had originally intended to swap out the turn signal lamps for LEDs as well, but there is a glitch. The motorcycle’s turn signal relay will do a fast blink pattern if burnt-out turn signal lamps are detected. Since LEDs consume considerably less current than the original bulbs, the relay will remain stuck in the fault condition. There are a few different ways around this, but it’s a problem for another day. For now, the tail light LED replacement is a success.

Working around existing hardware frequently brings unexpected challenges, but when safety systems (such as lights on a vehicle) are involved, it’s extra-important to make sure things are done right.

3D Printed Joystick Using Spherical Flexure Joint

One of the many advancements brought about by 3D printing is the rapid development of compliant mechanisms and flexure joints. One such example is [jicerr]’s joystick, which uses a pair of spherical flexure joints recently developed by researchers from Delft University of Technology in the Netherlands, See the videos after the break.

Both flexure joint designs make use of tetrahedron-shaped elements, allowing an object to pivot around a fixed point in space like a ball-and-socket joint. One of the joints, named Tetra 2, is perfect for printing on a standard FDM printer, and the 3D files were uploaded to Thingiverse by [Jelle_Rommers], one of the researchers. [jicerr] took the design and created a base to mount an HMC5883 3-axis magnetometer a short distance from the focal point, which senses the rotation of a small magnet at the focal point. An Arduino takes the output from the magnetometer, does the necessary calculation, and interfaces to a PC as a joystick. Demonstrates this by using it to rotate and pan the design in Solidworks. One thing to keep in mind with this design is that it needs a fixed base to prevent it from moving around. It should also be possible to integrate the design directly into the housing of a controller.

Another amusing application is to turn it into a pen holder with a chicken head on the front, as demonstrated by [50Pro]. If you have any ideas for other applications, drop them in the comments.

Compliant mechanisms have a number of interesting applications, including harmonic drives, dial indicators and thrust vectoring mounts.

Continue reading “3D Printed Joystick Using Spherical Flexure Joint”

Robot Arm Adds Freedom To 3D Printer

3D printers are an excellent tool to have on hand, largely because they can print other tools and parts rapidly without needing to have them machined or custom-ordered. 3D printers have dropped in price as well, so it’s possible to have a fairly capable machine in your own home for only a few hundred dollars. With that being said, there are some limitations to their function but some of them can be mitigated by placing the printer head on a robot arm rather than on a traditional fixed frame.

The experimental 3D printer at the University of Nottingham adds a six-axis robotic arm to their printer head, which allows for a few interesting enhancements. Since the printer head can print in any direction, it allows material to be laid down in ways which enhance the strength of the material by ensuring the printed surface is always correctly positioned with respect to new material from the printer head. Compared to traditional 3D printers which can only print on a single plane, this method also allows for carbon fiber-reinforced prints since the printer head can follow non-planar paths.

Of course, the control of this printer is much more complicated than a traditional three-axis printer, but it is still within the realm of possibility with readily-available robotics and microcontrollers. And this is a hot topic right now: we’ve seen five-axis 3D printers, four-axis 3D printers, and even some clever slicer hacks that do much the same thing. Things are finally heating up in non-planar 3D printing!

Thanks to [Feinfinger] for the tip!

Continue reading “Robot Arm Adds Freedom To 3D Printer”