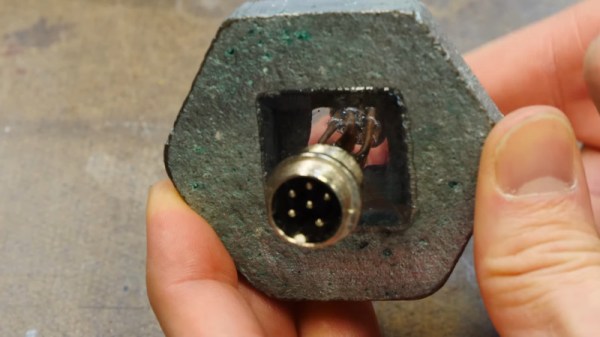
Axe Hacks: New Sounds For Your Electric Guitar Beginning From What Makes Them Tick

Creating music is a perfect hobby for anyone into hacking, and the amount of musical hacks and self-made instruments we come across here makes that supremely evident. It’s just a great match: you can either go full-on into engineering mode as music is in the end “just” applied physics, or simply ignore all of the theory and take an artistic approach by simply doing whatever feels right. The sweet spot is of course somewhere in between — a solid grasp of some music theory fundamentals won’t hurt, but too much overthinking eventually will.

The obvious choice to combine a favorite pastime like electronics or programming with creating music would be in the realm of electronic music, and as compelling as building synthesizers sounds, I’ll be going for the next best thing instead: the electric guitar. Despite its general popularity, the enormous potential that lies within the electric guitar is rarely fully utilized. Everyone seems to just focus on amp settings and effect pedals when looking for that special or unique sound, while the guitar itself is seen as this immutable object bestowed on us by the universe with all its predestined, magical characteristics. Toggle a pickup switch, and if we’re feeling extra perky, give that tone pot a little spin, that’s all there is to it.

The thing is, the guitar’s electrical setup — or wiring — in its stock form simply is as boring and generic as it can get. Sure, it’s a safe choice that does the job well enough, but there’s this entirely different world of tonal variety and individual controllability locked inside of it, and all it really takes is a screwdriver and soldering iron to release it. Plus, this might serve as an interesting application area to dive into simple analog electronics, so even if guitars aren’t your thing yet, maybe this will tickle your creativity bone. And if bass is more your thing, well, let me be ignorant and declare that a bass is just a longer guitar with thicker, lower-tuned strings, meaning everything that follows pretty much applies to bass as well, even if I talk about guitars.

However, in order to modify something, it helps to understand how it functions. So today, we’ll only focus on the basics of an electric guitar, i.e. what’s inside them and what defines and affects their tone. But don’t worry, once we have the fundamentals covered, we’ll be all settled to get to the juicy bits next time.

Continue reading “Axe Hacks: New Sounds For Your Electric Guitar Beginning From What Makes Them Tick”

A Monotrack Bike With Only Basic Tools And Parts

Tracked vehicles are cool, but can be quite complicated to build. [XenonJohn] wanted to skip the complexity, so he created Vector, an electric tracked motorcycle using only basic parts and tools. No machine tools required.

If it looks familiar, it’s because it was inspired by [Make It Extreme]’s monotrack motorcycle that we covered last year. [XenonJohn] liked the concept, but wanted one that was simpler to build. That meant ditching the custom machined parts like the wheels and the suspension system. These were replaced with three go cart wheels and axles mounted in pillow blocks, on a simple welded frame. An e-bike battery powers a 500 W golf cart motor that drives the rear wheel. Like [Make It Extreme]’s version, the track is an SUV tire with the sidewall cut off. [XenonJohn] used tin snips to do this, but from personal experience we would recommend a utility knife. This track design will have a tendency to collect debris inside it, so cutting some hole in the tread could help. As with most single wheeled/tracked vehicles, you really don’t want to try and stop quickly.

It looks like this bike works fine in straight lines, but there is room for improvement with the steering. [XenonJohn] has some ideas to do this, which we hope to see some time in the future. Let us know in the comments how you would make it turn better.

[XenonJohn] really like vehicles that can make you face plant. He built quite a few self-balancing motorcycles, one of which was supposedly designed with first responders in mind. It honestly seems more likely to create an emergency than respond to one.

Autonomous Rover Navigates The House With LIDAR

For those wishing to explore robot autonomy, there’s no better way then to learn by doing. [Greg] was in that camp, and decided to build an autonomous rover to roam his house, and learned plenty along the way.

[Greg]’s aims with the project were to build a robot that was capable of navigating his home without external assistance. To do the job, a Raspberry Pi 3 was put in charge, and kitted out with a LIDAR for mapping. Pololu Roboclaw motor controllers are then used to allow the Raspberry Pi to drive the robot’s individual wheel motors, giving the four-wheeled bot skid steering capability.

[Greg] goes into immense detail on the project’s writeup, exploring the code and concepts behind its autonomous abilities. Creating a robot that can navigate using LIDAR is no easy task, but [Greg] does a great job of explaining how it all works, and why.

It’s not the first autonomous rover we’ve seen here, and we’re sure it won’t be the last. If you’ve got your own build coming together in the lab, be sure to let us know. Video after the break.

Continue reading “Autonomous Rover Navigates The House With LIDAR”

Adding MIDI To A Mini Synth Is Easy As Pi

There are a handful of relatively dirt cheap synths out there like the KORG Monotron, but many of them use ribbon controllers that aren’t very precise.  Ribbon controllers basically slide pots that you operate with your finger or a stylus.  They’re painted to look like piano keys in order to show you approximately where the notes are supposed to be. The Stylophone is another extremely affordable synth that does even less as a synthesizer and uses this type of input. It’s a fun input if you don’t mind imprecision, but can be annoying otherwise.

[schollz] isn’t satisfied to synth this way, so they added MIDI input to their KORG Monotron using a Raspberry Pi and a DAC. Fortunately, the Monotron is quite the hackable little synth, with nice, big, labelled pads on the PCB.

All it really took was a couple of solder joints in the right places, plus a clever Python script. The script listens for MIDI input from a keyboard, and then controls an MCP4725 DAC, which sends voltages to the Monotron. [schollz] wrote a tuning function that computes the FFT of the MIDI tones to find the fundamental frequencies of each to send along to the Monotron. Check it out after the break.

If liquid control is what you’re after but all you have is a keyboard, try making your own ribbon controller.

Continue reading “Adding MIDI To A Mini Synth Is Easy As Pi”

A Motorcycle Dashboard Straight From The ECU

Classic motorcycles are the wild west of information displays. Often lacking even basic instrumentation such as a fuel gauge and sometimes even a speedometer, motorcycles have come a long way in instrument cluster design from even 20 years ago. There’s still some room for improvement, though, and luckily a lot of modern bikes have an ECU module that can be tapped into for some extra information as [Sophie Wheeler] illustrates with her auxiliary motorcycle dashboard.

This display is built for a modern Honda enduro, and is based upon an ESP32 module. The ESP32 is tied directly into the ECU via a diagnostic socket, unlike other similar builds that interface with a CAN bus specifically. It can monitor all of the bike’s activity including engine temperature, throttle position, intake air temperature, and whether or not the bike is in neutral. [Sophie] also added an external GPS sensor so the new display can also show GPS speed and location information within the same unit.

[Sophie] credits a few others for making headway into the Honda ECU. [Gonzo] created a similar build using a Raspberry Pi and more rudimentary screen but was instrumental in gathering the information for this build. If you’re looking for a display of any kind for your antique motorcycle which is lacking an ECU, though, we would suggest a speedometer made with nixie tubes.

Building A Cell Testing Station For 18650s

The 18650 is perhaps the world’s favorite lithium battery, even if electric car manufacturers are beginning to move towards larger cells such as the 21700. Used heavily in laptops and flashlights, it packs a useful amount of energy into a compact, easy to use package. There’s a small industry that has developed around harvesting these cells from old equipment and repurposing them, and [MakerMan] wanted to a piece of the action. Thus, he created a cell testing station to help in the effort.

Make no mistake, this is not a grandiose smart cell tester with 40 slots that logs every last iota of data into a cloud spreadsheet for further analysis. Nope, this is good old fashioned batch processing. [MakerMan] designed a single PCB that replicates the same cell testing circuit four times. Since PCB houses generally have a minimum order quantity of ten units, [MakerMan] ended up with forty individual cell testers on ten PCBs. Once populated, the boards were installed on a wooden frame with an ATX power supply which supplies the juice to run the system.

Overall, it’s a quick, cheap way for capacity testing cells en masse that should serve [MakerMan] well. We look forward to seeing where these cells end up. We’ve seen his work before, too – with a self-built laser engraver a particular highlight. Video after the break.

Continue reading “Building A Cell Testing Station For 18650s”

Circuit Board Origami Puts You Face-to-Face With Low-Poly Electronics

Paper craft has been around almost as long as paper itself. It’s fun to mimic paper craft and origami with low-poly 3D prints, and [Stephen Hawes] wondered whether it could be done with copper-clad PCBs. Two years after the question arose, we have the answer in the form of a fantastical mask with light-up eyes. Check it out in the video below.

[Stephen] started with a model (Update: [kongorilla]’s 2012 low poly mask model from back in 2012 was the starting point for this hack) from the papercraft program Pepakura Designer, then milled out dozens of boards. Only a few of them support circuitry, but it was still quite the time-consuming process. The ATmega32U4 on the forehead along with the fold-traversing circuitry serve to light up the WS2812B eyes. Power runs up the copper tube, which doubles as a handy mounting rod to connect to the 3D printed base.

Continue reading “Circuit Board Origami Puts You Face-to-Face With Low-Poly Electronics”