If you’ve been on the RTL-SDR forums lately you may have seen that a lot of work has been going into the DragonOS software. This is a software-defined radio group that has seen a lot of effort put into a purpose-built Debian-based Linux distribution that can do a lot of SDR out of the box. The latest and most exciting project coming from them involves a method for using the software to receive and demodulate analog video.
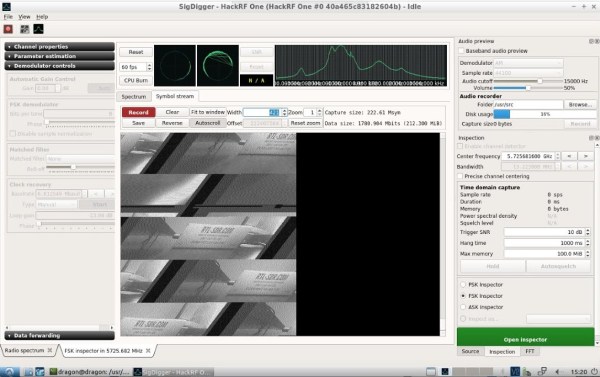
[Aaron]’s video (linked below) demonstrates using a particular piece of software called SigDigger to analyze an incoming analog video stream from a drone using a HackRF. (Of course any incoming analog signal could be used, it doesn’t need to be a drone.) The software shows the various active frequency ranges, allows a user to narrow in on one and then start demodulating it. While it has to be dialed in just right to get anything that doesn’t look like snow, [Aaron] is able to get recognizable results in just a few minutes.
Getting something like this to work completely in software is an impressive feat, especially considering that all of the software used here is free. Granted, this wouldn’t be as easy for a digital signal like most TV stations broadcast, but there’s still a lot of fun to be had. In case you missed the release of DragonOS, we covered it a few weeks ago and it’s only gotten better since then, with this project just as one example.
We begin with sad news indeed as we mark the passing of Marcel van Kervinck on Monday. The name might not ring a bell, but his project, the Gigatron TTL computer, certainly will. We did a deep dive on the microprocessor-less computer a while back, and Marcel was a regular at conferences and on the Gigatron forums, supporting users and extending what the computer can do. He was pretty candid about his health issues, and I’ll add that when I approached him a few weeks ago out of the blue about perhaps doing a Hack Chat about Gigatron, he was brutally honest about how little time he had left and that he wouldn’t make it that long. I was blown away by the grace and courage he displayed. His co-conspirator Walter Belger will carry on the Gigatron mission, including joining us for a Hack Chat on June 24. In the meantime, this might be a great time to pick up a Gigatron kit before they’re all sold out and get busy soldering all those delicious through-hole TTL chips.
May of 2020 is the month that never seems to end, and as the world’s focus seems to shift away from the immediate public health aspects of the ongoing COVID-19 pandemic to the long-term economic impact of the response to it, we happened across a very interesting article on just that topic. Mike Robbins from the Circuit Lab has modeled the economic impact of the pandemic using analog circuit simulations. He models people as charges and the flow of people between diseases states as currents; the model has capacitors to store the charge and allow him to measure voltages and filters that model the time delays needed for public policy changes to be adopted. It’s a fascinating mashup of engineering and policy. You can play with the model online, tweak parameters, and see what you come up with.
One of the things that the above model makes clear is that waiting to fully reopen the economy until a vaccine is ready is a long and dangerous game. But there has at least been some progress on that front, as Massachusetts biotech firm Moderna announced success in Phase 1 clinical trials of its novel mRNA vaccine against SARS-CoV-2. It’s important to temper expectations here; Phase 1 trials are only the beginning of human testing, aimed at determining the highest treatment dose that won’t cause serious side effects. Phase 2 and Phase 3 trials are much more involved, so there’s a long way to go before the vaccine, mRNA-1273, is ready for use. If you need to brush up on how these new vaccines work, check out our handy guide to mRNA vaccines.
In happier news, the “moar memory” version of the Raspberry Pi 4 is now on sale. Eben Upton announced that the 8GB version of the Pi 4 is now available for $75. The upgrade was apparently delayed by the lack of an 8GB LPDDR SDRAM chip in a package that would work in the Pi manufacturing process. They’ve also released a beta of a 64-bit version of the Raspberry Pi OS, if you’re interested in a bleeding-edge flex.
And finally, for those who missed the first wave of the computer revolution and never had a blinkenlight machine, you can at least partially scratch that itch with this Internet-connected Altair 8800. Jesse Downing has written a queueing system that allows users to connect to the machine via ssh and use Microsoft BASIC 5.0 on CP/M. Need to see those glorious front panels lights do their thing? Jesse has kindly set up a live stream for that, with an overlay of the current console output. It’s a great way to relive your misspent youth, or to get a taste of what computing was like when soldering skills were a barrier to entry.
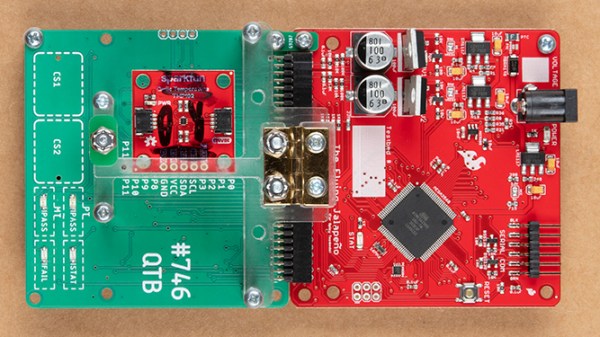
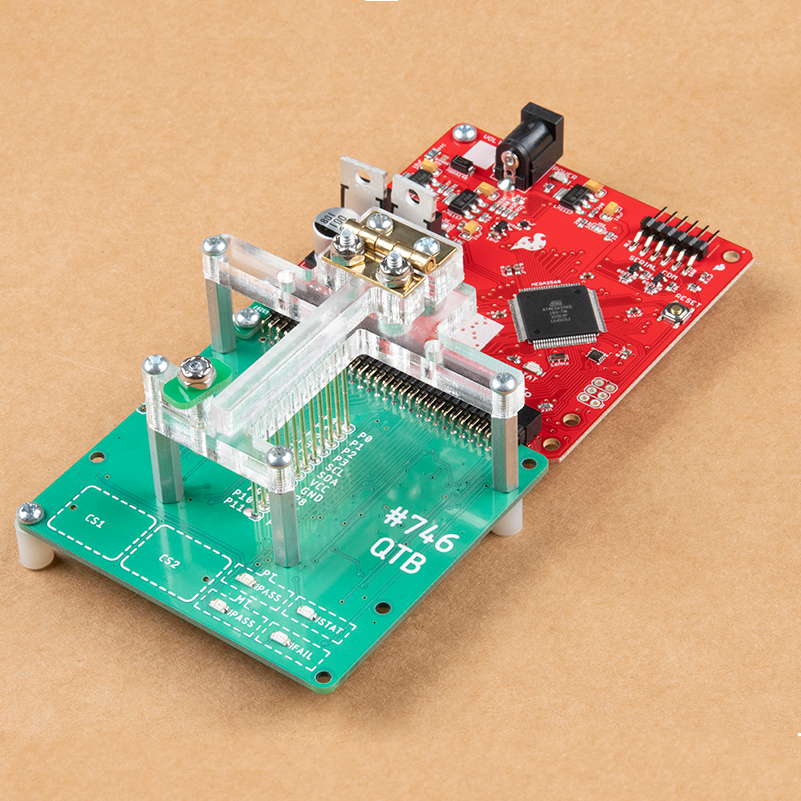
Test and programming fixtures are great time-savers for anyone who needs to deal with more than a handful of PCBs. Instead of plugging in connectors (or awkwardly holding probe tips or wires) to program some firmware or run tests, one simply pops a PCB into a custom fixture with one hand, and sips a margarita with the other while a program decides whether everything is as it should be. Test fixtures tend to be custom-made for specific board layouts, meaning one tester is needed per board or device type, but this work is easily justified by the huge time savings they offer.
An inserted PCB sits atop the thick acrylic piece, with pogo pins making contact from below. Generous space on the left and right make sure there is clearance for any mounted components. Visible near the bottom of the green board are output LEDs, and two touch-sensitive pads.
The test unit looks like pretty familiar stuff at first glance: some hardware responsible for running the test program, laser-cut acrylic jig to hold a test PCB in a consistent position, spring-loaded pogo pins to make temporary electrical connections, and LEDs to clearly indicate PASS and FAIL states. The clever part is the way the fixture is designed to accommodate multiple board designs, and how it uses several 74LVC4066 quad bilateral switch ICs to take care of switching which pogo pins are connected and to where.
As mentioned, to be compatible with multiple boards there must be common design elements to exploit. In Sparkfun’s case, the through-hole connections on their breakout boards are all in a row with standard 0.1″ spacing. By using the aforementioned pogo pins and 4066 ICs, different pinouts can be accommodated and multiple board types can be used without any need to swap to different test hardware.
So after a false start due to bad weather, the first crewed launch of a SpaceX Crew Dragon capsule with two astronauts on board has gone ahead. After playing catch-up with the ISS for around 27 hours they’re now safely aboard. At times it seems that space launches have become everyday occurrences, but they are still heroes who have risked their lives in the furtherment of mankind’s exploration of space. Their achievement, and that of all the scientists, engineers, and other staff who stand behind them, is immense.
I watched the drama unfold via the live video feed. Having heaved a huge sigh of relief once they were safely in orbit, the feed cut to the studio, and then moved on to interview the NASA administrator Jim Bridenstine. He was naturally elated at a successful launch, and enthused about the agency’s achievement. You can watch the full interview embedded below, but what caught my attention was his parting sentence:
And if this can inspire a young child to become the next Elon Musk, or the next Jeff Bezos, or the next Sir Richard Branson, then that’s what this is all about
I was slightly shocked and saddened to hear this from the NASA administrator, because to my mind the careers of Musk, Bezos, or Branson should not be the ones first brought to mind by a space launch. This isn’t a comment on those three in themselves; although they have many critics it is undeniable that they have each through their respective space companies brought much to the world of space flight. Instead it’s a comment on what a NASA administrator should be trying to inspire in kids.
Ask yourself how many billionaire masters-of-the-universe it takes for a successful space race compared to the number of scientists, engineers, mathematicians, technicians, physicists, et al. From the anecdote of the NASA administrator it takes about three, but if he is to make good on his goal of returning to the Moon in 2024 and then eventually taking humanity to Mars it will take a generation packed full of those other roles. To understand that we’ll have to take a trip back to the Apollo era, and how that generation of kids were inspired by the spacecraft on their screens.
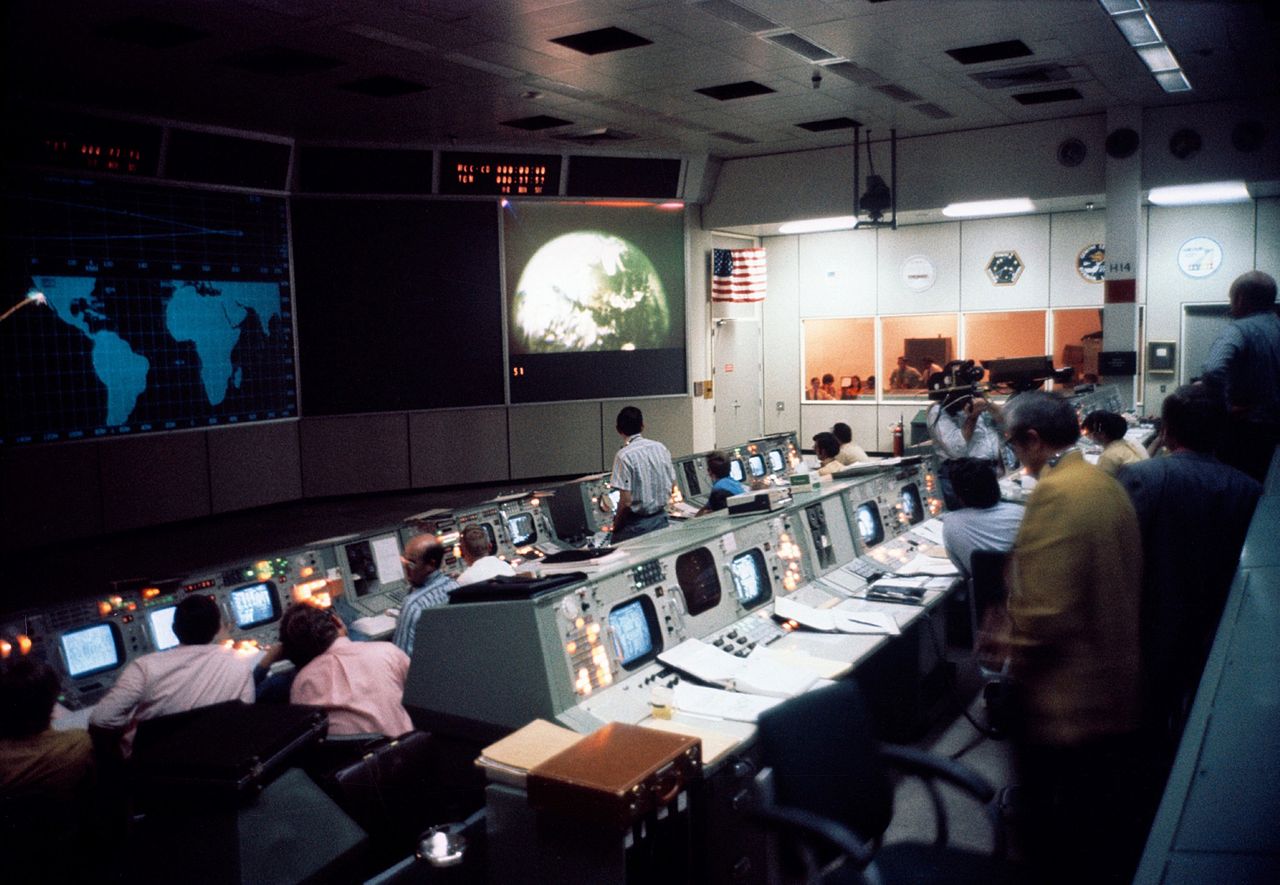
Inspiration from probably the coolest room in the world at the time, the Apollo mission control in Houston. NASA on The Commons / No restrictions
Fifty years ago, we were very much on the brink of becoming a spacefaring planet. American astronauts were taking their first steps on the Moon, and Soviet cosmonauts were occupying real space stations that would soon be capable of housing them for months at a time. Planetary probes were returning colour TV pictures from other worlds, and it was certain that in the immediate aftermath of the Apollo programme we’d be sending astronauts and probably cosmonauts too further afield. A Mars base in the 1980s perhaps, and following our fictional Star Trek heroes further afield thereafter.
We now know it didn’t quite work out that way, but a whole generation of tech-inclined kids grew up wanting nothing more than to be involved in space flight. The vast majority of us never made it, but with that inspiration we took our soldering irons and 8-bit home computers and ran with them. Those NASA folks were the coolest of role-models, and no doubt their Soviet equivalents were too for kids on the other side of the Iron Curtain.
With the best will in the world, the chances of any kid becoming the next Jeff Bezos is about as high as that of their becoming the next Neil Armstrong. Compared to the number of kids in the world, the number of billionaires and the number of astronauts both pale into statistical insignificance. But the chances of a kid becoming an engineer or a scientist is much higher, and in those careers their chances of having some of their work be involved with the space effort becomes not entirely unlikely.
I understand what the NASA administrator was trying to say, but can’t shake the feeling that if those are the people he rolls out to inspire kids watching a space launch, he’s missed an opportunity. Those are the names we all recognize, but shouldn’t we also elevate the people making the scientific breakthroughs so their names are equally recognized? Like Margaret Hamilton, Gene Kranz, and Sergei Korolev and many others before them, we should be making names like Tom Mueller and Margarita Marinova prominent examples of where a career in the sciences can take you. But to be honest, the real problem is we just don’t hear much about all the people doing this fascinating engineering and that’s a sad state of affairs.
Looks like it’s time for Hackaday to pursue a biography series based on the many great minds who are the ones delivering on the promise and vision of today’s (and tomorrow’s) space race. Get us started by talking about your favorite behind the scenes science folks in the comments below.
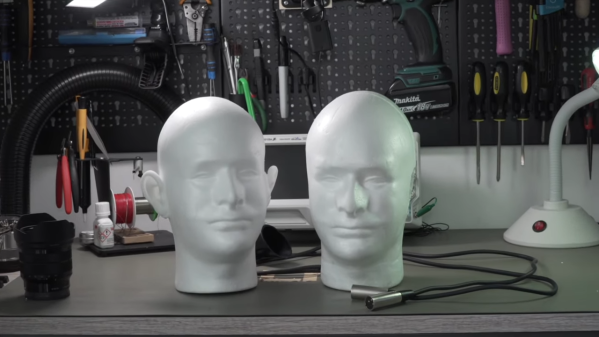
We humans may not have superpowers, but the sensor suite we have is still pretty impressive. We have binocular vision that autofocuses and can detect a single photon, skin studded with sensors for touch, heat, and pain, and a sense of smell that can detect chemicals down to the parts per trillion range. Our sense of hearing is pretty powerful, too, allowing us to not only hear sounds over a 140 dB range, but also to locate its source with a fair degree of precision, thanks to the pair of ears on our heads.
Recreating that binaural audio capture ability is the idea behind this homebrew 3D microphone. Commercially available dummy head microphones are firmly out of the price range of [LeoMakes] and most mortals, so his was built on a budget from a foam mannequin head and precast silicone rubber ears, which you can buy off the shelf, because of course you can.
Attached to the sides of the foam head once it got the [Van Gogh] treatment, the ears funnel sound to tiny electret cartridge microphones. [Leo] learned the hard way that these little capsule mics can’t use the 48-volt phantom power that’s traditionally pumped up the cable to studio microphones; he fixed that problem with a resistor in parallel with the mic leads. A filtering capacitor, an RC network between the cold line and ground on the balanced audio line, and a shield cleverly fashioned from desoldering braid took care of the RF noise problem.
The video after the break shows the build and test results, which are pretty convincing with headphones on. If you want to build your own but need to learn more about balanced audio and phantom power, we’ve got a short primer on the topic that might help.
Building computers from discrete components is a fairly common hobby project, but it used to be the only way to build a computer until integrated circuits came on the scene. If you’re living in the modern times, however, you can get a computer like this running easily enough, but if you want to dive deep into high performance you’ll need to understand how those components work on a fundamental level.
[Tim] and [Yann] have been working on replicating circuitry found in the CDC6600, the first Cray supercomputer built in the 1960s. Part of what made this computer remarkable was its insane (for the time) clock speed of 10 MHz. This was achieved by using bipolar junction transistors (BJTs) that were capable of switching much more quickly than typical transistors, and by making sure that the support circuitry of resistors and capacitors were tuned to get everything working as efficiently as possible.
The duo found that not only are the BJTs used in the original Cray supercomputer long out of production, but the successors to those transistors are also out of production. Luckily they were able to find one that meets their needs, but it doesn’t seem like there is much demand for a BJT with these characteristics anymore.
[Tim] also posted an interesting discussion about some other methods of speeding up circuitry like this, namely by using reach-through capacitors and Baker clamps. It’s worth a read in its own right, but if you want to see some highlights be sure to check out this 16-bit computer built from individual transistors.
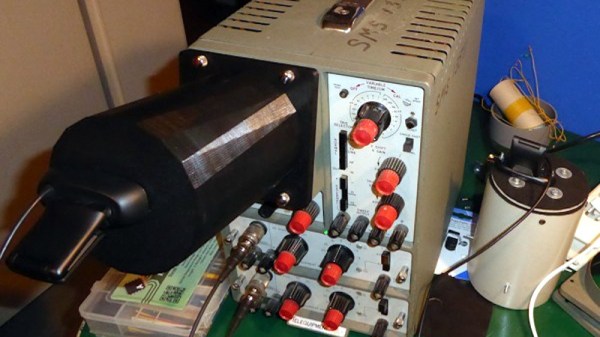
Many of us will possess digital oscilloscopes which offer at an affordable price an array of features once unimaginable on the analogue CRT ‘scopes of yesteryear. But those old analogue beasts were fine pieces of equipment when they were made and remain so today. So how can they find a place in the digital age?
Perhaps [Joseph Eoff] has the answer, because he’s fitted his trusty Telequipment D43 with a camera in a 3D-printed attachment, paired with a piece of cross-platform Python/Qt custom software using OpenCV to identify, digitize, and quantify the traces. The software allows viewing the either the digitized trace or the real trace, and derives measurements of voltage and frequency from them. One limitation is that despite the ‘scope being a dual-trace model, the software only has a single set of cursors to measure one trace at a time. All the code can be had from the GitHub repository, should you wish to experiment with it or extend it.
It’s worth thinking for a minute at what price point a remotely decent digital ‘scope starts, then considering the ease with which surprisingly good older analogue instruments can be found on the second-hand market for not a lot. An approach such as this one makes them an even more attractive proposition.