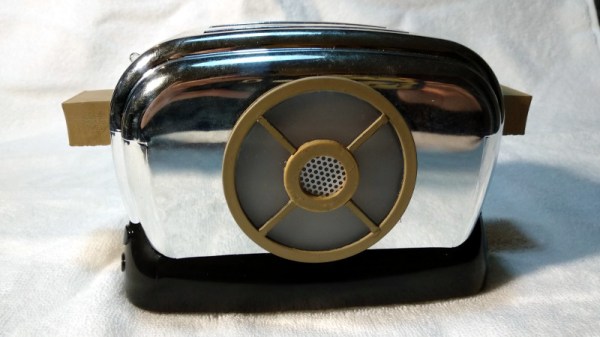
PixMob LED Wristband Teardown (Plus IR Emitters And How To Spot Them)

PixMob units are wearable LED devices intended for crowds of attendees at events like concerts. These devices allow synchronized LED effects throughout the crowd. [yeokm1] did a teardown of one obtained from a preview for the 2019 Singapore National Day Parade (NDP), and in the process learned about the devices and their infrastructure.

Suspected IR emitter for the PixMob units, mounted on a lighting tower (marked here in white).

PixMob hardware has been known to change over time. This version has two RGB LEDs (an earlier version had only one), an unmarked EEPROM, an unmarked microcontroller (suspected to be the Abov MC81F4104), and an IR receiver module. Two CR1632 coin cells in series power the device. [yeokm1] has made the schematic and other source files available on the teardown’s GitHub repository for anyone interested in a closer look.

One interesting thing that [yeokm1] discovered during the event was the apparent source of the infrared emitter controlling the devices. Knowing what to look for and reasoning that such an emitter would be mounted with a good view of the crowd, [yeokm1] suspected that the IR transmitter was mounted on a lighting tower. Viewing the tower through a smartphone’s camera revealed a purplish glow not visible to the naked eye, which is exactly the way one would expect an IR emitter to look.

Sadly, there wasn’t any opportunity to record or otherwise analyze the IR signals for later analysis but it’s possible that the IR protocol might be made public at some point. After all, running custom code on an earlier PixMob board was made possible in part by asking the right people for help.

An Epic Quest To Build The Perfect Retro Handheld

It’s a good time to be a fan of classic video games. Most of us carry around a smartphone that’s more than capable of emulating pretty much everything from the 32-bit era on down, and if you want something a little more official, the big players like Sony and Nintendo have started putting out “retro” versions of their consoles. But even still, [Mangy_Dog] wasn’t satisfied. To get the portable emulation system of his dreams, he realized he’d have to design and build it himself.

The resulting system, which he calls the “Playdog Blackbone”, is without a doubt one of the most impressive DIY builds we’ve ever seen. While there are still some issues that he’s planning on addressing in a later version of the hardware, it wouldn’t be an exaggeration to say that there’s commercially available game systems that didn’t have half as much thought put into them as the Blackbone.

Which is, incidentally, how this whole thing got started. The original plan was to buy one of those cheap emulation handhelds, which invariably seem to come in the form of a PSP clone, and fit it with a Raspberry Pi. But [Mangy_Dog] quickly realized that not only were they too small to get everything he wanted inside, but they also felt terrible in the hand. Since he wanted the final product to be comfortable to play, his first step was to design the case and get feedback on it from other retro game enthusiasts.

After a few iterations, he arrived at the design we see today. Once he printed the case out on his SLA printer, he could move on with fitting all of his electronics inside. This takes the form of a custom PCB “motherboard” which an Orange Pi Zero Plus2 (sorry Raspberry fans) connects to. There’s actually a surprising amount of room inside the case, enough for niceties like dual speakers and a fan complete with ducting to keep the board cool.

Unsurprisingly, [Mangy_Dog] says a lot of people have been asking him if they can buy their own version of the Blackbone, and have suggested he do a crowdfunding campaign to kick off mass production. While he’s looking at the possibility of resin or injection molding the case so he can produce a few more copies, on the whole, his attention has moved on to new projects. Which frankly, we can’t wait to see.

If you’re interested in slightly more modern games, we’ve seen a number of handhelds based on “trimmed” Nintendo Wii’s which you might be interested in. While they might not have the sleek external lines of the Blackbone, the work that goes into the electronics is nothing short of inspirational.

Continue reading “An Epic Quest To Build The Perfect Retro Handheld”

ATX2AT Makes Retrocomputing Safer, Heads To Kickstarter

It’s easy to take power supplies for granted in modern computing, but powering vintage hardware is not always so simple or worry-free. The power supplies for old electronics are themselves vintage, and the hardware being powered can be quite precious. A power problem can easily cause fried components and burned traces on a board. As [Doc TB] observes, by the time you hear crackling, it’s already far too late.

To address this, [Doc TB] designed the ATX2AT Smart Converter as an open source project and recently decided to make it available through a Kickstarter campaign. ATX2AT is a way to safely and securely replace some vintage power supplies with a standard PC ATX power supply, and adds a large number of protection features such as current monitoring and programmable reaction time for overcurrent protection. All of this can help prevent a retrocomputer enthusiast’s precious vintage hardware from being damaged in the event of a problem. It’s not just for powering known-good hardware; it can be invaluable when testing or repairing hardware that might be in an unknown state.

When we first came across [Doc TB]’s ATX2AT project we recognized it as a well-made device to address a specific niche, and to do it well. Assessing risk takes into account not only the probability of a problem occurring, but also just how bad things would be if it did happen. If your old hardware is precious enough to warrant the extra protection, or you are into repairing or assessing old hardware, then an ATX2AT might be just what you need. You can see it in action in the video embedded below.

Continue reading “ATX2AT Makes Retrocomputing Safer, Heads To Kickstarter”

Barcaderator Is Coin-Op Arcade Up Top And Kegerator Down Below

It’s a common sight in our community for a life-expired arcade cabinet to be repurposed as a MAME cabinet with an up-to-date screen and other internals. Many of us have had some fun pursuing high scores in a hackerspace somewhere, and even if they don’t have the screen burn and annoying need for cash of the originals they still deliver plenty of fun.

But if there’s one pleasure an adult can pursue that a kid in a 1980s arcade couldn’t, it’s a cool glass of beer. [Marcus Young] has brought together the two with his Barcaderator, a custom MAME cabinet with a beer tap on the side and a fridge for a keg in its base.

The MAME internals include a Lattepanda Alpha and an LED controller for those illuminated buttons. Where this build shines is in its custom cabinet, which instead of being an all-in-one unit takes the form of a base and top half that are detatchable. It appears to take its inspiration and build techniques from the world of flight cases. You can see the detail where the two halves come together in this image. The result should be of great interest to anyone who has struggled with moving an unwieldy traditional arcade cabinet.

This is we think the first beer/arcade combo to grace these pages. But we’ve had more than one arcade cabinet, and definitely quite a few kegs along the way.

Microphone Isolation Shield Is A Great IKEA Hack; Definitely Not A Xenomorph Egg

As any content creator knows, good audio is the key to maintaining an audience. Having a high quality microphone is a start, but it’s also necessary to reduce echoes and other unwanted noise. An isolation shield is key here, and [phico] has the low down on making your own.

The build starts with an IKEA lampshade, so it’s a great excuse to head down to the flatpack store and grab yourself some Köttbullar for lunch while you’re at it (that’s meatballs for those less versed in IKEA’s cafeteria fare). This is really more of a powder-coated steel frame than a shade, perfect as the bones of an enclosure. [Phico] hacks it open with a Dremel to make room for the microphone. Cardboard soaked in wallpaper paste is then used to create a papier-mache-like shell, which is then stuffed with acoustic foam. A small opening is left to allow the narrator’s voice to reach the microphone, while blocking sound from other directions. Finally, a stocking is wrapped around the whole assembly to act as an integral anti-pop filter.

It’s a tidy build, and while it looks a bit like a boulder to some, if you encounter a room full of ovomorphs that look just like this, tiptoe right out of there. IKEA hacks are always popular, and this laser projector lamp is a great example. If you’ve got your own nifty Swedish-inspired build, make sure you let us know!

Robotic Skin Sees When (and How) You’re Touching It

Cameras are getting less and less conspicuous. Now they’re hiding under the skin of robots.

A team of researchers from ETH Zurich in Switzerland have recently created a multi-camera optical tactile sensor that is able to monitor the space around it based on contact force distribution. The sensor uses a stack up involving a camera, LEDs, and three layers of silicone to optically detect any disturbance of the skin.

The scheme is modular and in this example uses four cameras but can be scaled up from there. During manufacture, the camera and LED circuit boards are placed and a layer of firm silicone is poured to about 5 mm in thickness. Next a 2 mm layer doped with spherical particles is poured before the final 1.5 mm layer of black silicone is poured. The cameras track the particles as they move and use the information to infer the deformation of the material and the force applied to it. The sensor is also able to reconstruct the forces causing the deformation and create a contact force distribution. The demo uses fairly inexpensive cameras — Raspberry Pi cameras monitored by an NVIDIA Jetson Nano Developer Kit — that in total provide about 65,000 pixels of resolution.

Apart from just providing more information about the forces applied to a surface, the sensor also has a larger contact surface and is thinner than other camera-based systems since it doesn’t require the use of reflective components. It regularly recalibrates itself based on a convolutional neural network pre-trained with data from three cameras and updated with data from all four cameras. Possible future applications include soft robotics, improving touch-based sensing with the aid of computer vision algorithms.

While self-aware robotic skins may not be on the market quite so soon, this certainly opens the possibility for robots that can detect when too much force is being applied to their structures — the machine equivalent sensation to pain.

Continue reading “Robotic Skin Sees When (and How) You’re Touching It”

Mike Harrison Knows Everything About LEDs

Driving an LED and making it flash is probably the first project that most people will have attempted when learning about microprocessor control of hardware. The Arduino and similar boards have an LED fitted, and turning it on and off is a simple introduction to code. So it’s fair to say that many of us will think we have a pretty good handle on driving an LED; connect it to a I/O pin via a resistor and that’s it. If this describes you, then Mike Harrison’s talk at the recent Hackaday Superconference (embedded below) will be an education.

Mike has appeared on these pages multiple times as he pushes LEDs and PCB techniques to their limits, even designing our 2017 Superconference badge, and his many years of work in the upper echelons of professional LED installations have given him an unrivaled expertise. He has built gigantic art projects for airports, museums, and cities. A talk billed as covering everything he’s learned about LEDs them promises to be a special one.

If there’s a surprise in the talk, it’s that he’s talking very little about LEDs themselves. Instead we’re treated to a fundamental primer in how to drive a lot of LEDs, how to do so efficiently, with good brightness and colour resolution, and without falling into design traps. It’s obvious that some of his advice such at that of relying on DIP switches rather than software for configuration of multi-part installations has been learned the hard way.

Multiple LEDs at once from your driver chip, using a higher voltage.

We are taken through a bit of the background to perceived intensity and gamma correction for the human eyesight. This segues neatly into the question of resolution, for brightness transitions to appear smooth it is necessary to have at least 12 bits, and to deliver that he reaches into his store of microcontroller and driver tips for how to generate PWM at the right bitrate. His favoured driver chip is the Texas TLC5971, so we’re treated to a primer on its operation. A useful tip is to use multiple smaller LEDs rather than a single big one in the quest for brightness, and he shows us how he drives series chains of LEDs from a higher voltage using just the TI chip.

Given the content of the talk this shouldn’t come as a shock, but at the end he reminds us that he doesn’t use all-in-one addressable LEDs such as the WS2932 or APA102. These are  the staple of so many projects, but as he points out they are designed for toy type applications and lack the required reliability for a multi-thousand LED install.

Conference talks come in many forms and are always fascinating to hear, but it’s rare to see one that covers such a wide topic from a position of experience. He should write it into a book, we’d buy it!

Continue reading “Mike Harrison Knows Everything About LEDs”