An Open Hardware Laser Engraver For Everyone

Right now, you can get a diode laser engraver on eBay for around $100 USD. That sounds like a deal, but it’ll probably use some arcane proprietary software, won’t be terribly accurate, and the laser itself will almost certainly be fully exposed. Of course there’s no shortage of DIY builds which improve upon this situation greatly, but unfortunately the documentation and instructions to replicate them yourself often leave a lot to be desired.

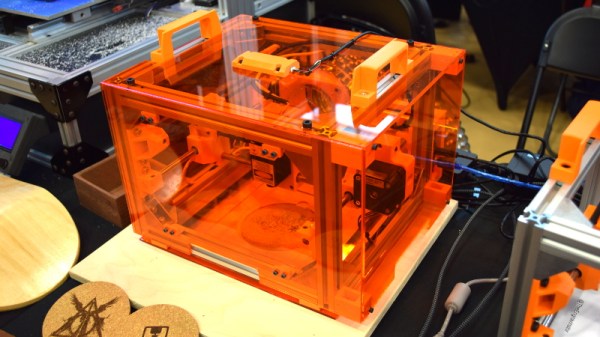
To get a safe and accurate laser platform into the hands of hackers everywhere, we need more well documented open source designs that are actually built with community in mind. Projects like the Engravinator from [Adam Haile]. This isn’t a one-off design with documentation thrown together after the fact, it’s a fully open hardware engraver with a concise assembly guide that’s built from 3D printed parts and readily available components. You’re free to source and print the parts yourself or, eventually, purchase everything as a kit.
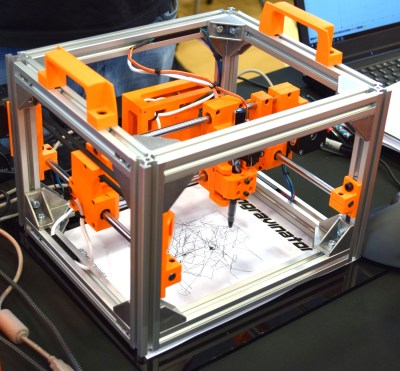
Pen-equipped Engravinator

The microwave-sized Engravinator is built from standard 2020 aluminum extrusion, and offers a workable area of 130mm x 130mm. There’s a hatch on the front of the enclosure for objects that are small enough to fit inside the machine, but the open bottom and handles on the top also allow the user to place the Engravinator directly onto the work surface. [Adam] says this feature can be especially useful if you’re looking to burn a design into a tabletop or other large object.

Outside of the aluminum extrusion and miscellaneous hardware that make up the frame, most of the other parts are 3D printed. Released under the CERN Open Hardware License v1.2 and distributed as both STL and STEP files, the printable parts for the Engravinator are ripe for modification should you be so inclined. The same goes for the DXF files for the enclosure panels, which will need to be cut out of orange acrylic with a CNC or (ironically) a laser.

Continue reading “An Open Hardware Laser Engraver For Everyone”

Bolt-On Stepper Motor Driver For The Raspberry Pi

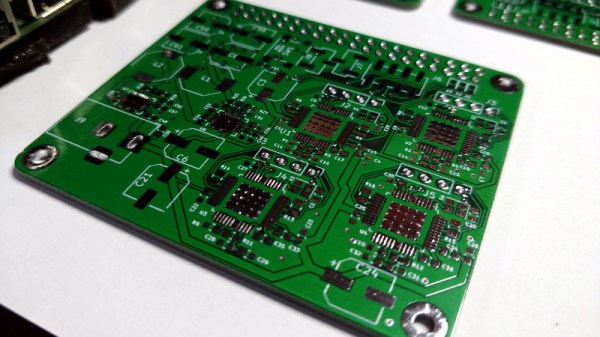
For his entry into the 2019 Hackaday Prize, [Tobius Daichi] is working on adding some motion control capabilities to everyone’s favorite Linux SBC. His 3+Pi board attaches to the Raspberry Pi’s GPIO header and gives you a convenient way to control four individual stepper motors. Perfect for a 3D printer, laser cutter, CNC, or anything else you can think of that needs to move in a few dimensions.

But such a simplistic description of the 3+Pi might be underselling it a bit. While [Tobius] says he was inspired by the classic Arduino CNC Shield that powers countless DIY 3D printers, he’s managed to improve on the concept. Rather than having the host Pi communicate directly with the stepper drivers, the 3+Pi features an onboard STM32F302CBT6 that handles the actual motor control. The Pi just needs to tell it what to do over UART.

If you’re looking to do things in real-time, having an onboard microcontroller handle the low-level aspects of talking to the stepper drivers can be a big help. A natural extension for this board could be support for the Klipper firmware, which leverages the fact that the Raspberry Pi is many times more powerful than your average 3D printer control board. With the Pi handling the math and providing the microcontroller instructions, Klipper allows for faster and more accurate printing than the microcontroller alone could accomplish.

As for the stepper drivers themselves, [Tobius] has decided to go with the Trinamic TMC2041-LA-T. This chip is notable as it puts dual drivers in one 48-QFN package, which is great if you’re looking to save space on your board. Some might complain that the 3+Pi doesn’t allow for easily swapping out the stepper drivers if you manage to cook one like on the Arduino CNC shield, but realistically you could say the same about many purpose-built stepper control boards.

[Tobius] is tackling this project by himself currently, but does mention that he’s open to teaming up with anyone who’s got an interest in this sort of thing. There have been previous attempts at creating Linux-powered 3D printer controllers in the past, but we think this approach holds particular promise if for no other reason than the Raspberry Pi’s popularity.

Modular CNC Build Gets You Both A Mill And A Laser Cutter

CNC builds come in all shapes and sizes. There’s delta manipulators, experimental polar rigs, and all manner of cartesian builds, large and small. After completing their first CNC build, [jtaggard] took what they learned and applied it in the development of a new machine.

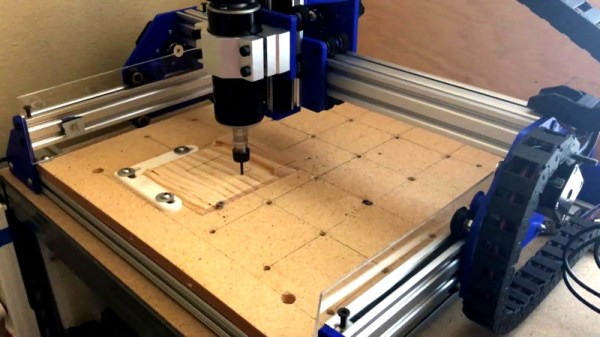
It’s a desk-sized cartesian design, with a frame built from V-slot extrusion cut to size by circular saw. This is a great way to get quality extrusion for a custom build, and is readily available and easy to work with. The gantry rides on wheels, with the X and Y axes being belt driven, plus a screw drive for Z. A couple of NEMA 17s and a NEMA 23 provide motive power, and an Arduino Uno with stepper drivers is the brains of the operation. 1/4″ thick PLA plates are used to assemble everything, and while [jtaggard] intended to replace these with aluminium down the track, so far the plastic has proved plenty rigid enough for early tests of both machining and engraving wood.

It’s a great entry-level CNC build, which has proved usable with both a 500W spindle and a 2.5W laser for engraving. Being modular in nature, it would be easy to add other tools, such as a pen plotter or vinyl cutting blade for further versatility.

DIY CNC builds are always popular, as you end up with a useful tool as a reward for your hard work. Video after the break.

Continue reading “Modular CNC Build Gets You Both A Mill And A Laser Cutter”

Building A 1.4W Laser Pointer In A Tiny Housing

Laser pointers were cool for about 30 seconds when they first came out, before becoming immediately passé and doing absolutely nothing to improve the boss’s quarterly reports presentation. However, just as with boom boxes and sports cars, more power can always make things better. [Styropyro] was unimpressed with the weak and unreliable laser pointers he’d sourced from eBay, so gutted one and began a fresh build.

After fiddling with some basic 1mW eBay green lasers, [styropyro] had some fun turning up the wick by fiddling with the internal trimpots. This led to the quick and untimely death of the cheap laser diodes, leaving a compact laser pointer shell ripe for the hacking.

To replace the underwhelming stock components, [styropyro] chose a Nichia NDG7475 high-powered laser diode, fitting it into a small heatsink for thermal management. Current draw was far too high to use the original switch, so the stock housing’s button is instead used to switch a MOSFET which delivers the full current to the laser driver. To reach the higher output power of 1.4W, the laser diode is being run over specification at 2.3 amps. All this current draw would quickly overwhelm standard AAA batteries, so a pair of lithium polymer 10440 batteries are substituted in to do the job.

The build shows that with clever parts selection and some easy hand soldering, you too can build an incredibly dangerous laser pointer at home, that fits neatly in your shirt pocket. Alternatively, you might prefer something on the larger scale. Video after the break.

Continue reading “Building A 1.4W Laser Pointer In A Tiny Housing”

Laser Noob: Getting Started With The K40 Laser

Why spend thousands on a laser cutter/engraver when you can spend as little as $350 shipped to your door? Sure it’s not as nice as those fancy domestic machines, but the plucky K40 is the little laser that can. Just head on down to Al’s Laser Emporium and pick one up.  Yes, it sounds like a used car dealership ad, but how far is it from the truth? Read on to find out!

Laser cutting and engraving machines have been around for decades. Much like 3D printers, they were originally impossibly expensive for someone working at home. The closest you could get to a hobbyist laser was Epilog laser, which would still cost somewhere between $10,000 and $20,000 for a small laser system. A few companies made a go with the Epilog and did quite well – notably Adafruit used to offer laptop laser engraving services.

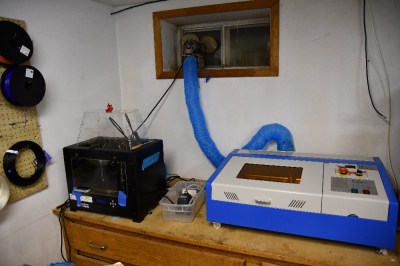
Over the last decade or so things have changed. China got involved, and suddenly there were cheap lasers on the market. Currently, there are several low-cost laser models available in various power levels. The most popular is the smallest – a 40-watt model, dubbed the K40. There are numerous manufacturers and there have been many versions over the years. They all look about the same though: A blue sheet metal box with the laser tube mounted along the back. The cutting compartment is on the left and the electronics are on the right. Earlier versions came with Moshidraw software and a parallel interface.
Continue reading “Laser Noob: Getting Started With The K40 Laser”

Laser Draws Weather Report

Have you ever wished that a laser could tell you the weather? If you have, then [tuckershannon] has you covered. He’s created a machine that uses a laser and some UV sensitive paper to draw the temperature and a weather icon! And that’s not all! It’s connected to the internet, so it can also show the time and print out messages.

Building on [tuckershannon]’s previous work with glow-in-the-dark drawing, the brains inside this machine is a Raspberry Pi Zero. The laser itself is a 5mw, 405nm laser pointer with the button zip-tied down. Two 28BYJ-48 stepper motors are used to orient the laser, one for the rotation and another for the height angle. Each stepper motor is connected to a motor driver board and then wired directly to the Pi.

The base and arm that holds the laser were designed in SolidWorks and then 3d printed. The stepper motors are mounted perpendicular to one another and then the laser pointer mounted at the end. The batteries have been removed from the laser and the terminals are also wired directly to the raspberry pi. The Pi is then connected to Alexa via IFTTT so that it can be controlled by voice from anywhere.

The real beauty of [tucker]’s laser drawing machine is that is will draw out the temperature and weather icon, as well as drawing the time in either digital or analog forms! We’ve seen [tuckershannon]’s work before. The precursors to this project were his clock which uses a robotic arm with a UV LED on it to draw the time and another clock which uses similar robotic arm only with a laser attached. Let’s hope we get to see the rest of [tucker]’s progress!

Continue reading “Laser Draws Weather Report”

Laser Projector Ditches Galvanometer For Spinning Drum

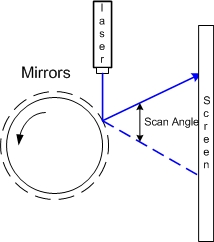
Laser projectors like those popular in clubs or laser shows often use mirror galvanometers to reflect the laser and draw in 2D. Without galvos, and on a tight budget, [Vitaliy Mosesov] decided that instead of downgrading the quality, he would seek an entirely different solution: a spinning mirror drum.

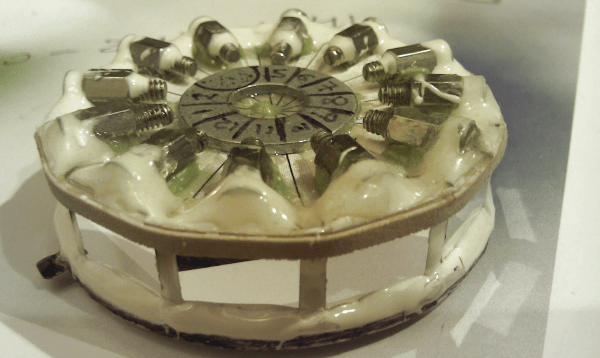
He fires a laser at a rotating drum with twelve mirror faces, each at a different adjustable vertical angle. The laser will hit a higher or lower point on the projection surface depending on which mirror it’s reflecting off – this creates resolution in the Y direction.

Timing the pulsing of the laser so that it reflects off the mirror at a certain horizontal angle provides the X resolution.

As you can already tell, speed and timing is critical for this to work. So much so that [Vitaliy] decided he wanted to overclock his Arduino – from 16 MHz to 24.576 MHz. Since this changes the baud rate, an AVR ISP II was used for programming after the modification, and the ‘duino’s hardware serial initialization had to be hacked too.

For the laser itself, [Vitaliy] designed some nifty driver circuitry, which can respond quickly to the required >50 kHz modulation, supply high current, and filter out voltage transients on the power supply (semiconductor lasers have no protection from current spikes).

On the motor side of things, closed loop control is essential. A photo-interrupter was added to the drum for exact speed detection, as well as a differentiator to clean up the signal. Oh, and did we mention the motor is from a floppy disk drive?

We’ve actually seen builds like this before, including a dot-matrix version with multiple lasers and one made apparently out of Meccano and hot-glue that can project a Jolly Wrencher. But this build, with its multiple, adjustable mirrors, is a beauty.  Check it out in action below.

Continue reading “Laser Projector Ditches Galvanometer For Spinning Drum”