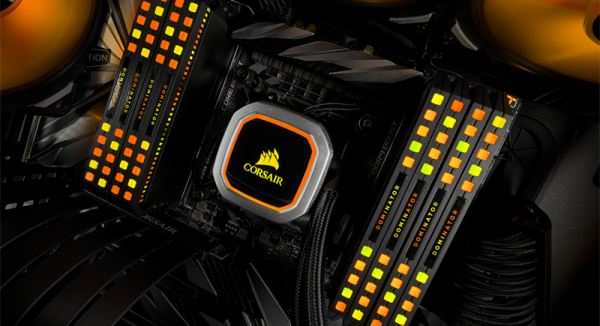
Hackaday Prize Entry: Modular Circuits With SnapBloks

[Ekawahyu Susilo]’s twist on the modular circuit kit, SnapBloks helps you create circuits by stacking components on top of each other with the help of three magnetic contacts that not only keep the modules stuck together but also deliver power, ground, and data to each part.

[Ekawahyu] envisioned it as a prototyping kit, used to whip together an idea without a lot of hassle. It could also be an educational aid, used to teach Arduino coding while skipping the confusing tangle of wiring. You can stack a sound module on top of a power module to make a buzzer, or attach power to a wheel Blok to make a robot.

With version 2 of the project [Ekawahyu] updated the look with color-coded shells, with pink signifying input Bloks, green for output, orange for communication, and blue for power. Each Blok has a Arduino chip inside — an STM32, which Hackaday reviewed back in March. For version three, he hopes to leverage the ESP8266 to make a WiFi-enabled Blok. [Ekawahyu]’s idea of having a cheap SMD Arduino in every module seems like a smart way to simplify module creation—no “controller block” needed!

Another Helping Hands Build

[Punamenon2] wanted a soldering station with integrated helping hands. He couldn’t find one, but he decided it would be a good 3D printed project. In all fairness, this is really 3D printing integrating several off-the-shelf components including a magnifier, a soldering iron holder, a soldering iron cleaner, a couple of “octopus” tripods, and some alligator clips. Total cost? Less than $30.

In addition to holding the Frankenstein monster together, the 3D printed structure also provides a storage tray with special sloped edges to make removing small screws easier.

Continue reading “Another Helping Hands Build”

IPad, Not Flux Capacitor, Brings DeLorean Back To The Future

Add a flux capacitor and a Mr. Fusion to a DeLorean and it becomes a time machine. But without those, a DeLorean is just a car. A 35-year old car at that, and thus lacking even the most basic modern amenities. No GPS, no Bluetooth — not even remote locks for the gullwing doors!

To fix that, [TheKingofDub] decided to deck his DeLorean out with an iPad dash computer that upgrades the cockpit experience, and we have to say we’re impressed by the results. Luckily, the space occupied by the original stereo and dash vents in the center console is the perfect size for an iPad mini, even with the Lightning cable and audio extension cable attached. A Bluetooth relay module is used to interface to the doors, windows, trunk, garage door remote, and outdoor temperature sensor. A WiFi backup camera frames the rear license plate. Custom software ties everything together with OEM-looking icons and a big GPS speedometer. The build looks great, adds functionality, and should make road trips a little easier.

When [TheKingofDub] finally gets sick of people complaining about where the BTTF guts are, maybe he can add a flux capacitor and time circuits.

[via r/electronics]

Animated Bathroom Sign

Once upon a time, pants were created. After a while, women were allowed to wear them too. This has made a lot of people happy and been widely regarded as a good thing. There is a problem, however – bathroom signage is largely predicated on the idea that there are two rigid genders which all humans must be sorted into, and they’re defined by whether you’re wearing pants or a dress. [Robb Godshaw], among others, disagrees with this, and set about building a gender fluid bathroom sign.

The sign assembled on the motor.

The project seeks to exploit the traditional symbols of “male” and “female” – the human figures wearing pants or a dress – by creating a sign that switches between the two every 15 seconds. This is likely to initially confuse – one might imagine the bathroom is actually changing its gender designation rapidly, forcing users to complete their business in an incredibly short timeframe. However, the message behind the project is to highlight the absurdity of defining gender by pants, colours, or indeed in a binary nature at all. [Robb] also helpfully points out that all humans have to pass waste, regardless of gender.

The sign is built with 3D-printed components, using a crank mechanism to actuate the moving parts. The mechanism is designed to give equal time to the pants and dress configurations. [Robb] shares the important details necessary to replicate the build, such as how to assemble the metal crank pin insert with a paperclip and a lighter. It’s particularly tidy the way the mechanism is integrated into the parts themselves. In true hacker style, the motor is a standard microwave oven turntable motor, which can be harvested easily from a junk appliance and can be plugged straight into mains power to operate, if you know what you’re doing. If you don’t, check out our primer on the topic.

Overall, the project is a great use of hacker techniques, like 3D printing and harvesting parts, to make a statement and start a conversation, while being fun, to boot. We’ve also seen some of [Robb]’s work before, like this giant hamster wheel for people. Video after the break.

Continue reading “Animated Bathroom Sign”

Dirty Now Does Cables

PCB makers Dirty made a name for themselves in the prototype PCB biz, with a convenient web form and numerous options for PCB color, thickness, layers, silk screening, and so on. Now they’ve branched out into custom cabling with Dirty Cables.

You can design it yourself by dragging wires and connectors out of a sidebar and arranging them on a workspace, deciding which wire goes to what pin of the connector. Your choices for wires include various gauges and ribbon configurations. You choose a color (they have eleven) select connectors and drag those out too–choose from 17 cable-to-cable and cable-to-board connector families. We made a quick cable with four 32ga wires and two 16ga wires, with two different connectors on each side, with pricing updated realtime. If you want a sample pack of connectors, Dirty sells them for $10.

The downside to the service: there’s a minimum order of 100, though paying Shenzhen prices might make it worth your while. Just imagining crimping all of those connectors makes Hackaday’s hands hurt.

To get a sense of the diversity of connectors out there, read Elliot’s piece on the connector zoo that we published last year.

[thanks, Akiba]

Listen To Your Body

[John Miller] has the perfect response next time he complains about an ache or pain and one of his friends says, “You should listen to your body!” As you can see in the video below, he already does. Using two 9V batteries and some instrumentation amplifiers, [John] built an electromyography (EMG) rig.

If you haven’t heard of EMG, think of EEG or EKG, but for muscles instead of your brain or your heart. The LT1167 amplifier is well-suited for this application and even has a data sheet showing how to create an EMG circuit. [John] also used some more garden-variety op amps and the ubiquitous LM386N chip for audio amplification.

Continue reading “Listen To Your Body”

3D-Printed Rover Rolls Light And Looks Right

[Rick Winscott]’s RO-V Remotely Operated Vehicle instructable shows you how to make this cool-looking and capable robot. The rover, a 1/10th scale truggy, sports a chassis printed in silver and black PLA. It’s got a wireless router mounted on the back, and a webcam in a 2-servo gimbal up front. [Rick] made his own steering rack and pinion out of 3D printed parts and brass M3-threaded rods which he tapped himself.

The simplified drive system nixes the front, rear, and center differentials, thereby saving [Rick] on printing time, complexity, and weight — he was able to include a second 4000 mAH battery. A TReX Jr motor controller runs a pair of Pololu gear motors. All of this is controlled by a Beaglebone Black alongside a Spektrum DX6i 2.4Ghz transmitter and an OrangeRx 6-channel receiver. The DX6i [Rick] employs typically finds use as an airplane/quad controller, but he reconfigured it to steer the rover—the left stick controls direction and the right stick (elevator and aileron) control the webcam servos.

Enough talking technicals. We think this rover is pretty in the face. Much of this attraction owes to the set of Dagu Wild Thumper wheels (an entirely reasonable name) and the awe-inspiring 100mm shocks that jack up this whip so pleasingly. However, [Rick]’s elegant chassis and the silver-and-black color scheme doesn’t hurt one bit. The wheels are mostly for the cool factor, however—[Rick] recommends swapping out the relatively modest Pololu 20D gear motors in favor of higher-torque models if you’re planning any actual off-road extremeness. If you’re interested in making your own you can download the chassis files from Tinkercad or the BeagleBone code from Github.

If it’s other drone projects you’re after, check out the duct rover and solar wifi rover we published recently.