A song by Rockwell, “Somebody’s Watching Me” might be the anthem for the tin foil hat crowd. But a new paper reveals that it might be just as scary to have someone listening to you. Researchers have used common microphones to listen in on computer monitors. The demonstration includes analyzing audio to determine input from virtual keyboards and even a way to tell if people are surfing the web during a Google Hangout session.
Reading monitors based on electronic emissions is nothing new — ask Wim van Eck or read about TEMPEST. What makes this worrisome is that we constantly have live microphones around our computers. Webcams, phones, the latest smart assistant. Even some screens have built-in microphones. According to the paper, you could even pick up data from recorded audio. The paper has three main goals: extract display text, distinguish between different websites on screen, and extracting text entered with a virtual keyboard.
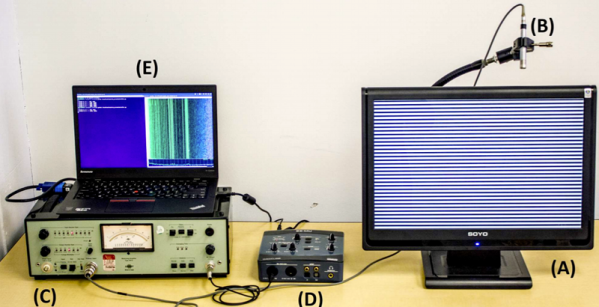
The analysis looked at 31 different screens. There were 12 distinct models from 6 different vendors. They did use a special VGA cable to tap the vertical sync to help manage the data, but they claim this was only an aid and not essential. They also used a high-end sound setup with a 192 kHz sampling rate.
Measuring the sound made by different display patterns was empirical. The authors think the mechanism is from subtle changes in the vibrations of the power supply components due to changes in current consumption. The refresh rate of the monitor also plays a part.
Armed with the proof of concept, the team went on to use an LG V20 cellphone and via a Hangouts call. Imagine if the person on the other end of your call could tell when you were reading Hackaday instead of paying attention to the call.
Different types of monitors need to be learned for best accuracy. It appears that reading small text may have problems, too. Even website detection depends on training. Still, maybe the tin hat people aren’t exactly wrong.
If you want to try your hand at reading the RF emissions, software defined radio is your friend. We’ll be interested to see if anyone duplicates the acoustic method in this paper, though.