There is a huge variety of hardware out there with a font of some form or other baked into the ROM. If it’s got a display it needs a font, and invariably that font is stored as a raster. Finding these fonts is trivial – dump the ROM, render it as a bitmap, and voilà – there’s your font. However, what if you’re trying to dump the font from a vintage Apple 410 Color Plotter? It’s stored in a vector format, and your job just got a whole lot harder.
The problem with a vector font is that the letters aren’t stored as individual images, but as a series of instructions that, when parsed correctly, draw the character. This has many benefits for generating characters in all manner of different sizes, but makes the font itself much harder to find in a ROM dump. You’re looking for both the instructions that generate the characters, as well as the code used to draw them, if you want a full representation of the font.
The project begins by looking at what’s known about the plotter. The first part of any such job is always knowing where to look, of course. It’s quickly determined that the font is definitely stored in the main ROM, and that there is no other special vector drawing chip or ROMs on board. The article then steps through the search process, beginning with plaintext searches of the binary dump, before progressing to a full disassembly of the plotter firmware. After testing out various assumptions and working methodically, the vector data is found and eventually converted into a modern TrueType font.
In the end, the project is successful, and it’s a great guide on how to approach similar projects. The key is to lay out everything you know at the start, and use that to guide your search step by step, testing and discarding assumptions until you hit paydirt. We’ve seen similar works before, like this project to dump the voice from an ancient Chrysler Electronic Voice Alert.
Whether coffee, tea, or beer is your jam, brewing is a delicate pas de deux of time and temperature. Proper brewing of any of these beverages can elevate the experience from average to amazing. With this in mind, [Marcelo] created a time and temperature tool to dial in his beer-brewing process.
BrewBuddy is a complex application-specific timer with an integrated thermometer. It lets him program time and temperature profiles for both the mashing process and the boiling process and store up to 10 steps for each. BrewBuddy doesn’t control the brewing temperature, but it does unify temperature-taking and time-marking into one convenient device that can last about 20 hours on a single CR2032.
The system is based on an STM32 and an LMT86 analog temperature sensor which has been modified to sit inside a stainless steel tube. There are four directional buttons to navigate through intuitive menus to set the desired times and temperatures. As each step completes, the status LED lights up and BrewBuddy waits for confirmation via button push before moving on to the next step. If there’s a problem, the timer can be paused and resumed using the up/down buttons. [Marcelo] is working to perfect the case design, but he already has the board files and firmware up on GitHub. Open up a cold one and check out the demo videos after the break.
After boiling and cooling comes fermentation, and that requires careful monitoring of the sugar content. Here’s a tool for that.
Part of why people can’t stop talking about Meltdown/Spectre is the fact that all the individual pieces have been sitting in plain sight for a long time. When everyone saw how it all came together last week, many people (and not even necessarily security focused people) smacked themselves on the forehead: “Why didn’t I see that earlier?” Speculative execution has caused headaches going way back. [Bruce Dawson] tells one such story he experienced back in 2005. (Warning: ads on page may autoplay video.)
It’s centered around Xbox 360’s custom PowerPC processor. Among the customization on this chip was the addition of an instruction designed to improve memory performance. This instruction was a hack that violated some memory consistency guarantees held by the basic design, so they knew up front it had to be used very carefully. Even worse: debugging problems in this area were a pain. When memory consistency goes wrong, the code visible in the debugger might not be the actual code that crashed.
Since we’re talking about the dark side of speculative execution, you can already guess how the story ends: no matter how carefully it was used, the special instruction continued to cause problems when speculatively executed outside the constrained conditions. Extensive testing proved that instructions that were not being executed were causing crashes. That feels more like superstition than engineering. As far as he can recall, it ended up being more trouble than it was worth and was never used in any shipped Xbox 360 titles.
What do you do, when you need a random number in your programming? The chances are that you reach for your environment’s function to do the job, usually something like rand() or similar. This returns the required number, and you go happily on your way.
A shift register configured as a pseudo-random number generator. [by KCAuXy4p CC0 1.0]Except of course the reality isn’t quite that simple, and as many of you will know it all comes down to the level of randomness that you require. The simplest way to generate a random number in software is through a pseudo-random number generator, or PRNG. If you prefer to think in hardware terms, the most elementary PRNG is a shift register with a feedback loop from two of its cells through an XOR gate. While it provides a steady stream of bits it suffers from the fatal flaw that the stream is an endlessly repeating sequence rather than truly random. A PRNG is random enough to provide a level of chance in a computer game, but that predictability would make it entirely unsuitable to be used in cryptographic security for a financial transaction.
There is a handy way to deal with the PRNG predictability problem, and it lies in ensuring that its random number generation starts at a random point. Imagine the shift register in the previous paragraph being initialised with a random number rather than a string of zeros. This random point is referred to as the seed, and if a PRNG algorithm can be started with a seed derived from a truly unpredictable source, then its output becomes no longer predictable.
Selecting Unpredictable Seeds
Computer systems that use a PRNG will therefore often have some form of seed() function alongside their rand() function. Sometimes this will take a number as an argument allowing the user to provide their own random number, at other times they will take a random number from some source of their own. The Sinclair 8-bit home computers for example took their seed from a count of the number of TV frames since switch-on.
The not-very-random result of a thousand analogRead() calls.
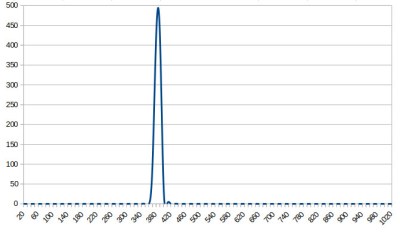
The Arduino Uno has a random() function that returns a random number from a PRNG, and as you might expect it also has a randomSeed() function to ensure that the PRNG is seeded with something that will underpin its randomness. All well and good, you might think, but sadly the Atmel processor on which it depends has no hardware entropy source from which to derive that seed. The user is left to search for a random number of their own, and sadly as we were alerted by a Twitter conversation between @scanlime and @cybergibbons, this is the point at which matters start to go awry. The documentation for randomSeed() suggests reading the random noise on an unused pin via analogRead(), and using that figure does not return anything like the required level of entropy. A very quick test using the Arduino Graph example yields a stream of readings from a pin, and aggregating several thousand of them into a spreadsheet shows an extremely narrow distribution. Clearly a better source is called for.
Noisy Hardware or a Jittery Clock
As a slightly old-school electronic engineer, my thoughts turn straight to a piece of hardware. Source a nice and noisy germanium diode, give it a couple of op-amps to amplify and filter the noise before feeding it to that Arduino pin. Maybe you were thinking about radioactive decay and Geiger counters at that point, or even bouncing balls. Unfortunately though, even if they scratch the urge to make an interesting piece of engineering, these pieces of hardware run the risk of becoming overcomplex and perhaps a bit messy.
The significantly more random result of a thousand Arduino Entropy Library calls.
The best of the suggestions in the Twitter thread brings us to the Arduino Entropy Library, which uses jitter in the microcontroller clock to generate truly random numbers that can be used as seeds. Lifting code from the library’s random number example gave us a continuous stream of numbers, and taking a thousand of them for the same spreadsheet treatment shows a much more even distribution. The library performs as it should, though it should be noted that it’s not a particularly fast way to generate a random number.
So should you ever need a truly random number in your Arduino sketch rather than one that appears random enough for some purposes, you now know that you can safely disregard the documentation for a random seed and use the entropy library instead. Of course this comes at the expense of adding an extra library to the overhead of your sketch, but if space is at a premium you still have the option of some form of hardware noise generator. Meanwhile perhaps it is time for the Arduino folks to re-appraise their documentation.
We’ve all heard linear motors, like those propelling Maglev trains, described as “unrolled” versions of regular electric motors. The analogy is apt and helps to understand how a linear motor works, but it begs the question: what if we could unroll the stator in two dimensions instead of just one?
That’s the idea behind [BetaChecker’s] two-axis stepper motor, which looks like it has a lot of potential for some interesting applications. Build details are sparse, but from what we can gather from the videos and the Hackaday.io post, [BetaChecker] has created a platen of 288 hand-wound copper coils, each of which can be selectively controlled through a large number of L293 H-bridge chips and an Arduino Mega. A variety of sleds, each with neodymium magnets in the base, can be applied to the platen, and depending on how the coils are energized, the sled can move in either dimension. For vertical applications, it looks like some coils are used to hold the sled to the platen while others are used to propel it. There are RGB LEDs inside the bore of each coil, although their function beyond zazzle is unclear.
We’d love more details to gauge where this is going, but with better resolution, something like this could make a great 3D-printer bed. If one-dimensional movement is enough for you, though, check out this linear stepper motor that works on a similar principle.
Lasers are such a fundamental piece of technology today that we hardly notice them. So cheap that they can be given away as toys and so versatile that they make everything from DVD players to corneal surgery a reality, lasers are one of the building blocks of the modern world. Yet lasers were once the exclusive province of physicists, laboring over expansive and expensive experimental setups that seemed more the stuff of science fiction than workhouse tool of communications and so many other fields. The laser has been wildly successful, and the story of its development is an intriguing tale of observation, perseverance, and the importance of keeping good notes.
[Modustrial Maker] is at it again with another seriously cool LED visualizer. This time around, he’s built pair of pendant lights inspired by the rings of Saturn.
The rings are made mostly of walnut plywood using a circle router jig to make the cut easier. If you are inspired to make these for yourself, [Modustrial Maker] is clear — the order in which you cut out the pieces of the rings is absolutely critical. The pieces are glued together — with any edges sanded smooth — and edgebanding applied using a hot air gun due to the curved surface before staining. Duplicate for the second (or more if you so choose!) rings. Be forewarned — a little geometry will be needed to find anchor points that will keep the rings properly balanced.
[Modustrial Maker] suggests an off-the shelf LED controller to handle the visualizations and lighting effects, but he used an Arduino Mega clone as the brains — code available here, a MonkeyJack MAX9814 electret mic, and a four-channel RF remote/transceiver to control the different modes. Pulsing along to the music, these rings make for sleek lighting indeed.