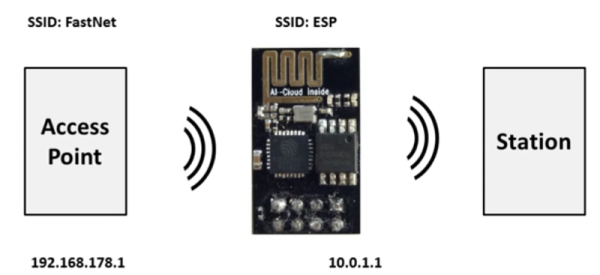
Few things are as frustrating as a WiFi signal that drops in and out. On a public network it is bad enough but at home? Even if you can live with it, your cohabitants will certainly impune your technical abilities if they don’t have solid WiFi. One solution is a WiFi repeater. You can buy one, of course. But you can also make one out of an ESP8266 and some code from GitHub. There is also a video about the project, below.
[Martin Ger’s] code implements NAT, so it isn’t a true WiFi repeater, but more of a bridge or router. Of course, that means performance isn’t stellar, but tests show it can sustain about 5 Mbps, which isn’t bad for a little board that costs a couple of bucks. There is a limit of 8 clients, but that’s more than enough for a lot of cases. Even if you don’t want to use it as a router, it has a mesh mode that could be a basis for some interesting projects all by itself.
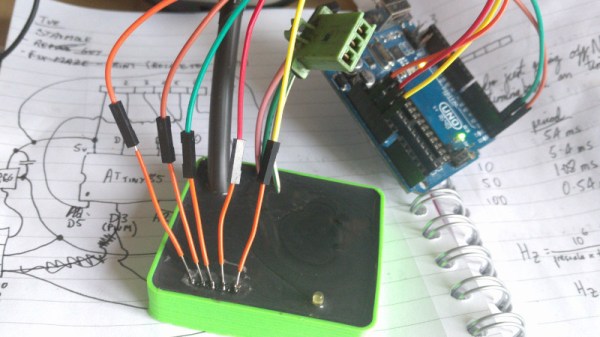
After swapping the engine out in his scooter, [James Stanley] made an unfortunate discovery. The speedometer was digitally controlled, and while the original engine had a sensor which would generate pulses for it to interpret, his new engine didn’t. Learning that the original sensor would pull the signal wire to ground each time it detected a tooth of one of the spinning gears, [James] reasoned he needed to find a way to detect the scooter’s speed and create these pulses manually.
To find the scooter’s speed, he installed a magnet on the front wheel and a hall effect sensor on the fork to detect each time it passed by. Since the wheel is of a known circumference, timing the pulses from the sensor allows calculation of the current speed. A GPS receiver could be used if you wanted fewer wires, but the hall effect sensor on the wheel is simple and reliable. With the speed of the scooter now known, he needed to turn that into a signal the speedometer understands.
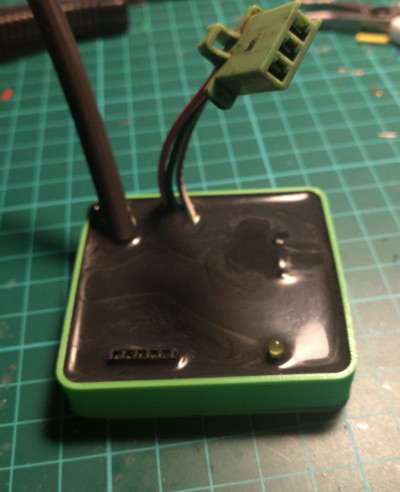
Speedometer controller potted with resin.
[James] wrote a program for an ATmega that would take the input from the wheel sensor and use it to create a PWM signal. This PWM signal drives a transistor, which alternates the speedometer sensor wire between low and floating. With a bit of experimentation, he was able to come up with an algorithm which equated wheel speed to the gearbox speed the speedometer wanted with accuracy close enough for his purposes.
While the software side of this project is interesting in its own right, the hardware is an excellent case study in producing robust electronic devices suitable for use on vehicles. [James] 3D printed a shallow case for the circuit board, and potted the entire device with black polyurethane resin. He even had the forethought to make sure he had a debugging LED and programming connector before he encapsulated everything (which ended up saving the project).
While the specific scenario encountered by [James] is unlikely to befall others, his project is an excellent example of not only interfacing with exiting electronics but producing rugged and professional looking hardware without breaking the bank. Even if scooters aren’t your thing, there are lessons to be learned from this write-up.
[Elon Musk] recently staged one of his characteristic high-profile product launches, at which he unveiled a new Tesla electric semi-truck. It was long on promise and short on battery pack weight figures, so of course [Real Engineering] smelled a rat. His video investigating the issue is below the break, but it’s not the link that caught our eye for this article. As part of the investigation he also created an online calculator to estimate the battery size required for a given performance on any electric vehicle.
It’s not perfectly intuitive, for example it uses SI units rather than real-world ones so for comparison with usual automotive figures a little mental conversion is needed from kilometres and hours to metres and seconds if you’re a metric user, and miles if you use Imperial-derived units. But still it’s a fascinating tool to play with if you have an interest in designing electric cars or conversions, as you can tweak the figures for your chosen vehicle indefinitely to find the bad news for your battery pack cost.
It’s very interesting from a technical standpoint to see a credible attempt at an electric truck, and we hope that the existing truck manufacturers will show us more realistic prototypes of their own. But we can’t help thinking that the overall efficiency of electric long-distance trucking could be improved hugely were they to make a truck capable of hauling more than one trailer at once. Any safety issues could be offset by giving these super-trucks their own highways, and with such dedicated infrastructure the power could be supplied from roadside cables rather than heavy batteries. In such circumstances these long trains of electrically hauled containers could be rather successful, perhaps we might call them railroads.
[Nothorwitzer] built a pretty incredible Rubik’s Cube table with hidden storage. The coolest feature of this table is the way it opens. Twisting the top section of the cube causes two drawers to pop out from the sides. The further you turn the top, the more the drawers extend. As the top hits its rotational limit, the lid of the cube lifts up, revealing the entire top section is hollow.
[Nothorwitzer] built the table from plywood, hardboard, and MDF. Hiding inside the base is an old car wheel hub and bearing. The entire rotating system spins on this assembly. The drawers are actuated by an ingenious set of plywood cams which push the two opposing drawers out as the top assembly rotates. Two levers pop the top open.
The attention to detail here is amazing. [Nothorwitzer] build a set of hidden hinges that make the lid invisible, yet allows it to lift up and over the edge of the cube. A spring ensures that the heavy lid will pop open neatly. The lid fit is so close that air pressure ensures the top doesn’t slam down when it is dropped.
While the internal parts of the table are left in bare wood, that the external parts had to match a real Rubik’s Cube. [Nothorwitzer] scrambled a cube, then copied the colors. The panels are made of cut hardboard. Each panel is spray painted, then hot glued to the cube. The body is plywood which [Nothorwitzer] grooved with a router to match the profile of a real Rubick’s Cube.
The project doesn’t end here. [Nothorwitzer] has created a second cube, which is even more tricky. The lid pops by pressing in one section. The drawers operate in a similar way, but there is a lever to engage or disengage the drawer opening. This may be the perfect place to hide your retro gaming systems!
Ah, Christmas, the time of festive good cheer, cherubic carol-singers standing in the crunchy snow, church bells ringing out across the frozen landscape, Santa Claus in his red suit flying down the chimney with a sack of presents, the scent of Christmas meals cooking heavy upon the air, and a Canadian guy wearing a trainset.
Wait a minute, we hear you say, a Canadian guy wearing a trainset? That’s right, not satisfied with the sheer awfulness of his ugly Christmas sweater on its own, [BD594] made it extra-special by incorporating a working Christmas tree trainset into the ensemble. As if the discovery that Christmas tree trainsets are a thing was not enough, we are treated to the spectacle of one on a plywood ring suspended from a particularly obnoxious Christmas-themed garment. Not all hacks are in good taste, and in fairness we have to note that this one is tagged as comedy rather than railroad engineering.
You can view the result in the video below the break. It’s short on technical detail, which is a slight shame as even though there are few mysteries in powering a small trainset it might be interesting to know how the method used to suspend the baseboard. We’d suspect a harness underneath that jumper, as Christmas garments are built for looks rather than strength.
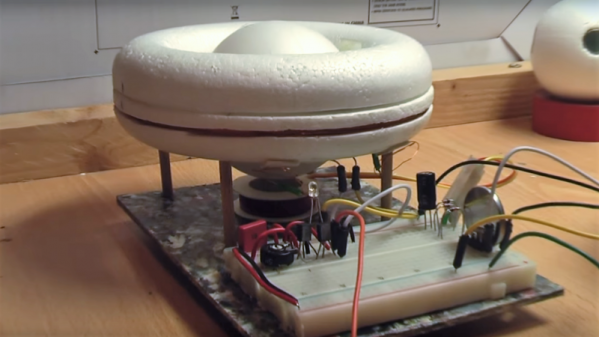
Can you run an electric motor for two years on a single lithium coin cell? [IamWe] figured out how to do it, and even though his donut motor doesn’t look like any motor we’ve ever seen before, it’s a pretty solid lesson in low-current design.
The donut motor is really just a brushless DC motor with a sign-pole stator and a multi-pole rotor. The frame of the motor is built from a styrofoam donut, hence the motor’s name. The rotor is a styrofoam sphere with neodymium magnets embedded around its equator. A sharpened bicycle spoke serves as an axle, and clever magnetic bearings provide near-zero friction rotation. The stator coil comes from an old solenoid and is driven by a very simple two-transistor oscillator. [IamWe]’s calculations show that the single CR2032 coin cell should power this motor for over two years. This one looks easy enough to whip up that it might make a nice project for a long winter’s night. Watch it spin in the video below.
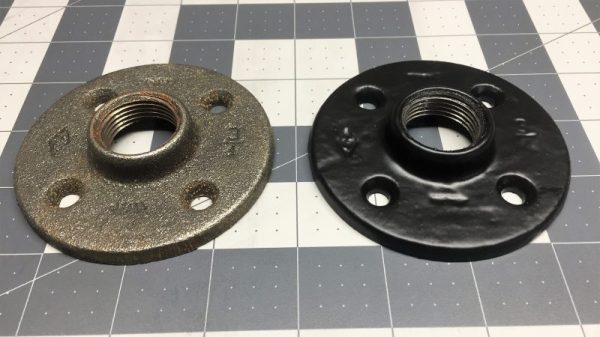
There’s no beating the beauty and durability of a high-quality powder-coated part. There’s just something about the look and feel of the finish that goes far beyond mere painting and makes it worth the effort and expense. The typical electrostatic spray powder-coating setup can be expensive, though, and not necessarily suitable for every workpiece.
Enter the fluidized-bed powder coating chamber, perfect for limited runs of small parts, and the brainchild of [Andrew Mayhall]. With a business providing furniture kits based on iron pipe, [Andrew] needed a way to finish flanges and fittings, and powder coating provided the best look. The fluidizer he built is a great alternative to spray coating; it blows air through a bed of fine thermoplastic granules, which causes them to act like a fluid. It’s similar to the fluidized-bed hot tub we recently featured, but on a much smaller scale and with different requirements based on the ultrafine particle size and aggregation properties of the powder. [Andrew] had to add mechanical agitation to achieve a homogeneous fluid bed, and after much experimentation he’s now able to dip preheated parts into the bed and achieve one-step powder coating. The video after the break shows some of the operational details.
Does electrostatic powder-coating sound like more of your thing? No problem – DIY solutions abound, and a homebrew oven to bake your parts may be as close as the nearest file cabinet.