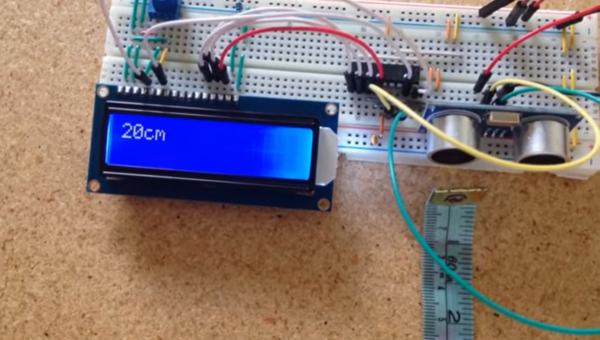
Beautiful DIY Ambilight Display

A proper battlestation — or more colloquially, computer desk — setup can sometimes use a bit of technical flair to show off your skills. [fightforlife2] has shared their DIY ambilight monitor backlighting that flows through different colours which mimic what is displayed on the screen.

[fightforlife2]’s setup uses fifty RGB LEDs with individual controllers that support the FastLED library, regulated by an Arduino Nano clone — although any will suffice. The power requirement for the display was a bit trickier, ultimately requiring 3 amperes at 5V; an external power brick can do the trick, but [fightforlife2] also suggests the cavalier solution of using your computer power supply’s 5V line — adding the convenience of shutting off the ambilight display when you shut down your PC!

Continue reading “Beautiful DIY Ambilight Display”

The Zero Ohm Resistor

What’s your favorite value of resistor? 1K? 10K? They’re all fine, but when you need nearly no resistance at all, nothing beats the good old zero-ohm resistor.

Wait a minute! Resistors are supposed to resist current. What the heck does a zero-ohm resistor do? Well, the short story (tee-hee!) is that it’s like a jumper for single-sided surface-mount boards. In the bad old days, companies used to save money by running single-sided boards, and you could buy wire jumpers to help make the layout that much easier.

Fast forward to the modern era, where there’s not a through-hole component to be seen. What’s the resistance (ideally) of a wire? Zero ohms. And thus the zero-ohm resistor was born. We have a whole spool of them in our closet in 1206, the largest SMD size that we use, in order to be able to sneak two or three tracks underneath, even on a home-etched board. They’re great.

Anyway, what set us off rhapsodizing about the lowest value resistor was this article on the peculiarities of the zero ohm resistor. Of course, nothing has zero resistance, and the article walks you through some of their real-world properties. Enjoy!

Talking Neural Nets

Speech synthesis is nothing new, but it has gotten better lately. It is about to get even better thanks to DeepMind’s WaveNet project. The Alphabet (or is it Google?) project uses neural networks to analyze audio data and it learns to speak by example. Unlike other text-to-speech systems, WaveNet creates sound one sample at a time and affords surprisingly human-sounding results.

Before you rush to comment “Not a hack!” you should know we are seeing projects pop up on GitHub that use the technology. For example, there is a concrete implementation by [ibab]. [Tomlepaine] has an optimized version. In addition to learning English, they successfully trained it for Mandarin and even to generate music. If you don’t want to build a system out yourself, the original paper has audio files (about midway down) comparing traditional parametric and concatenative voices with the WaveNet voices.

Another interesting project is the reverse path — teaching WaveNet to convert speech to text. Before you get too excited, though, you might want to note this quote from the read me file:

“We’ve trained this model on a single Titan X GPU during 30 hours until 20 epochs and the model stopped at 13.4 ctc loss. If you don’t have a Titan X GPU, reduce batch_size in the train.py file from 16 to 4.”

Last time we checked, you could get a Titan X for a little less than $2,000.

There is a multi-part lecture series on reinforced learning (the foundation for DeepMind). If you wanted to tackle a project yourself, that might be a good starting point (the first part appears below).

Continue reading “Talking Neural Nets”

Foundry From Scrapped Oven For Cheap, Clean Castings

Home-built foundries are a popular project, and with good reason. Being able to melt and cast metal is a powerful tool, even if it’s “only” aluminum. But the standard fossil-fuel fired foundries that most people build are not without their problems, which is where this quick and clean single-use foundry comes into play.

The typical home foundry for aluminum is basically a refractory container of some kind that can take the heat of a forced-air charcoal or coal fire. But as [Turbo Conquering Mega Eagle] points out, such fuels can lead to carbon contamination of the molten aluminum and imperfections when the metal is cast. With a junked electric range, [Turbo Conquering Mega Eagle] fabricates a foundry that avoids the issue in an incredibly dangerous way. The oven’s heating element is wrapped around an old stainless saucepan, fiberglass bats from the stove insulate the ad hoc crucible, and the range’s power cord is attached directly to the heating element. The video below shows that it does indeed melt aluminum, which is used to sand cast a fairly intricate part.

We can’t see getting more than one use out of this setup, though, so it’s only as sustainable as the number of ranges you can round up. But it’s worth keeping in mind for one-off jobs. For a more permanent installation, check out this portable propane-powered foundry. And to see what you can make with one, check out this engine breather cast from beer cans.

Continue reading “Foundry From Scrapped Oven For Cheap, Clean Castings”

Making A Spectrum Analyzer The Wrong Way On An ATtiny85

Everyone’s a critic, but it’s hard to argue with success. And that’s exactly what [agp.cooper] has with his ATtiny85-based spectrum analyzer devices.

The “normal” way to build a spectrum analyzer is to collect a bunch of samples and run a Fast Fourier Transform (FFT) on them all in one shot. As the name implies, the FFT is fast, and the result is the frequency components of the sampled data. [agp.cooper]’s “wrong” way to do it takes the Goertzel algorithm, which is used for detecting the intensity of a particular frequency, and scanning across the frequency range of interest. It’s a lot slower than a single FFT but, importantly for the ATtiny85 that he implements this on, it’s less demanding of the RAM.

Continue reading “Making A Spectrum Analyzer The Wrong Way On An ATtiny85”

Thwomp Drops Brick On Retro Gaming

[Geeksmithing] wanted to respond to a challenge to build a USB hub using cement. Being a fan of Mario Brothers, a fitting homage is to build a retro-gaming console from cement to look just like your favorite Mario-crushing foe. With a Raspberry Pi Zero and a USB hub embedded in it, [Geeksmithing] brought the Mario universe character that’s a large cement block — the Thwomp — to life.

[Geeksmithing] went through five iterations before he arrived at one that worked properly. Initially, he tried using a 3D printed mold; the cement stuck to the plastic ruining the cement on the face. He then switched to using a mold in liquid rubber (after printing out a positive model of the Thwomp to use when creating the mold). But the foam board frame for the mold didn’t hold, so [Geeksmithing] added some wood to stabilize things. Unfortunately, the rubber stuck to both the foam board and the 3D model making it extremely difficult to get the model out.

Like [Han] in carbonite, that's a Rapsberry Pi Zero being encased in cement
Like [Han] in carbonite, that’s a Raspberry Pi Zero being encased in cement
Next up was regular silicone mold material. He didn’t have enough silicone rubber to cover the model, so he added some wood as filler to raise the level of the liquid. He also flipped the model over so that he’d at least get the face detail. He found some other silicone and used it to fill in the rest of the mold. Despite the different silicone, this mold worked. The duct tape he used to waterproof the Raspberry Pi, however, didn’t. He tried again, this time he used hot glue – a lot of hot glue! – to waterproof the Pi. This cast was better, and he was able to fire up the Pi, but after a couple of games his controller stopped working. He cracked open the cement to look at the Pi and realized that a small hole in the hot glue caused a leak that shorted out the USB port on the Pi. One last time, he thought, this time he used liquid electrical tape to waterproof the Pi.

The final casting worked and after painting, [Geeksmithing] had a finished cement Thwomp console that would play retro games. He missed the deadline for the USB Hub Challenge, but it’s still a great looking console, and his video has a lot of detail about what went wrong (and right) during his builds. There’s a great playlist on YouTube of the other entries in the challenge, check them out along with [Geeksmithing]’s video below!

Continue reading “Thwomp Drops Brick On Retro Gaming”

JOLED – A 3D Flip Dot Display

Flip-Dot displays are so awesome that they’re making a comeback. But awesome is nothing when you can have an insane flip-dot display that is three-dimensional with the dots floating in mid-air. Researchers at the Universities of Sussex and Bristol have built what they call JOLED, an array of floating pixels that can be controlled via a combination of ultrasonic standing waves and an electrostatic field. These “voxels” can be individually moved in space via ultrasonics, and can also be individually flipped or rotated through any angle, via the electrostatic field.

The key to the whole thing is something they call Janus Objects – hence JOLED. Janus particles have different features or chemistry on two opposite sides. A portion of each voxel is speckled with a small amount of titanium dioxide nano powder. This gives it a bipolar charge that makes it respond to the variable electrostatic field and hence capable of axial rotation. Half of each white voxel can then be covered with a contrasting color – red, blue, black – to achieve the flip dot effect. Each voxel appears to be a couple of millimeters in diameter. The ultrasonic actuators appear to be regular piezo transmitters found in every hacker’s parts bin. Transparent glass plates on opposite sides apply the variable electrostatic field.

While this is still experimental and confined to the research lab, future applications would be interesting. It would be like breaking e-ink displays out of their flat glass confines and giving them a third dimension. The short, two-minute video after the break does a good job of explaining what’s going on, so check it out. Now, who want’s to be the first to build a JOLED clock?

Thanks to [Garrow] for tipping us off about this.

Continue reading “JOLED – A 3D Flip Dot Display”