Classic British Phone Gets A Google Makeover

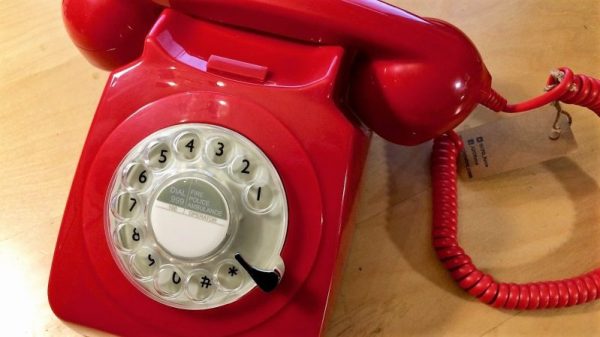
It may seem like an odd concept to younger readers, but there was once a time when people rented their phones rather than buying them outright. Accordingly, these phones were built like tanks, and seeing one of these sturdy classics of midcentury modern design can be a trip down memory lane for some of us. So retrofitting a retro phone with a Raspberry Pi and Google’s AIY seems like a natural project to tackle for nostalgia’s sake.

The phone that [Alasdair Allan] decided to hack was the iconic British desk telephone, the GPO-746, or at least a modern interpretation of the default rental phone from the late 60s through the 70s. But the phone’s looks were more important than its guts, which were stripped away to make room for the Raspberry Pi and Google AIY hat. [Alasdair] originally thought he’d interface the Pi to the rotary dial through DIOs, until he discovered the odd optical interface of the dialer — a mask rotates over a ring of photoresistors, one for each digit, exposing only one to light from an LED illuminated by a microswitch on the finger stop. The digital interface brings up the Google voice assistant, along with some realistic retro phone line sounds. It’s a work in progress, but you can see where [Alasdair] is in the video below.

If stuffing a Google Pi into a retro appliance sounds familiar, it might be this vintage intercom rebuild you have in mind, which [Alasdair] cites as inspiration for his build.

Continue reading “Classic British Phone Gets A Google Makeover”

There Is No Parity: Chien-Shiung Wu

Hold out your hands in front of you, palms forward. They look quite similar, but I’m sure you’re all too aware that they’re actually mirror images of each other. Your hands are chiral objects, which means they’re asymmetric but not superimposable. This property is quite interesting when studying the physical properties of matter. A chiral molecule can have completely different properties from its mirrored counterpart. In physics, producing the mirror image of something is known as parity. And in 1927, a hypothetical law known as the conservation of parity was formulated. It stated that no matter the experiment or physical interaction between objects – parity must be conserved. In other words, the results of an experiment would remain the same if you tired it again with the experiment arranged in its mirror image. There can be no distinction between left/right or clockwise/counter-clockwise in terms of any physical interaction.

Dr. Wu working with a particle accelerator via Biography.

The nuclear physicist, Chien-Shiung Wu, who would eventually prove that quantum mechanics discriminates between left- and right-handedness, was a woman, and the two men who worked out the theory behind the “Wu Experiment” received a Nobel prize for their joint work. If we think it’s strange that quantum mechanics works differently for mirror-image particles, how strange is it that a physicist wouldn’t get recognized just because of (her) gender? We’re mostly here to talk about the physics, but we’ll get back to Chien-Shiung Wu soon.

The End of Parity

Conservation of parity was the product of a physicist by the name of Eugene P. Wigner, and it would play an important role in the growing maturity of quantum mechanics. It was common knowledge that macro-world objects like planets and baseballs followed Wigner’s conservation of parity. To suggest that this law extended into the quantum world was intuitive, but not more than intuition. And at that time, it was already well known that quantum objects did not play by the same rules as classical objects. Would quantum mechanics be so strange as to care about handedness? Continue reading “There Is No Parity: Chien-Shiung Wu”

Mini Drill Made From A Motor

We love this hacked-together mini drill by [BuenaTec] that uses a DC7.2V 10K-RPM motor with a 1/8” Dremel chuck added on. Power is supplied by a USB-A cable with the data wires cut off, with a switch controlling the voltage and a rectifier diode protecting the USB port or battery pack from back voltage from the motor.

The drill isn’t very powerful, only able to bore holes in PCBs, plastic, and similar soft materials. However, you could see how just a couple more components could make it even more robust — maybe a speed controller and voltage booster? Even so, we appreciate this bare-bones, ultra-low budget approach — only the barest essentials are included, with the components held together with hot glue and solder. Also, no one is allowed to complain about their soldering iron after viewing this video.

For more projects involving motors, read up on this brushless motor made from 3D-printed parts and this guide to hand-winding quadcopter motors.


Laser-Cut Modular Toolbox

[ystoelen] created this modular wooden toolbox out of laser-cut 5mm plywood secured with leather hinges bolted into place. The leather strips secure the various tool boards with grommets connecting to plastic plugs. The toolboards use cross-shaped holes with laser-cut plugs and strips of elastic securing the tools, allowing each board to be uniquely configured depending on what tool is being stored there. There is a larger, “main” board, onto which smaller boards can be placed depending on what tools you’ll need.

While this is a clever approach to tool transport, we have some concerns about this project. Usually the problem with a box full of tools is that you’ve overloaded it and can’t readily lift it up. Often this involves a steel toolbox that won’t break, no matter what happens. But a plywood construct isn’t nearly that strong, and if overloaded or dropped it’s gonna take some damage.

For more toolbox inspirations, read our posts on a machine shop in a toolbox as well as this Transformers-themed portable workbench.


Lock In Amplifiers

If you have about an hour to kill, you might want to check out [Shahriar’s] video about the Stanford Research SR530 lock in amplifier (see below). If you know what a lock in amplifier is, it is still a pretty interesting video and if you don’t know, then it really is a must see.

Most of the time, you think of an amplifier as just a circuit that makes a small signal bigger in some way — that is, increase the voltage or increase the current. But there are whole classes of amplifiers designed to reject noise and the lock in amplifier is one of them. [Shahriar’s] video discusses the math theory behind the amplifier, shows the guts, and demonstrates a few experiments (including measuring the speed of sound), as well.

Continue reading “Lock In Amplifiers”

An Arduino Weather Station With An E-Ink Display

For our Northern Hemisphere readers the chill winds of winter are fast approaching, so it seems appropriate to feature a weather station project. Enjoy your summer, Southern readers!

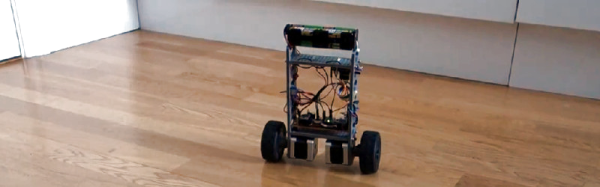
[Fandonov] has created a weather station project with an Arduino Uno at its heart and a Waveshare e-ink display as its face to the world, and as its write-up (PDF) describes, it provides an insight into both some of the quirks of these displays, and into weather forecasting algorithms.

The hardware follows a straightforward formula, aside from Arduino and display it boasts an Adafruit sensor board and a hardware clock. Software-wise though there are some tricks to give the display a scalable font that other tinkerers might find useful, drawing characters as a matrix of filled circle primitives.

The write-up gives an introduction to forecasting based only on local readings rather than on the huge volumes of data over a wide area used by professional meteorologists. In play here is the Zambretti algorithm, which takes the readings and information about whether they are rising or falling, and returns a forecast from a look-up table.

As we’ll all be aware, even professional weather forecasting is fraught with inaccuracies, but this is nonetheless an interesting project that is very much worth a second look. Meanwhile we’ve covered huge numbers of weather stations in the past, a couple of interesting ones are this one using a classic TI99/4A home computer, and more relevant here, this one using an e-paper badge.

Thanks [Phil] for the tip!

A Robot That Can Still Keep Its Balance After A Night In The Pub

One of the star attractions at the recent bring-a-hack prior to our London unconference was [Dan]’s two-wheeled self-balancing robot. As the assorted masses of the Hackaday readership consumed much fine ale and oohed and ahhed over each others work, there it stood on a pub table, defying all attempts to topple it.

In a way a successful self-balancer can look surprisingly unexciting because it achieves the seemingly unimpressive task of just standing there and not doing much except trundling about, but to take such a superficial view belies the significant feat of engineering that gives the self-balancer its party trick. And it’s no mean achievement to create one from fairly basic hardware, so how has he done it?

The 3D-printed frame holds a pair of stepper motors to do the hard work, while a piece of stripboard acts as carrier for boards containing the MPU6050 accelerometer and DRV8825 stepper motor drivers. Meanwhile the brains of the whole show started as an Espruino Pico but has since been moved to an ESP32.

There is a linked GitHub repository with all the code, and if our description of seeing it in a London pub isn’t good enough for you then you can see it in action in the video below.

Continue reading “A Robot That Can Still Keep Its Balance After A Night In The Pub”