Ambitious Homebrew X-Ray Machine Reveals What Lies Within

We’re not quite sure what to say about this DIY X-ray machine. On the one hand, it’s a really impressive build, with incredible planning and a lot of attention to detail. On the other hand, it’s a device capable of emitting dangerous doses of ionizing radiation.

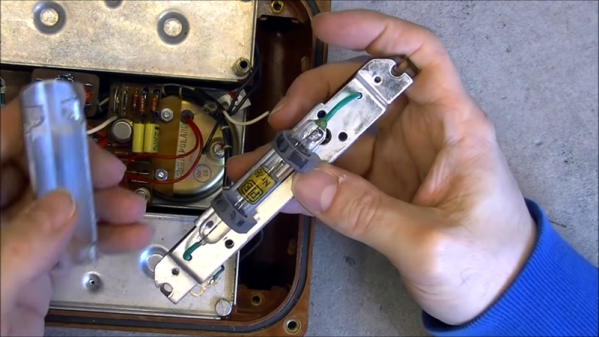
In the end, we’ll leave judgment on the pros and cons of [Fran Piernas]’ creation to others. But let’s just say it’s probably a good thing that a detailed build log for this project was not provided. Still, the build video below gives us the gist of what must have taken an awfully long time and a fair amount of cash to pull off. The business end is a dental X-ray tube of the fixed anode variety. We’ve covered the anatomy and physiology of these tubes previously if you need a primer, but basically, they use a high voltage to accelerate electrons into a tungsten target to produce X-rays. The driver for the high voltage supply, which is the subject of another project, is connected to a custom-wound transformer to get up to 150V, and then to a voltage multiplier for the final boost to 65 kV. The tube and the voltage multiplier are sealed in a separate, oil-filled enclosure for cooling, wisely lined with lead.

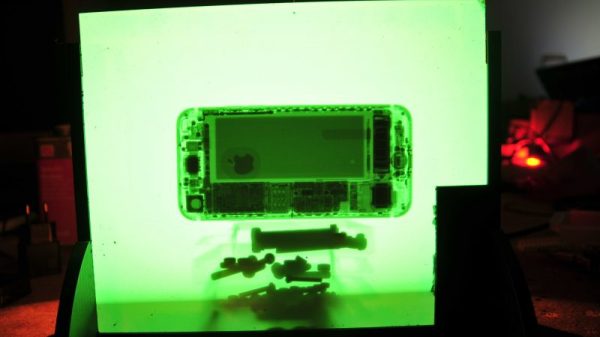
The entire machine is controlled over a USB port. An intensifying screen converts the X-rays to light, and the images of various objects are quite clear. We’re especially impressed by the fluoroscopic images of a laptop while its hard drive is seeking, but less so with the image of a hand, presumably [Fran]’s; similar images were something that [Wilhelm Röntgen] himself would come to regret.

Safety considerations aside, this is an incredibly ambitious build that nobody else should try. Not that it hasn’t been done before, but it still requires a lot of care to do this safely.

Continue reading “Ambitious Homebrew X-Ray Machine Reveals What Lies Within”

Build Your Own Anechoic Chamber

For professional-level sound recording, you’ll need professional-level equipment. Microphones and mixing gear are the obvious necessities, as well as a good computer with the right software on it. But once you have those things covered, you’ll also need a place to record. Without a good acoustic space, you’ll have all kinds of reflections and artefacts in your sound recordings, and if you can’t rent a studio you can always build your anechoic chamber.

While it is possible to carpet the walls of a room or randomly glue egg crate foam to your walls, [Tech Ingredients] tests some homemade panels of various shapes, sizes, and materials against commercially available solutions. To do this he uses a special enclosed speaker pointed at the material, and a microphone to measure the sound reflections. The tests show promising results for the homemade acoustic-absorbing panels, at a fraction of the cost of ready-made panels.

From there, we are shown how to make and assemble these panels in order to get the best performance from them. When dealing with acoustics, even the glue used to hold everything together can change the properties of the materials. We also see a few other cost saving methods in construction that can help when building the panels themselves as well. And, while this build focuses on acoustic anechoic chambers, don’t forget that there are anechoic chambers for electromagnetic radiation that use the same principles as well.

Thanks to [jafinch78] for the tip!

Continue reading “Build Your Own Anechoic Chamber”

The Space Station Has A Supercomputer Stowaway

The failed launch of Soyuz MS-10 on October 11th, 2018 was a notable event for a number of reasons: it was the first serious incident on a manned Soyuz rocket in 35 years, it was the first time that particular high-altitude abort had ever been attempted, and most importantly it ended with the rescue of both crew members. To say it was a historic event is something of an understatement. As a counterpoint to the Challenger disaster it will be looked back on for decades as proof that robust launch abort systems and rigorous training for all contingencies can save lives.

But even though the loss of MS-10 went as well as possibly could be expected, there’s still far reaching consequences for a missed flight to the International Space Station. The coming and going of visiting vehicles to the Station is a carefully orchestrated ballet, designed to fully utilize the up and down mass that each flight offers. Not only did the failure of MS-10 deprive the Station of two crew members and the experiments and supplies they were bringing with them, but also of a return trip which was to have brought various materials and hardware back to Earth.

But there’s been at least one positive side effect of the return cargo schedule being pushed back. The “Spaceborne Computer”, developed by Hewlett Packard Enterprise (HPE) and NASA to test high-performance computing hardware in space, is getting an unexpected extension to its time on the Station. Launched in 2017, the diminutive 32 core supercomputer was only meant to perform self-tests and be brought back down for a full examination. But now that its ticket back home has been delayed for the foreseeable future, NASA is opening up the machine for other researchers to utilize, proving there’s no such thing as a free ride on the International Space Station.

Continue reading “The Space Station Has A Supercomputer Stowaway”

Why Is Continuous Glucose Monitoring So Hard?

Everyone starts their day with a routine, and like most people these days, mine starts by checking my phone. But where most people look for the weather update, local traffic, or even check Twitter or Facebook, I use my phone to peer an inch inside my daughter’s abdomen. There, a tiny electrochemical sensor continuously samples the fluid between her cells, measuring the concentration of glucose so that we can control the amount of insulin she’s receiving through her insulin pump.

Type 1 diabetes is a nasty disease, usually sprung on the victim early in life and making every day a series of medical procedures – calculating the correct amount of insulin to use for each morsel of food consumed, dealing with the inevitable high and low blood glucose readings, and pinprick after pinprick to test the blood. Continuous glucose monitoring (CGM) has been a godsend to us and millions of diabetic families, as it gives us the freedom to let our kids be kids and go on sleepovers and have one more slice of pizza without turning it into a major project. Plus, good control of blood glucose means less chance of the dire consequences of diabetes later in life, like blindness, heart disease, and amputations. And I have to say I think it’s pretty neat that I have telemetry on my child; we like to call her our “cyborg kid.”

But for all the benefits of CGM, it’s not without its downsides. It’s wickedly expensive in terms of consumables and electronics, it requires an invasive procedure to place sensors, and even in this age of tiny electronics, it’s still comparatively bulky. It seems like we should be a lot further along with the technology than we are, but as it turns out, CGM is actually pretty hard to do, and there are some pretty solid reasons why the technology seems stuck.

Continue reading “Why Is Continuous Glucose Monitoring So Hard?”

FPV Antenna Leans Into The Bank

If you’re doing remote controlled flight, odds are you’re also flying FPV. Or you at least have a camera on board. If you’re transmitting to the ground, you may have noticed the antenna on your plane has some weird radiation patterns; bank your plane to the left or right, and your signal gets worse. [Ant0003] over on Thingiverse has a great solution to this problem that’s small, lightweight, and will fit into just about any airframe.

[Ant]’s flying a Mini Talon with FPV, and since planes turn slower than drones, and can fly much further than multicopters, the radiation pattern of the antenna is very important. In this case, [Ant] wants to keep the antenna perpendicular to the ground. This problem was solved with a cheap 9-gram servo and a few 3D printed parts that hold an SMA connector. One end of this wire goes to the video transmitter, and the antenna is screwed into the other end.

A servo alone does not make the antenna point straight up. To do this, [Ant] needed to program his flight controller. He’s using iNav, and a few clicks of the mouse makes one servo channel do whatever the gyroscope isn’t doing. The results (video below) speak for themselves. It’s an antenna that always points straight up, which is exactly what this video transmitter needed.

Continue reading “FPV Antenna Leans Into The Bank”

The Electronics Of Cold War Nightmares

It is a good bet that if you look around you, you’ll be able to find at least one smoke detector in sight. If not, there’s probably one not too far away. Why not? Fires happen and you’d like to know about a fire even if you are sleeping or alert others if you are away. During the cold war, there were other things that people didn’t want to sleep through. [Msylvain59] tears down two examples: a Soviet GSP-11 nerve agent detector and a Polish RS-70 radiation alarm. You can see both videos, below.

In all fairness, the GSP-11 is clearly not meant for consumer use. It actually uses a test strip that changes colors and monitors the color change. Presumably, the people operating it were wearing breathing gear because the machine could take quite a while to provide a positive output. Inside reminded us of a film processing machine, which isn’t too far off.

The radiation monitor looks more like a miniature version of an old floor-standing radio. The case design, the thick-traced, single-sided, hand-drawn printed wiring board, and the –by today’s standards — huge parts within all contribute to making this look like a piece of radio gear from the 1970s or even earlier.

Continue reading “The Electronics Of Cold War Nightmares”

The Electric Imp Sniffs Out California Wildfires

The wildfires in California are now officially the largest the state has ever seen. Over 50,000 people have been displaced from their homes, hundreds are missing, and the cost in property damage will surely be measured in the billions of dollars when all is said and done. With a disaster of this scale just the immediate effects are difficult to conceptualize, to say nothing of the collateral damage.

While not suggesting their situation is comparable to those who’ve lost their homes or families, Electric Imp CEO [Hugo Fiennes] has recently made a post on their blog calling attention to the air quality issues they’re seeing at their offices in Los Altos. To quantify the problem so that employees with respiratory issues would know the conditions before they came into work, they quickly hacked together a method for displaying particulate counts in their Slack server.

The key to the system is one of the laser particle sensors that we’re starting to see more of thanks to a fairly recent price drop on the technology. A small fan pulls air to be tested into the device, where a very sensitive optical sensor detects the light reflected by particles as they pass through the laser beam. The device reports not only how many particles are passing through it, but how large they are. The version of the sensor [Hugo] links to in his blog post includes an adapter board to make it easier to connect to your favorite microcontroller, but we’ve previously seen DIY builds which accomplish the same goal.

[Hugo] then goes on to provide firmware for the Electric Imp board that reads the current particulate counts from the sensor and creates a simple web page that can be viewed from anywhere in the world to see real-time conditions at the office. From there, this data can be plugged into a Slack webhook which will provide an instantaneous air quality reading anytime a user types “air” into the channel.

We’ve covered a number of air quality sensors over the years, and it doesn’t look like they’re going to become any less prevalent as time goes on. If anything, we’re seeing a trend towards networks of distributed pollution sensors so that citizens can collect their own data on their air they’re breathing.

[Thanks to DillonMCU for the tip.]