Engineers are, for the time being, only human. This applies even more so to executives, and all the other people that make up a modern organisation. Naturally, mistakes are made. Some are minor, while others are less so. It’s common knowledge that problems are best dealt with swift and early, and yet so often they are ignored in the hopes that they’ll go away.
You might have heard the name Takata in the news over the last few years. If that name doesn’t ring a bell you’ve likely heard that there was a major recall of airbag-equipped vehicles lately. The story behind it is one of a single decision leading to multiple deaths, scores of injuries, a $1 billion fine, and the collapse of a formerly massive automotive supplier.
If you’ve been kind enough to accompany me on these regular hardware explorations, you’ve likely recognized a trend with regards to the gadgets that go under the knife. Generally speaking, the devices I take apart for your viewing pleasure come to us from the clearance rack of a big box retailer, the thrift store, or the always generous “AS-IS” section on eBay. There’s something of a cost-benefit analysis performed each time I pick up a piece of gear for dissection, and it probably won’t surprise you to find that the least expensive doggy in the window is usually the one that secures its fifteen minutes of Internet fame.
DKC500RW installed on right side.
But this month I present to you, Good Reader, something a bit different. This time I’m not taking something apart just for the simple joy of seeing PCB laid bare. I’ve been given the task of repairing an expensive piece of antiquated oddball equipment because, quite frankly, nobody else wanted to do it. If we happen to find ourselves learning about its inner workings in the process, that’s just the cost of doing business with a Hackaday writer.
The situation as explained to me is that in the late 1990’s, my brother’s employer purchased a Yamaha Mark II XG “Baby Grand” piano for somewhere in the neighborhood of $20,000. This particular model was selected for its ability to play MIDI files from 3.5 inch floppy disks, complete with the rather ghostly effect of the keys moving by themselves. The idea was that you could set this piano up in your lobby with a floppy full of Barry Manilow’s greatest hits, and your establishment would instantly be dripping with automated class.
Unfortunately, about a month or so back, the piano’s Disklavier DKC500RW control unit stopped reading disks. The piano itself still worked, but now required a human to do the playing. Calls were made, but as you might expect, most repair centers politely declined around the time they heard the word “floppy” and anyone who stayed on the line quoted a price that simply wasn’t economical.
Before they resorted to hiring a pianist, perhaps a rare example of a human taking a robot’s job, my brother asked if he could remove the control unit and see if I could make any sense of it. So with that, let’s dig into this vintage piece of musical equipment and see what a five figure price tag got you at the turn of the millennium.
You’d think that something called “white fuming nitric acid” would be more than corrosive enough to dissolve just about anything. Heck, it’s rocket fuel – OK, rocket fuel oxidizer – and even so it still it wasn’t enough to pop the top on this vintage Fairchild μL914 integrated circuit, at least not without special measures.
As [John McMaster], part of the team that analyzed the classic dual 2-input NOR gate RTL chip from the 1960s, explains it, decapping modern chips is a straightforward if noxious process. Generally a divot is milled into the epoxy, providing both a reservoir for the WFNA and a roughened surface for it to attack. But the Fairchild chip, chosen for dissection for the Maker Faire Bay Area last week specifically because the features on the die are enormous by modern standards, was housed in an eight-lead TO-99 case with epoxy that proved nigh invulnerable to WFNA. [John] tried every chemical and mechanical trick in the book, going so far as to ablate epoxy with a Nd:YAG laser. He eventually got the die exposed, only to discover that it was covered with silicone rather than the silicon dioxide passivation layer of modern chips. Silicone can be tough stuff to remove, and [John] resorted to using lighter fluid as a solvent and a brush with a single bristle to clean up the die.
We applaud the effort that this took, which only proves that decapping is more art than science sometimes. And the results were fabulous; as Hackaday editor-in-chief [Mike Szczys] notes, the decapping led to his first real “a-ha moment” about how chips really work.
When Maker Faire Bay Area closed down early Saturday evening, the fun did not stop: there’s a strong pool of night owls among the maker demographic. When the gates close, the after-parties around San Mateo run late into the night, and Hackaday’s meetup is a strong favorite.
This year Hackaday and Tindie joined forces with Kickstarter and moved our combined event to B Street Station, a venue with more space for hacks than previous years. The drinks started flowing, great people started chatting, basked in an ever present glow of LEDs. A huge amount of awesome hardware showed up, so let’s take a look the demos and stunts that came out to play.
Sometimes, rather than going the commercialistic route, it can be nice to make a gift for that personal touch. [Mahesh Venkitachalam] had been down this very road before, often stumbling over that common hurdle of getting in too deep and missing the deadline of the occasion entirely. Not eager to repeat the mistake, help was enlisted early, and the iCE bling earrings were born.
The earrings were a gift for [Mahesh]’s wife, and were made in collaboration with friends who helped out with the design. The earrings use a Lattice iCE40UP5k FPGA to control an 8×8 grid of SMD LEDs. This is all achieved without the use of shift registers, with the LEDs all being driven directly from GPIO pins. This led to several challenges, such as routing all the connections and delivering enough current to the LEDs. The final PCB is a 4-layer design, which made it much easier to get all the lines routed effectively. A buffer is used to avoid damaging the FPGA by running too many LEDs at once.
It’s a tidy build, which makes smart choices about component placement and PCB design to produce an attractive end result. LEDs naturally lend themselves to jewelry applications, and we’ve seen some great designs over the years. Video after the break.
We were all glued to our screens for a moment a few weeks ago, watching the Scaled Composites Stratolaunch dual-fuselage space launch platform aircraft make its first flight. The six-engined aircraft represents an impressive technical feat by any standard, and with a wingspan of 385 ft (117 m) and payload weight of 550,000 lb (250 t), is touted as the largest ever flown.
Our own Brian Benchoff took a look at the possibility of hauling more mundane cargo as an alternative (and possibly more popular) use of its lifting capabilities. And in doing so mentioned that “by most measure that matter” this is the largest aircraft ever built. There are several contenders for the title of largest aircraft that depend upon different statistics, so which one really is the largest? Sometimes it’s not as clear as you’d think, but finding out leads us into a fascinating review of some unusual aeronautical engineering.
I spent a good chunk of Saturday afternoon hanging out at the Homebrew Robotics Club booth at Maker Faire Bay area. They have a ton of really interesting robot builds on display and I just loved hearing about what went into these two in particular.
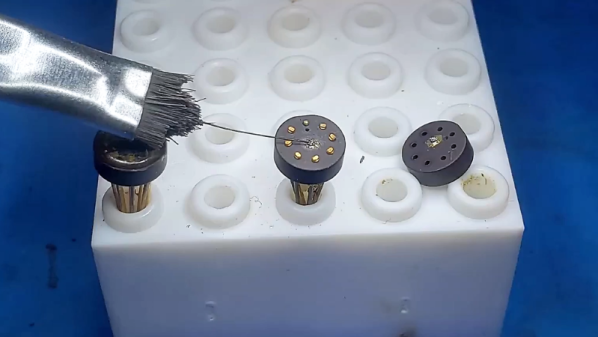
It’s obvious where BugBot gets its name. The six-legged walker is the creation of [Mark Johnston] who built the beast in a time where components for robots were much harder to come by. Each leg is driven by a very thin strand of muscle wire which contracts when high voltage is run through it. One of the really tricky parts of the build was finding a way to attach this wire. It has a very low melting point, so trying to solder it usually results in melting right through. His technique is to wrap the wire around the leg itself, then slide a small bit of brass tubing over it and make a crimp connection.
PIC microcontroller and muscle wire connections visible in this closeup
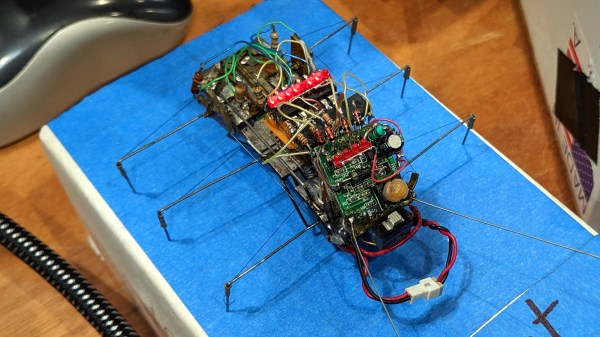
The underside of BugBot is impressive too! Two hoops normally hold the battery which is not shown here
At the heart of the little bug is a PIC microcontroller that is point-to-point soldered to the rest of the components. This only caused real problems once, when Mark somehow bricked the chip and had to replace it. Look close and you’ll see there’s a lot of fiddly bits to work around to pull that off. As I said, robot building was more difficult before the explosion of components and breakout modules hit the scene. The wireless control components on this were actually salvaged out of children’s RC toys. They’re not great by any stretch of the imagination, but it was the best source at the time and it works! You can find a demo of the robot embedded after the jump.
Ralph Campbell (left) and Mark Johnston (right)
An Android robot was on display, but of course, I was most interested in seeing what was beneath the skin. In the image above you can see the mask sitting to the left of the “Pat” skeleton. Ralph Campbell has been working on this build, and plans to incorporate interactive features like facial recognition and gesture recognition to affect the gaze of the robot.
Overview of “Pat” without skin
Hoops are coat hangers soldered together
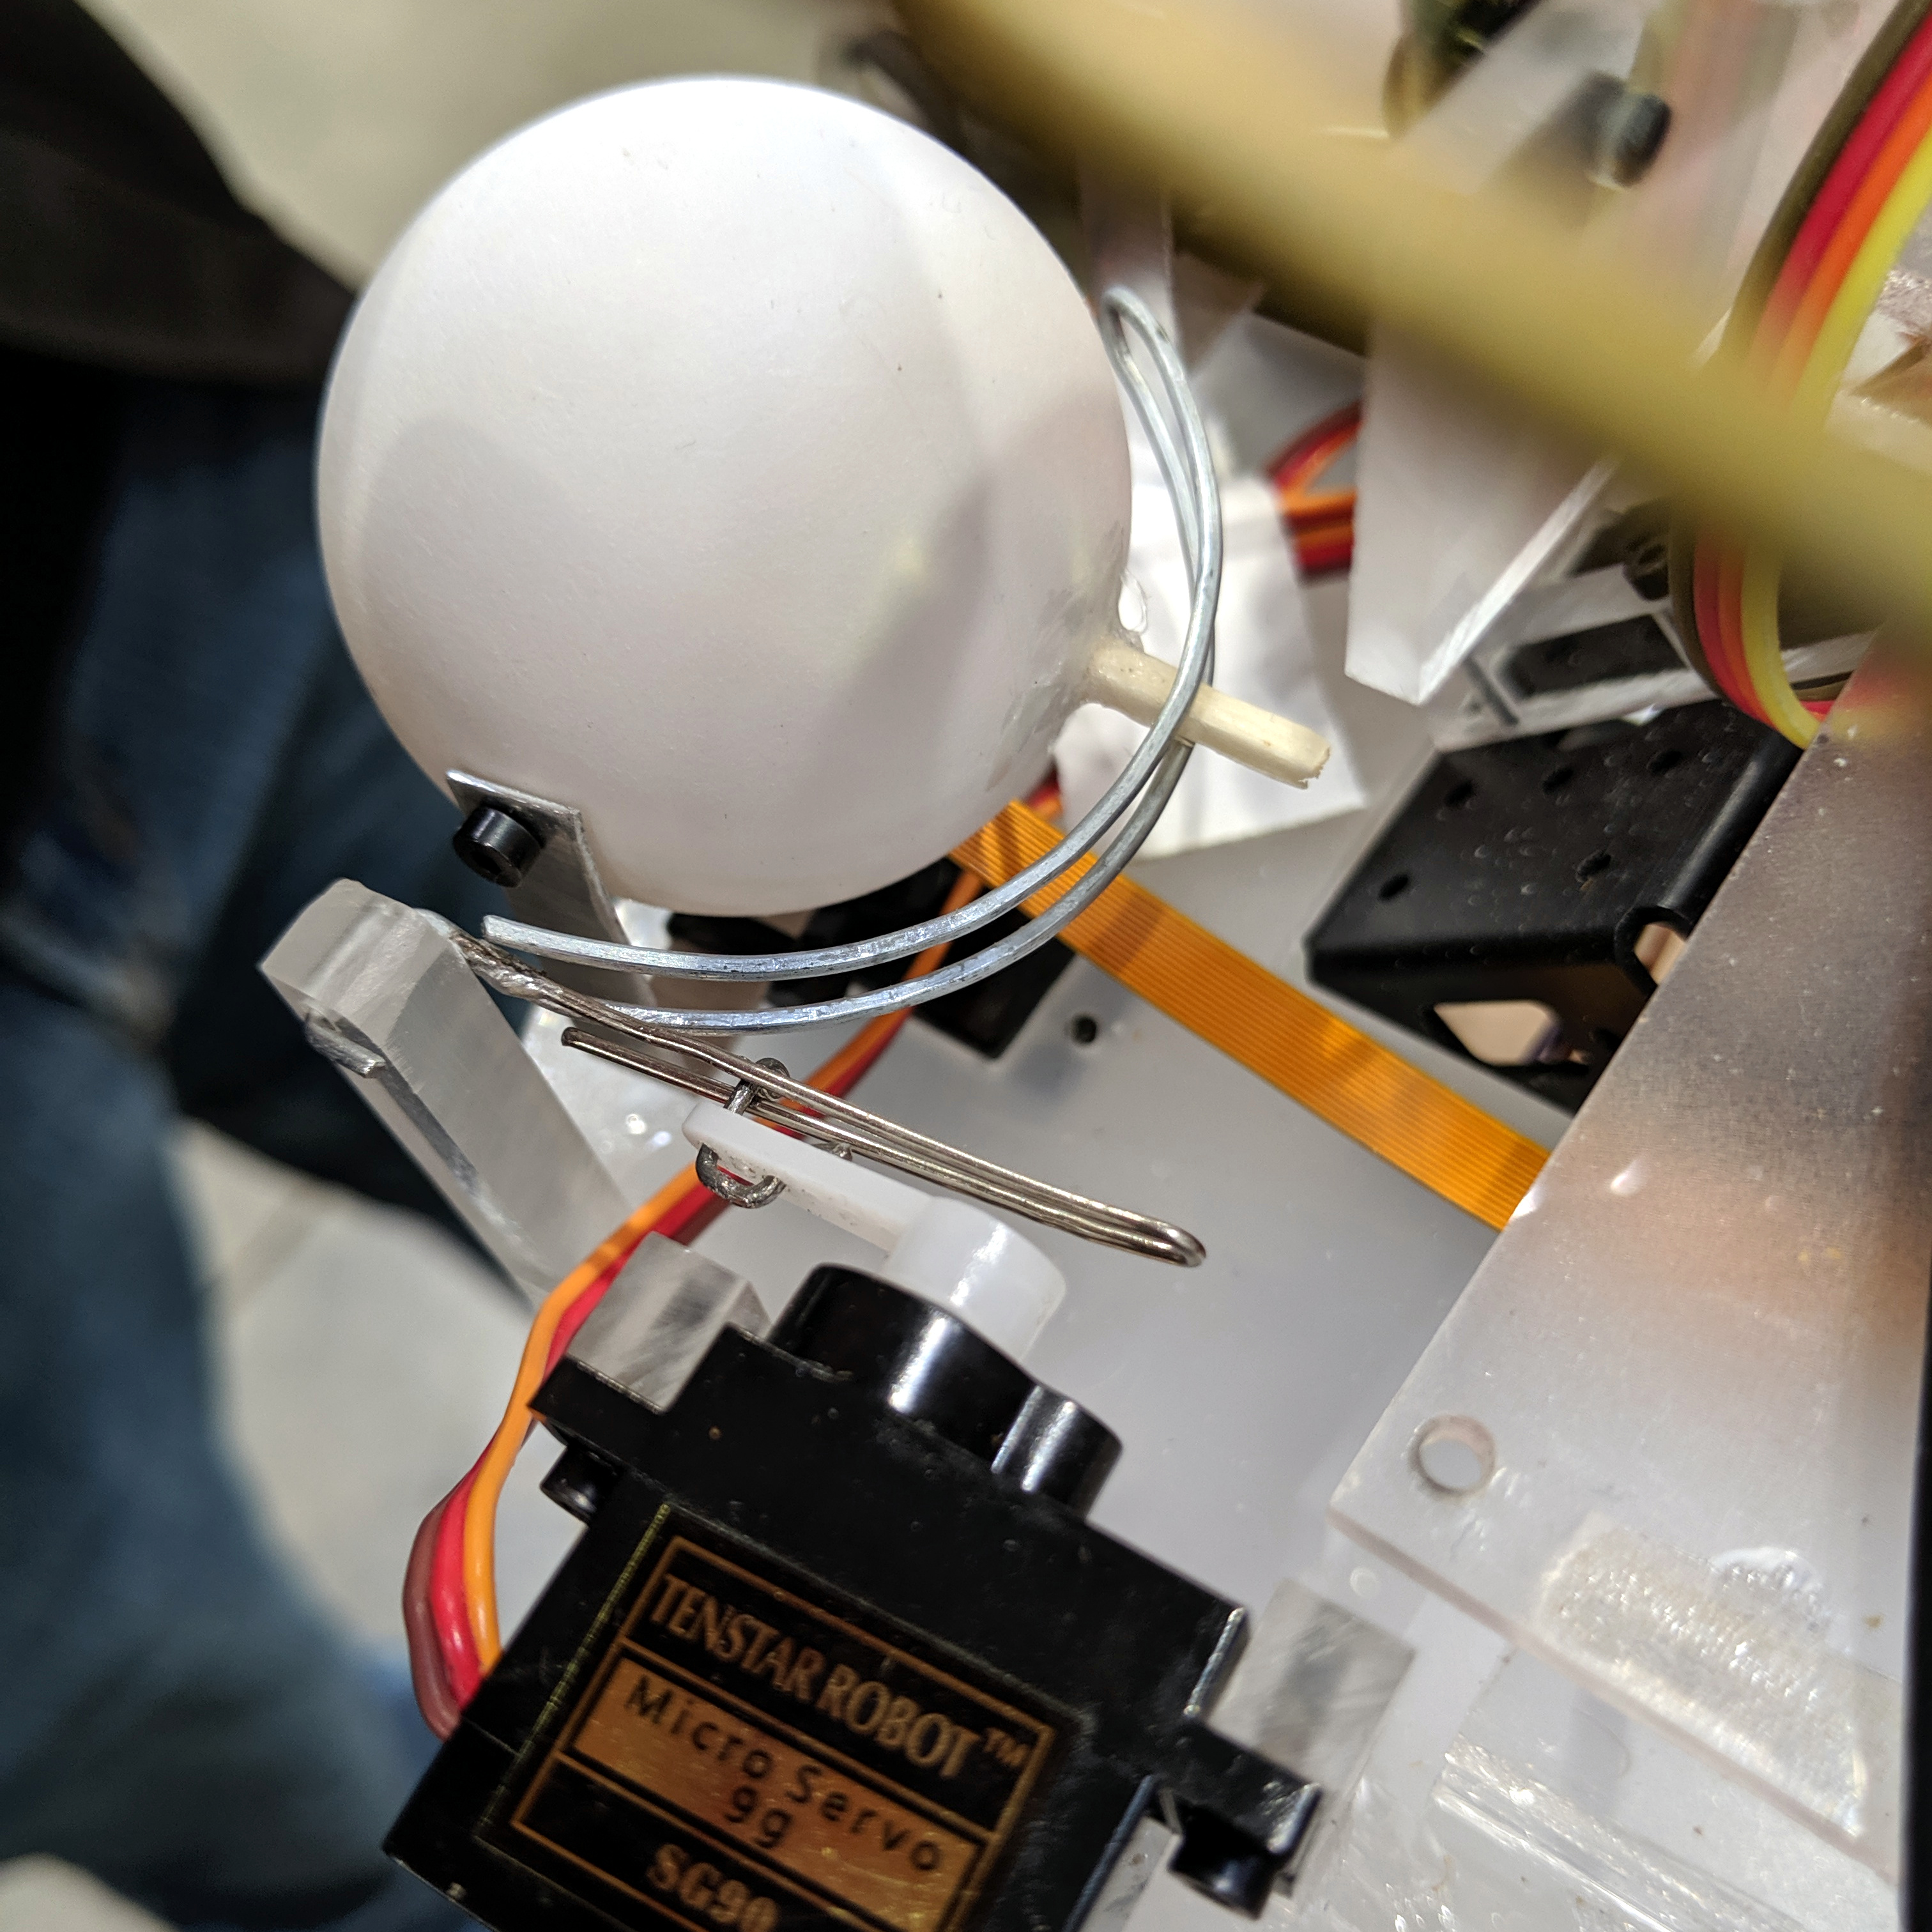
Inside each of the ping pong ball eyes is a Raspberry Pi camera (actually the Adafruit Spy Camera because of its small board size). Ralph has a separate demonstration for facial recognition that he’s in the process of incorporating. But for me, it was the mechanical design of the bot that I find fascinating.
The structure of the skull is coat hanger lashed and soldered together using magnet wires. The eyes move thanks to a clever frame made out of paper clips. The servos to the side of each eye move the gaze up and down, while a servo beneath the eye takes care of left and right. A wooden match stick performs double duty — keeping the camera in place as the pupil of the eye, and allowing it to pivot along the paperclip track of the vertical actuator. It’s as simple as it can be and I find it quite clever!