Seven-Segment Flip Clock Display Finally Finished

Earlier this year, we mentioned in a Hackaday Links article that [Spencer Hamblin] was in the process of building a seven-segment flip clock. Well, it’s finally finished, and it looks great!

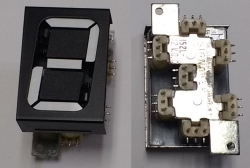
Vintage seven segment digits make up the display. These digits work the same way that flip-dot displays work – current through each segment’s coil creates a magnetic field which causes the segment to flip over. Current in the other direction creates the opposite magnetic field and flips the segment the other way. On these digits, there are three connections on the coils. The middle one is power and the other two are used to enable and disable the segment – ie., flip it one way or the other. To save on pins on the microcontroller, [Spencer] connected all the middle coil pins together on a digit. Each coil can be powered using a single pin on the microcontroller. Similarly, the segments for each digit are connected together as well, so one pin on the micro controls the same segment on each of the digits. The microcontroller in question is the AVR ATMega48.

There are two parts of the clock face left to do: AM/PM and whether the alarm is set or not. [Spencer] used a fifth digit, slightly offset, for those – the top and middle segments are used.

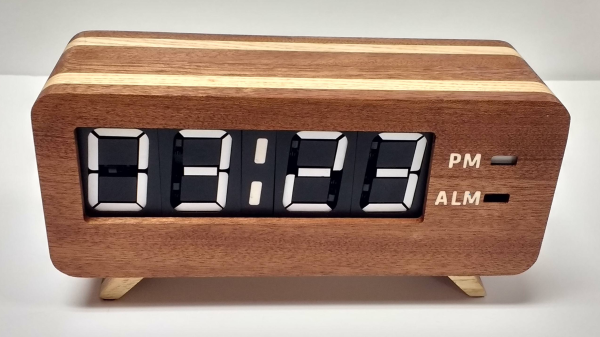
For the housing of the clock, [Spencer] used layers of offsetting colored wood. The wood (sapele and ash) were CNC cut and aligned. The back plate, also made from wood, holds buttons for setting the time and alarm, as well as some LEDs for what [Spencer] calls the “daylight alarm.” A capacitive sensor on the top of the unit (inside the wooden case) is used to turn the alarm off.

The result, after sanding and shellacing, looks amazing. [Spencer] nailed the art-deco look he was going for. There are plenty of pictures and the circuit designs, schematics and code are on [Spencer]’s Hackaday.io page, and you can find the Hackaday links post here. This is a complete log of a project we mentioned earlier on Hackaday, here, but there are other mechanical flip display clock projects, such as this DIY mechanical flip seven-segment prototype, or, you could create your own (really big) clock using this Lego mechanical seven-segment display.

via Reddit.

A Gloriously Impractical Electromechanical Display

For this year’s office holiday party, [Gavan Fantom] wanted to do something really special. Coworkers were messing with LEDs to come up with displays and decorations, but they lack that old-school feel of mechanical displays. He wanted to create something that had retro look of moving elements, but didn’t want to just recreate the traditional flip mechanism we’ve all seen over and over.

The mechanism to drive a single “pixel”.

What [Gavan] came up with is breathtakingly impractical 8×8 display that sounds as cool as it looks. Each “pixel” in the display is a 3D printed screw mechanism rotated by a hobby servo. As the pixel is rotated in its case, it becomes progressively more visible to the observer. The opacity of the pixel can even be adjusted by varying the degree of rotation, allowing for rudimentary display of grayscale images.

Each element in the display is made up of seven 3D printed parts and two nails, which the mechanism slides on to move forward and backward. An 8×8 display needs 64 elements, which means the entire display needs 64 servos, 128 nails, and a whopping 448 3D-printed parts. Even with two printers attacking the production in parallel, the printing alone took over two weeks to complete.

The display is powered by a Raspberry Pi and three “Mini Maestro” controllers which can each handle 24 servos. [Gavan] found some sample code in Python to pass commands to the Maestro servo controllers, which he used as a template when writing his own software. The Python script opens image files, converts them to grayscale, and then maps the value of each pixel to rotation of the corresponding servo. He says the software is a little rough and that there’s still some calibration to be done, but we think the results are phenomenal so far.

Mechanical displays are a favorite of hackers, due in no small part to the awesome noises they make while in operation. While we’ve seen some very creative approaches to this type of display before, what [Gavan] has created here is certainly in a league of its own.

Continue reading “A Gloriously Impractical Electromechanical Display”

Brute Forcing Passwords With A 3D Printer

Many of us use a 4 digit pin code to lock our phones. [David Randolph] over at Hak5 has come up a simple way to use a 3D printer to brute force these passwords. Just about every 3D printer out there speaks the same language, G-code. The same language used in CAD and CNC machines for decades.

[David] placed a numeric keypad on the bed of his printer. He then mapped out the height and positions of each key. Once he knew the absolute positions of the keys, it was easy to tell the printer to move to a key, then press and release. He even created a G-code file which would press every one of the 10,000 4 key pin combinations.

A file this large was a bit unwieldy though, so [David] also created a python script which will do the same thing — outputting the G-code and coordinates to brute force any 4 pin keypad. While a printer is quite a bit slower than Hak5’s own USB Rubber Ducky device (which acts as an automated keyboard), it will successfully brute force a password. Although most phones these days do limit the number of password attempts a user gets.

[David] admits this is probably useless in a clandestine/hacking application, but the video is still a great introduction to G-code and using 3D printers for non-printing functions.

Continue reading “Brute Forcing Passwords With A 3D Printer”

Solving A Rubik’s Cube With Just Two Motors

We’ve all seen videos of Rubik’s cube champions who can solve the puzzle in less than 5 seconds. And there are cube-twisting robots that can solve the cube even faster, often in under a second. This Rubik’s cube solver is not one of those robots, but it’s still pretty cool.

The reason we like Dexter Industries’ “BricKuber” is not for its lightning speed — it takes a minute or two to solve the puzzle. What we like is the simplicity of the approach to manipulating the cube. Built from LEGO parts, including Mindstorms motors and a BrickPi controller, the BricKuber uses only two motors to work the cube. One motor powers a square turntable upon which the cube sits, while the other powers an arm that does double duty — it either clamps the cube so the turntable can rotate a layer, or it rakes the cube to flip it 90° on the turntable. With a Pi Cam overhead, the rig images all six faces, calculates a solution to the cube, and then flips and twists the cube to solve it. It’s simultaneously mind-boggling and strangely relaxing to watch.

All the code is open source, and we strongly suspect a similar and possibly faster robot could be built without the LEGO parts. You might even be able to build one with popsicle sticks and an Arduino.

Continue reading “Solving A Rubik’s Cube With Just Two Motors”

Functioning Technic SLJ900 Bridge Builder

There is definitely a passion for detail and accuracy among LEGO builders who re-create recognizable real-world elements such as specific car models and famous buildings. However, Technic builders take it to a level the regular AFOLs cannot: Not only must their model look like the original, it has to function the same way. Case in point, [Wolf Zipp]’s version of a massive bridge-building rig. The Chinese-built SLJ900 rolls along the tops of bridges and adds ginormous concrete spans with the aplomb found only in sped-up YouTube videos. It is nevertheless a badass robot and a worthy target for Technicization.

[Wolf]’s model is 2 meters long and weighs 10.5kg, consisting of 13 LEGO motors and a pneumatic rig, all run by a handheld control box. The rig inserts LEGO connectors to a simulated bridge span, lifts it up, moves it over the next pier, then drops it down into place. The span weighs 2.5kg by itself — that ain’t no styrofoam! There are a lot of cool details in the project. For instance, the mechanism that turns the wheels for lateral movement consists of a LEGO-built pneumatic compressor that trips pneumatic actuators that lift the wheels off the ground and allows them to turn 90 degrees.

Sometimes it blows the mind what can be built with Technic. Check out this rope-braiding machine and this 7-segment display we’ve posted. Continue reading “Functioning Technic SLJ900 Bridge Builder”

An Interview With Alex Williams, Grand Prize Winner

Alex Williams pulled off an incredible engineering project. He developed an Autonomous Underwater Vehicle (AUV) which uses a buoyancy engine rather than propellers as its propulsion mechanism and made the entire project Open Source and Open Hardware.

The design aims to make extended duration missions a possibility by using very little power to move the vessel. What’s as remarkable as the project itself is that Alex made a goal for himself to document the project to the level that it is fully reproducible. His success in both of these areas is what makes the Open Source Underwater Glider the perfect Grand Prize winner for the 2017 Hackaday Prize.

We got to sit down with Alex the morning after he won to talk about the project and the path he took to get here.

Continue reading “An Interview With Alex Williams, Grand Prize Winner”

Mindstorms Forkliftbots Gonna Take Your Job

With every advance in robotics, we get closer to being able to order stuff from Amazon and have no human being participate in its delivery. Key step in this dream: warehouse robots, smart forklifts able to control and inventory and entire warehouse full of pallets, without the meat community getting involved. [Thomas Risager] designed just such a system as part of his Masters Thesis in Software Engineering. It consists of five LEGO Mindstorms robots working in concert (video embedded below), linked via WiFi to a central laptop. Mindstorms’ native OS doesn’t support WiFi (!!!) so he reflashed the EV3’s ARM9 chip with software developed using Java and running under LeJOS. On the laptop side [Thomas] wrote a C++ application that handles the coordination and routing of the forklifts. We can see a lot of weary forklift drivers ready to kick back and let a robot have the full-time job for a change.

The robots use WiFi to a central laptop. Mindstorms’ native OS doesn’t support WiFi (!!!) so [Thomas] reflashed the EV3’s ARM9 chip with software developed using Java and running under LeJOS. On the laptop side he wrote a C++ application that handles the coordination and routing of the forklifts. [Thomas] is sharing his forklift design.

Now to scale up — maybe with DIY forklifts like we published earlier? We can see a lot of weary forklift drivers ready to kick back and let a robot have the full-time job for a change.

Continue reading “Mindstorms Forkliftbots Gonna Take Your Job”