Everyone who deals with electronics knows that grounding is important. Your house has a copper rod in the ground. But [Kristen K6WX] has news: the idea of ground is kind of a myth. She explained at a talk at the recent ARRL National Convention, and if you didn’t make it, you can watch it in the video below.
The problem is analogous to finding something that is standing still. You really can only talk about something standing still relative to something else. Sure, you might be standing still outside a building, but seen from the moon, you and the building are spinning around at about one revolution per day. If you were sitting on the sun and not burning up, you’d see lots of motion of everything, and, of course, the sun itself is moving in the right frame of reference.
With all the tools and services available to us these days, it’s hard to narrow down a set of skills that the modern hacker or maker should have. Sure, soldering is a pretty safe bet, and most projects now require at least a little bit of code. But the ability to design 3D printable parts has also become increasingly important, and you could argue that knowledge of PCB design and production is getting up there as well. With home laser cutters on the rise, a little 2D CAD wouldn’t hurt either. So on, and so on.
If you ever wanted an example of the multitude of skills that can go into a modern hardware project, take a look at this gorgeous Vacuum Fluorescent Display (VFD) tube calculator built by [oskar2517]. As fantastic as the final product is, we were particularly impressed with everything it took to get this one over the finish line.
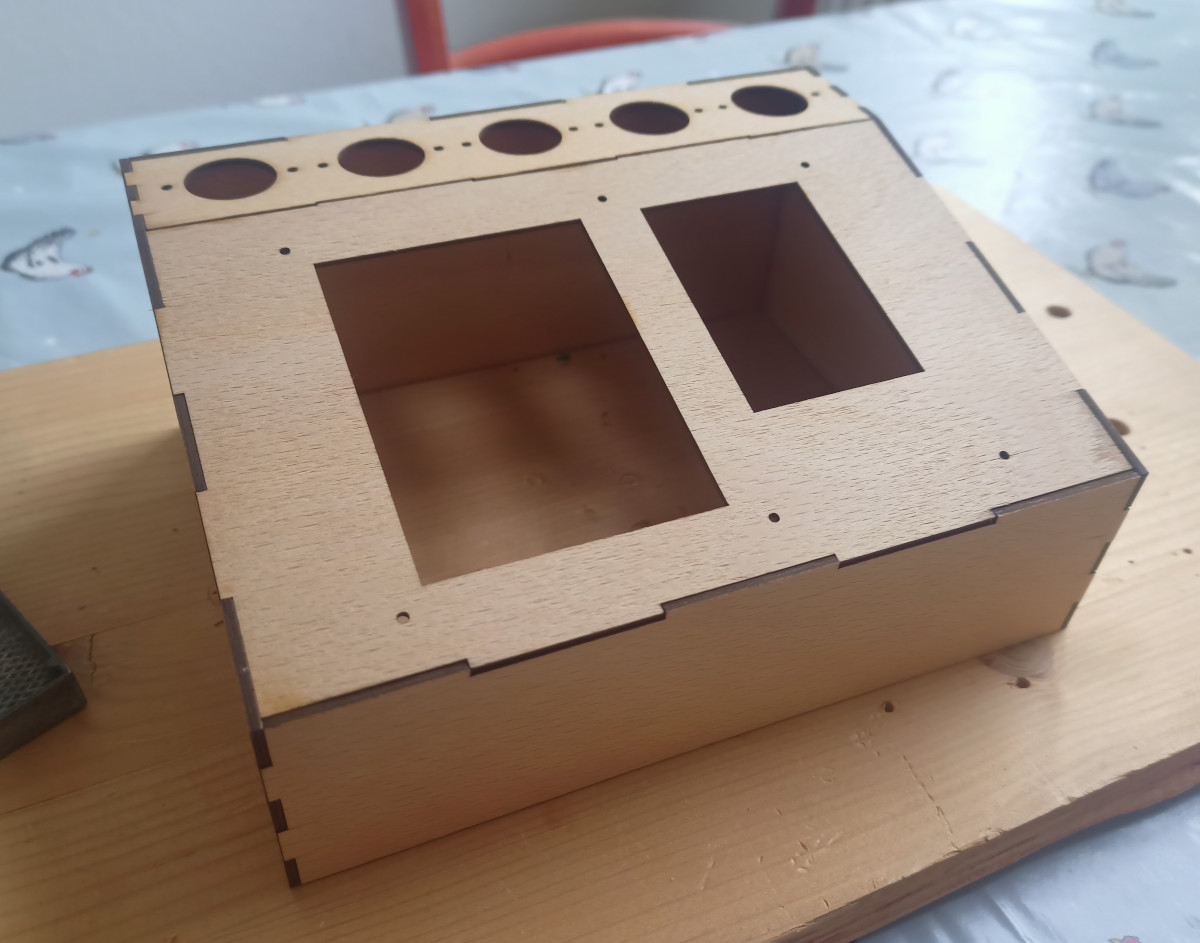
A .7 mm walnut veneer covers the pieced together plywood frame.
It’s got it all: 3D printed parts, a laser cut wooden frame, a custom PCB, and even a bit of old school woodworking. To top it all off, the whole thing has been meticulously documented.
But what’s perhaps most impressive here is that [oskar2517] was approaching most of these techniques for the first time. They had never before worked with IV-12 tubes, designed an enclosure in 3D, had parts laser cut, applied wood veneer, or designed a custom PCB. They did have solid experience writing code in C at least, which did make developing the Arduino firmware a bit easier.
Although they might look outwardly similar, VFD tubes like the IV-12 are easier to work with than Nixie tubes thanks to their lower operating voltage. That said, a look through our archives shows that projects using Nixies outnumber VFD tubes by nearly four to one, so there’s no shortage of folks willing to take on the extra effort for that sweet warm glow.
The world of experimental self-built aircraft is full of oddities, but perhaps the most eye-catching of all is the JD-2 “Dyke Delta” designed and built by [John Dyke] in the 1960s. Built to copy some of the 1950’s era innovations in delta-style jet aircraft, the plane is essentially a flying wing that seats four.
And it’s not just all good looks: people who have flown them say they’re very gentle, they get exceptional gas mileage, and the light wing-loading means that they can land at a mellow 55 miles per hour (88 kph). And did we mention the wings fold up so you can store it in your garage?
Want to build your own? [John] still sells the plans. But don’t jump into this without testing the water first — the frame is entirely hand-welded and he estimates it takes between 4,000 and 5,000 hours to build. It’s a labor of love. Still, the design is time-tested, and over 50 of the planes have been built from the blueprints. Just be sure to adhere to the specs carefully!
You want to pass TCP traffic from one computer to another, but there’s a doggone firewall in the way. Can they both see a shared file? Turns out, that’s all you need. Well, that and some software from [fiddyschmitt].
If you think about it, it makes sense. Unix treats most things as a file, so it is pretty easy to listen on a local TCP port and dump the data into a shared file. The other side reads the file and dumps the same data to the desired TCP port on its side. Another file handles data in the other direction. Of course, the details are a bit more than that, but that’s the basic idea.
Performance isn’t going to be wonderful, and the files keep growing until the program detects that they are bigger than 10 megabytes. When that happens, the program purges the file.
The code is written in C# and there are binaries for Windows and Linux on the release page. The examples show using shared files via Windows share and RDP, but we imagine any sort of filesystem that both computers can see would work. Having your traffic stuffed into a shared file is probably not great for security but, you know, you are already jumping a firewall, so…
Of course, no firewall can beat an air gap. Unless you can control the fans or an LED.
There’s an oft-quoted maxim that youngsters growing up on farms have a much stronger immune system than those growing up in cities. The idea is that they are exposed to far more dirt and eat food much closer to the field than their urban cousins. Without the help of a handy microbiologist or epidemiologist it’s difficult to judge its veracity, but personal experience suggests that the bit about dirt may be true at least.
It’s Dangerous To Idealise The Past.
It’s likely that the idea of rural kids seeing more bugs may come from the idea that those in the cities consume sterile processed food from the supermarket, it plays into a notion of an idealised past in which a somehow purer diet came more directly from its source. Somehow so the story goes, by only eating pasteurised and preserved foods, city dwellers are eating something inferior, stripped of its goodness. There’s a yearning for a purer alternative, something supermarkets are only too happy to address by offering premium products at elevated prices. So, was the diet of the past somehow more wholesome, and are those kids having their future health ruined by Big Food? Perhaps it’s time to turn back the clock a little to find out.
Even clean cows have bugs. Carolyn Parsons, CC BY-SA 4.0.
It’s likely everyone knows that food spoils if left unattended for long enough. Some foods, such as grain, can last a long time if kept dry, while others such as milk will go bad quite quickly. Milk in particular goes bad for two reasons; firstly because it’s an excellent bacterial growth medium, and secondly because it contains plenty of bacteria by its very nature. Even very clean cows have bugs.
If you lived in most large cities in the nineteenth century, the Industrial Revolution had likely placed you far enough from the nearest cow that your milk had a significant journey to make to reach you even with up-to-date rail transport. Without refrigeration, during that journey it had become a bacterial soup to the extent that even though it might not yet have gone sour, it had certainly become a bacterial brew. It was thus responsible for significant numbers of infections, and had become a major health hazard. So much for the purer diet consumed by city kids of the past. Continue reading “Pasteurisation: Probably Why You Survived Childhood”→
Writing code without having some way to easily organize sets of variables or data would be a real bother. Even if in the end you could totally do all of the shuffling of bits and allocating in memory by yourself, it’s much easier when the programming language abstracts all of that housekeeping away. In Ada you generally use a few standard types, ranging from records (equivalent to structs in C) to a series of containers like vectors and maps. As with any language, there are some subtle details about how all of these work, which is where the usage of these types in the Sarge project will act as an illustrative example.
In this project’s Ada code, a record is used for information about command line arguments (flag names, values, etc.) with these argument records stored in a vector. In addition, a map is created that links the names of these arguments, using a string as the key, to the index of the corresponding record in the vector. Finally, a second vector is used to store any text fragments that follow the list of arguments provided on the command line. This then provides a number of ways to access the record information, either sequentially in the arguments vector, or by argument (flag) name via the map.
Ever wish you could do a little target shooting in a galaxy far, far away? Well then you’re in luck, as the Star Wars inspired GlowBlaster designed by [Louis Abbott] can help you realize those dreams with a real-life laser pistol — albeit a much weaker one than you’d want to carry into a Mos Eisley cantina.
Inside the 3D printed frame of the GlowBlaster is a 5 mW 405 nm module, an Arduino Nano, a speaker, a vibration motor, and a 9 V battery. When you pull the trigger, it pushes down on a 12 mm tactile button which causes the Arduino to fire the laser and sprinkle in a bit of theatrics by way of the speaker and vibration motor. There’s also a second button on the side of the blaster that lets you pick between firing modes.