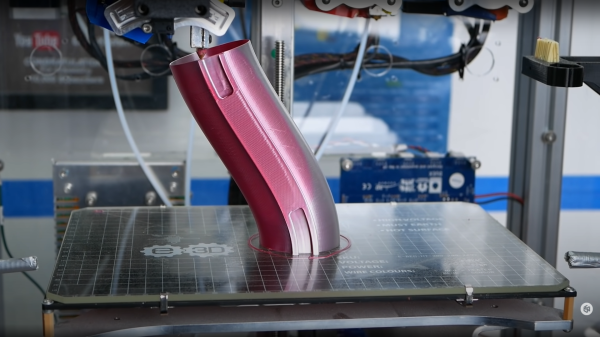
Servo Plotter Needs Nothing Exotic

Although the widespread use of 3D printers has made things like linear bearings and leadscrews more common, you still can’t run down to your local big-box hardware store and get them. However, you can get drawer slides and any hobby shop can sell you some RC servos. That and an Arduino can make a simple and easy plotter. Just ask [JimRD]. You can also watch it do its thing in the video below.

Of course, servos aren’t usually what you use in a plotter. But the slides convert the rotation of the servo into linear motion. One servo for X and one for Y is all you need. Another microservo lifts the pen up and down using a hinge you could also get from a hardware store.

Continue reading “Servo Plotter Needs Nothing Exotic”

USB to Dupont adapter by [PROSCH]

USB Power Has Never Been Easier

USB cables inevitably fail and sometimes one end is reincarnated to power our solderless breadboards. Of course, if the cable broke once, it is waiting to crap out again. Too many have flimsy conductors that cannot withstand any torque and buckle when you push them into a socket. [PROSCH] has a superior answer that only takes a couple of minutes to print and up-cycles a pair of wires with DuPont connectors. The metal tips become the leads and the plastic sheathing aligns with the rim.

The model prints with a clear plus sign on the positive terminal, so you don’t have to worry about sending the wrong polarity, and it shouldn’t be difficult to add your own features, like a hoop for pulling it out, or an indicator LED and resistor. We’d like to see one with a tiny fuse holder.

If you want your breadboard to have old-school features, like a base and embedded power supply, we can point you in the right direction. If you are looking to up your prototyping game to make presentation-worthy pieces, we have a host of ideas.

Art of 3D printer in the middle of printing a Hackaday Jolly Wrencher logo

3D Printering: One Bed Level To Rule Them All

In an ideal world, your FDM 3D printer’s bed would be perfectly parallel with the print head’s plane of movement. We usually say that means the bed is “level”, but really it doesn’t matter if it is level in the traditional sense, as long as the head and the bed are the same distance apart at every point. Of course, in practice nothing is perfect.

The second best situation is when the bed is perfectly flat, but tilted relative to the print head. Even though this isn’t ideal, software can move the print head up and down in a linear fashion to compensate for the tilt. Things are significantly worse if the bed isn’t itself flat, and has irregular bumps up and down all over.

To combat that, some printer firmware supports probing the bed to determine its shape, and adjusts the print head up and down as it travels across the map. Of course, you can’t probe the bed at every possible point, so the printer will have to interpolate between the measured reference points. Marlin’s bilinear bed leveling is an example.

But if you have enough flash space and you use Marlin, you may want to try unified bed leveling (UBL). This is like bilinear leveling on steroids. Unfortunately, the documentation for this mode is not as plain as you might like. Everything is out there, but it is hard to get started and information is scattered around a few pages and videos. Let’s fix that.

Continue reading “3D Printering: One Bed Level To Rule Them All”

UV Resin Perfects 3D Print, But Not How You Think

At this point, everyone knows that the print quality you’ll get from even an entry level UV resin printer far exceeds what’s possible for filament-based fused deposition modeling (FDM) machines. But there’s a trade-off: for the money, you get way more build volume by going with FDM. So until the logistics of large-format resin printers gets worked out, folks looking to make things like replica prop helmets have no choice but to put considerable time into post-processing their prints to remove the obvious layer lines.

But thanks to this somewhat ironic trick demonstrated by [PropsNstuff], you can actually use UV resin to improve the finish quality of your FDM prints. The idea is to put a layer of resin over the layer lines and other imperfections of the 3D print, cure it with a handheld UV flashlight, and then sand it smooth. Essentially it’s like using resin in place of a body filler like Bondo, with the advantage here being that the resin cures in seconds.

The thick resin fills in tough spots quickly.

Now to be clear, this isn’t a new idea. Our very own [Donald Papp] investigated the process back in 2018, and [Thomas Sanladerer] covered the idea in a video of his own the following year. But the difference here is that [PropsNstuff] doesn’t just coat the whole print with resin, he takes a more methodical approach. Working in small sections, he targets areas that really need the high-build properties offered by this technique.

With the tough spots addressed, he then moves on to coating larger areas with resin. But this time, he mixes leftover resin from his SLA printer with talcum powder to make a mix that can be brushed on without running everywhere. It takes a few thin coats, but with this mix, he’s able to build up large swaths of the print without losing any surface detail.

Is it still a hassle? Absolutely. But the final result does look spectacular, so until we figure out how to build the replicators from Star Trek, it looks like we’ll have to make up for our technological shortcomings with the application of a little elbow grease.

Continue reading “UV Resin Perfects 3D Print, But Not How You Think”

TFT35 Dual Mode 3D Print Control – Hands On

I was rebuilding one of my 3D printers — again — and decided I needed a display upgrade. A color screen is nice, but there are some limitations. I also found there are ways around these limitations, so I wanted to share my thoughts on a dual-mode color touch screen LCD controller for your 3D printer. The screen in question is a TFT35 from BigTree Tech. It is similar to an MKS screen, but it can operate in two different modes, as you will see.

A few years ago, I picked up an Anet A8 which was very inexpensive, especially on sale. Not the best printer, though, because it has that cheap acrylic frame. No problem. A box full of aluminum extrusion later, the printer was reborn. Over time, I’ve completely reworked the extrusion system and the Y-axis, leaving only the motors, bearings, and the controller/display as the original.

That last part was what bothered me. The Anet board is actually pretty capable for a small cheap board. But it is just what the printer needs and nothing more. If you wanted to hack the printer there was very little memory left and only one spare pin for I/O. So it was time to replace the board and why not the controller, too?

Continue reading “TFT35 Dual Mode 3D Print Control – Hands On”

3D Printering: Adding A Web Interface Where There Was None Before

[Renzo Mischianti] got himself a Chinese 3D printer, specifically a FlyingBear Ghost 5. (Cracking name, huh?) He was more than a little irritated with the fact that whilst the controller, an MKS Robin Nano, did have a integrated Wi-FI module, it provided no browser-based interface for monitoring and control purposes. This seemed a bit short-sighted in this day and age, to say the least. Not being at all happy with that situation, [Renzo] proceeded to write dedicated Wi-Fi firmware using websockets, but not without fully documenting his journey in a detailed series of the blog posts.

The resulting BeePrint web interface supports all the usual functions you would expect when managing a printer, everything from monitoring warm-up at the prep stage, to keeping tabs on the potential spaghetti monster via the connected IP camera. All good stuff. [Renzo] used an ESP32-cam, which is a low-cost 2 MP unit from our friends at Olimex, but we suspect it wouldn’t vastly difficult to add your own IP camera into the mix.

[Renzo] has a YT channel detailing quite a few other projects, which is definitely worth some viewing time in our opinion.

We’ve been covering 3D printer hacking since the dinosaurs were roaming. This is the oldest, and still one of the strangest, posts that we could find in a quick search. Anyone care to find something older?

Continue reading “3D Printering: Adding A Web Interface Where There Was None Before”

UV Printing PCBs

We always enjoy [Thomas Sanladerer’s] 3D printing videos. But his latest isn’t only about 3D printing. He shows how he uses a DLP printer — which has UV light, after all — to expose PC board blanks with great results. Honestly, once we heard the idea, we immediately saw how that could work it is surprising more people aren’t taking advantage of their DLP printers like that. Of course, [Thomas] does his usual thorough treatment of the topic.

Really, this isn’t exactly 3D printing even though it uses a 3D printer. Exposing boards with UV light and artwork is an old process that has been around for years, usually using transparency film and a UV light source. With a printer, you can create artwork digitally and the UV light source is already there.

Continue reading “UV Printing PCBs”