Ways To Embed Magnets In 3D Prints And Not Ruin Printers

Adding magnets to a 3D print can be very useful in a design, but there are some things that can trip you up if you’re not aware of them. In a recent video by [Lost in Tech] some of the essentials are covered, including why you shouldn’t get magnets near most extruder nozzles or the printing bed.

The easiest method is of course to add magnets in after printing, using friction fit with or without ribs, or with a dab of glue. Here making sure that the magnet stays in place is the trick, as you do not want the magnet to get lost or end up in the tummy of a curious pet or toddler.

The magnetic pattern on an FDM printer's magnetic bed. (Credit: Lost in Tech, YouTube)
The magnetic pattern on an FDM printer’s magnetic bed.

Things get spicy when you’re talking about adding magnets during the printing process, as some extruders are made of a ferromagnetic material and thus a magnet will happily stick to said nozzle if it’s not pure brass or similar. As seen in the video even some purported ‘brass’ nozzles aren’t pure enough to not be significantly ferromagnetic.

Another issue is that of heat, which is something that magnets generally do not like much. Using magnets like you’d use heat inserts for bolts is a recipe for disaster, as the heat from a soldering iron will demagnetize the magnet, which for the typical magnet is less than 200°C. At least this should mean that the magnet stuck to your extruder nozzle will eventually fall off by itself after it demagnetizes.

With the bed of the typical FDM printer these days you’re talking about magnetically attached plates, with the underlying heated bed using a Halbach array configuration as is typical of flat magnets, yet with the gotcha that these aren’t typically real Halbach arrays, but knock-offs with simply alternating north-south pole magnets. As it turns out, these types of magnetic arrays can be disturbed by another magnet, such as a powerful neodymium magnet near said printing bed, flipping polarity in a way that cannot be easily undone.

You can still install magnets during printing, but it’s recommended to use something like side-insertion, where the extruder nozzle cannot pull out a magnet. Regardless of your approach, it’s good to know of the risks with ferromagnetic nozzles, the magnetic bed and treating magnets like they’re just heat inserts. While you can get higher-temperature magnets, many of the same issues still remain here.

Continue reading “Ways To Embed Magnets In 3D Prints And Not Ruin Printers”

Turning An Old 3D Printer Into A Vinyl Cutter For Cheap

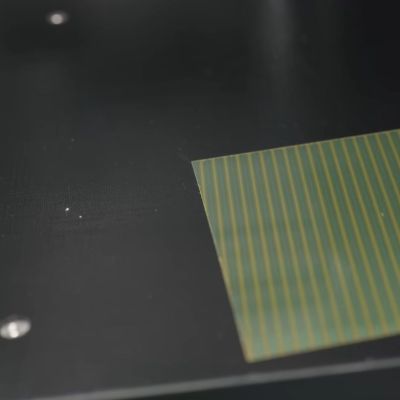
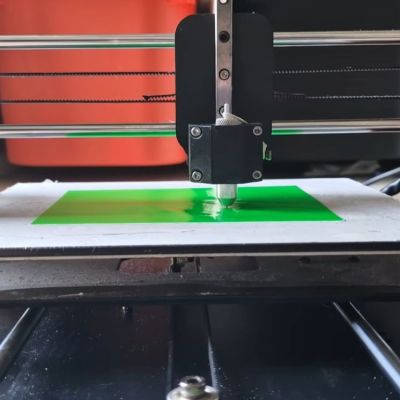
Replacing a 3D printer’s extruder with a cutting blade seems like an easy way to do things like vinyl cutting, but you cannot just put on any blade and expect good results. The right type of blade is called a drag knife and it’s designed so that it follows the direction in which you’re cutting. You can get these in dedicated vinyl cutting machines, as well as in the form of attachments for the likes of CNC machines. How to use them with an old Anycubic Mega S FDM printer is demonstrated by [Cocoanix 3D Printing] in a recent video.

For a bit more background information you can peruse for example this write-up by [Kronos Robotics], who goes through the steps of selecting the right blade, cutting mat and such for use with a CNC machine.

For the 3D printer in the video a Roland vinyl cutter style holder and blades were bought off AliExpress, for which then a custom 3D printed mount was designed, though you can often get a ready-made one off your usual 3D model sources. Following this you get into the hardest part, being the software and making sure you don’t cut too deep into the vinyl through its backing paper.

Fortunately most of the hard work here is done already by the Polycut project, which is precisely designed to help you turn a 3D printer or similar into a vinyl cutter or plotter. This takes in an SVG file and generates the appropriate g-code, after which you better have gotten your Z-offset calibration right if you want that perfect result. With all that in place it’s then actually quite easy to cut your very own vinyl without shelling out big bucks for a dedicated machine.

Of course, it’ll likely never be as fast as those machines, requires more calibration and have a more limited cutting space, but as it’s not a permanent modification and probably less crazy than putting a laser engraver module on a commercial FDM printer like the Bambu Lab H2D.

Continue reading “Turning An Old 3D Printer Into A Vinyl Cutter For Cheap”

Cookies, Baked The 3D Printer Way

Imagine for a moment that the Cookie Monster is going to visit, but all the cookie baking utensils in your house have been mislaid. The horror! Fortunately [Startup Chuck] is here with a video showing the process of baking cookies in a 3D printer, and as an extra treat he’s using entirely 3D printed utensils too.

The utensils are comprehensive array of all you’d need for serious cookie production, even going as far as to print a mixing bowl and beater for a KitchenAid mixer. There are scoops aplenty, and something we’re particularly impressed with, a spatula with a TPU blade. We’re guessing that FDM prints might not be the best for cooking because all manner of food could get caught in those layer lines and go off, but let’s face it, this is a bit of fun rather than a forever cooking project. We like the AI generated spork for its near-flatness, reminding us of our AI-generated breakfast. Finally he even prints a cookie baking sheet using nylon filament.

An enclosed 3D printer makes a surprisingly effective low-temperature oven, with the heated bed as the element. It works, and makes recognizable cookies, though they’re not browned. As entertaining as this experiment may be, we can’t recommend following his example — at the very least, moisture and food ingredients in your printer probably aren’t conducive to good future printing.

Continue reading “Cookies, Baked The 3D Printer Way”

Making A Zippy FDM Printer Out Of Wood

Generally, the frame and other structural parts of an FDM printer use steel or similar, but could you use wood instead for that truly artisan look? As [Mitsu Makes] demonstrates after half a year of work, you absolutely can, and it looks about as amazing as you might imagine.

Naturally, you cannot make everything out of wood – such as the linear rails and lead screws – and there is a fair bit of FDM-printed black PLA in there too, but the wood is both structural and decorative. The stained look does really add something. For the FDM-specific parts, the Voron 0 was taken as the base, including the bed. The motion system isn’t CoreXY but Cartesian for ease of construction and driving the axes, while also providing more torque due to the additional motors.

Since it’s more or less a Voron FDM printer and even has automatic bed leveling, it works basically perfectly after assembly and input shaping. Even if it’s not the most practical way to make your own FDM printer from parts, it definitely makes it look unique and would be the focal point of any printing farm.

Continue reading “Making A Zippy FDM Printer Out Of Wood”

A 3D printer hotend with four filament leads in positioned on an arm above a hole in a glass plate. Wires lead from a carbon fiber frame under the glass to four stepper motors with pulleys.

The Final Steps To A Sub-Minute Benchy

In 2024, [Jan Roetz] decided to see whether he could 3D print a Benchy – the boat-shaped benchmarking tool used in 3D printer calibration – in less than one minute. Two years later, after experiments with air bearing print beds, dry ice cooling, multi-filament hotends, and more, he’s finally broken the one-minute mark.

There are three primary factors limiting the speed of the printer: the extrusion flow rate, the cooling rate for extruded plastic, and the motion system itself. The printer’s hotend combines four strands of filament in one hotend and can extrude about 400 cubic millimeters of plastic per second. For cooling, an air duct around the nozzle could deliver about 400 liters of air per minute, which left the motion system as the only bottleneck.

The original print bed was on top of an air bearing on a granite base, and its motion could be controlled by cords connected to stepper motors. This whole system had very low friction, but its inertia was too high. [Jan] therefore replaced the build plate with a lighter carbon-fiber frame. This had no air bearing, but it slid between the base granite slab and a glass plate above it, which had an opening above the portion used as a build plate. Even the metal pulleys used on the stepper motors had too much inertia, so [Jan] replaced them with smaller, semi-circular plastic pulleys.

The first test was a sub-60-second dry run to make sure nothing would break. This revealed the need for cable guides to keep them from whipping around (not surprising when they were pulling the bed at an acceleration of 225 G). Finally, [Jan] was able to successfully print several successive 59-second Benchies. The prints weren’t photogenic, but they were mechanically sound and dimensionally correct. [Jan] could have gone even faster, but this degraded the print quality too much.

It’s quite an accomplishment, and an impressive conclusion to a major project; we covered the beginning of the project back when [Jan] was going for parallelization rather than speed. The final print didn’t use it, but he also experimented with dynamic temperature control.

Continue reading “The Final Steps To A Sub-Minute Benchy”

Testing Various Ways To Waterproof FDM Printed Parts

Along with layer lines, FDM printers are notorious for being neither air- nor water-tight due to the countless very small gaps between the layers. This is very unfortunate if you are trying to FDM print something that should keep water either inside or outside. Although a variety of potential solutions exist, it’s hard to easily compare them. Correspondingly [Half-Baked-Research] decided that the best approach here was to just try everything and pit them against each other.

These solutions include various coatings either in- or outside the part, as well as the foam solution that he tried previously joined by a number of community-suggested alternatives that should not get waterlogged. To properly test them, the water pressure at a depth of about 10 meters would be good enough, but rather than find a really deep swimming pool or try his luck at nearby bodies of water, compressed air was used to ramp up the pressure of a what is basically a big bucket of water.

For the pressure chamber a Vevor vacuum chamber was modified to contain the 1 bar (103 kPa) of pressure, which was a fair bit of work and required a CNCed metal top plate. Among the printed and treated samples were also a couple of wild cards: a PETG cube with a TPU printed cover, a PU molded part and PETG with thicker walls.

Along with the long soak, percussive testing was also performed to see how it’d affect the water intrusion resistance. After all that, there were three winners: internal epoxy coating and two types of internal PU coating, though epoxy held up the best after repeated abuse. PU rubber also got a thumbs-up if you don’t need as high a pressure resistance but are more concerned with resisting physical abuse.

Continue reading “Testing Various Ways To Waterproof FDM Printed Parts”

A person is standing in front of an acrylic enclosure, lowering a door on the enclosure. The enclosure contains the space between two sets of cabinets, and has three doors on the front. Inside the enclosure is an air filter and a washing station.

A Fume-Control Cabinet For Resin 3D Printing

For a certain kind of intricate, highly-detailed manufacturing, there’s really no substitute for a resin 3D printer, and it’s therefore unfortunate that they require so many poisonous chemicals. The resin itself usually contains irritating acrylates and methacrylates, it can emit a wide spectrum of volatile organic compounds (VOCs) during printing, and even the isopropyl alcohol used in cleaning is moderately toxic. [Allie Katz] accordingly built this fume-control enclosure for resin printing and other ventilation-critical processes.

The biggest constraint was space: [Allie]’s workspace had a fairly limited volume available, and the enclosure needed to hold an SLA printer, an isopropyl alcohol washing station, a UV curing chamber, and miscellaneous supplies. Most of the enclosure was made out of IKEA cabinets, using some large cabinets at the base to hold the printer and curing station, a countertop over these to hold the washing station, and more cabinets above to hold supplies. An MDF backing panel and acrylic side panels enclose the workspace between the cabinets. There was no safe way to exhaust fumes, so the enclosure recycles its air: a fan pulls air in through an activated-carbon filter mounted above the work area and into the plenum behind the chamber, from which it passes through the printer’s cabinet back into the workspace enclosure. Panel filters surround the carbon filter to catch particulate matter.

The enclosure uses four ESP32-based boards for automation: one uses a touchscreen to display data, and three are paired with BME680 sensors, primarily to report VOC concentrations. One, which also has a particulate matter sensor, senses air quality in the main chamber and plenum, one monitors air quality in the rest of the shop, and the third detects clogging from within the filter enclosure. The first real test of the chamber was to 3D print and paint some handles for the cabinets. It worked as expected, detecting the increased VOCs and ramping up the fan to keep them in check.

We’ve seen a ventilated printer enclosure before, that time for an FDM printer. Although their hazards are less blatant, they too can produce dangerous fumes, which could possibly be carcinogenic.

Thanks to [Keith Olson] for the tip!