This excellent content from the Hackaday writing crew highlights recurring topics and popular series like Linux-Fu, 3D-Printering, Hackaday Links, This Week in Security, Inputs of Interest, Profiles in Science, Retrotechtacular, Ask Hackaday, Teardowns, Reviews, and many more.
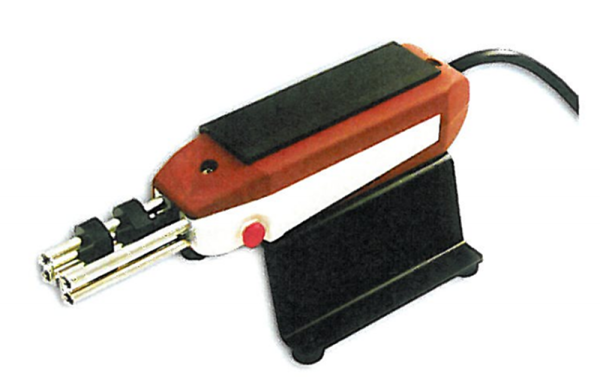
I wanted to point out a tool that I often use, but rarely see on other people’s workbenches: thermal strippers. They aren’t cheap, but once you’ve used them, it is hard to go back to stripping wires with an ordinary tool.
I know, I know. When I first heard of such a thing, I thought what you are probably thinking now: maybe for some exotic coated wire, but for regular wire, I just use a pair of diagonal cutters or a mechanical stripper or a razor blade. You can do that, of course, and for large solid wires, you can even get good results. But for handling any kind of wire, regardless of size, you just can’t beat a thermal stripper.
Rarely on these pages have I read such a fluff piece! Al Williams’ coverage of Emacs versus Vim was an affront to the type of in-depth coverage our Hackaday readers deserve. While attempting to be “impartial” he gave a seven-sentence summary of Vim, the Ultimate Editor. Seven sentences! Steam is pouring out of my ears like Yosemite Sam.
Al, like a lot of you out there, thinks that he “knows how to use vi”. I’m here to tell you that he doesn’t. And unless you’ve spent the last few years alone in a cave high in the Himalayas, with only food, drink, a laptop, and Vim Golf, you probably don’t either. Heck, I don’t consider myself a Vim master, but I’m going to write this overwrought essay praising it (using Vim, naturally).
The reason I’m writing this is not to perpetuate the vi-versus-Emacs war. That idea is silly anyway, and was probably invented by Emacs folks to steal some of vi’s limelight. You see, vi-versus-Emacs is a red herring. Vi and Vim are so strange, so different from any other editor you might use, that it makes Emacs look simply boring in comparison: it’s just a normal editor with decent extensibility (if you can stand Lisp), horrible key combinations that may or may not cause carpal tunnel syndrome, and code bloat that rivals Microsoft Word. If you’re comfortable using Pico or Nano or Joe or Notepad++ or Gedit or Kate, or anything else for that matter, you can be comfortable using Emacs in a month or so. It’s really just another editor. Yawn.
Vi is something else. It’s a programming language for editing text that’s disguised as an editor. If you try to use it like a normal text editor, you will suffer. If you approach your text editing chores like factoring code into functions, you’re starting to understand Vi.
As many of the members of the Brian Benchoff hate/fan club know, the life of a Hackaday writer is nomadic and filled with exciting adventures. Jenny List is actually crime fighting cyborg (think Bond); it’s why she knows so much about electronics. James Hobson is Iron Man. The list goes on. There are lots of unnecessary details, but to summarize: Last month I was living in Washington State, this month I am in Paris, France. It’s really nice here, the buildings are beautiful, the cathedrals stunning, and the food significantly tastier.
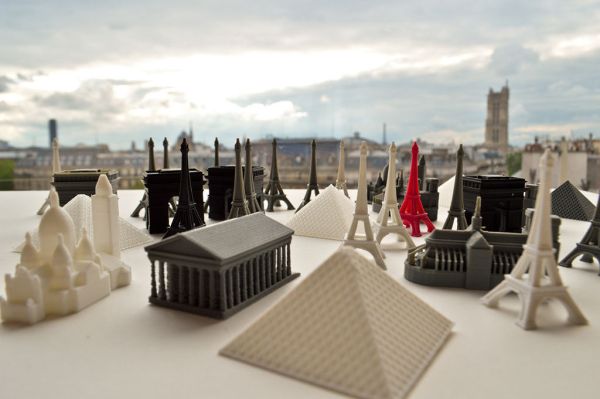
However, as a contracting engineer with a project involving a deadline; I found myself in dire need of a significant amount of quick turn-around 3D printing during my working vacation to France. Through a lot of trial and tribulation, I eventually discovered that the most cost-effective way to get the prints done… was to just buy a cheap 3D printer and run it into the ground.
I was spoiled by my hackerspace in Louisville, KY. They had enough 3D printers to go around and the pricing was fixed at 10 cents a gram. For the amount of printing I needed, this would be a perfectly economical arrangement. So, I set out to find a hackerspace in Paris. Whereupon I reached my first and obvious problem; I speak very little French.
Most of the hackerspaces listed in Paris are, as far as I can tell, illegally squatting in a scary part of town, exclusive to a university, exclusive to a business, or closed down.
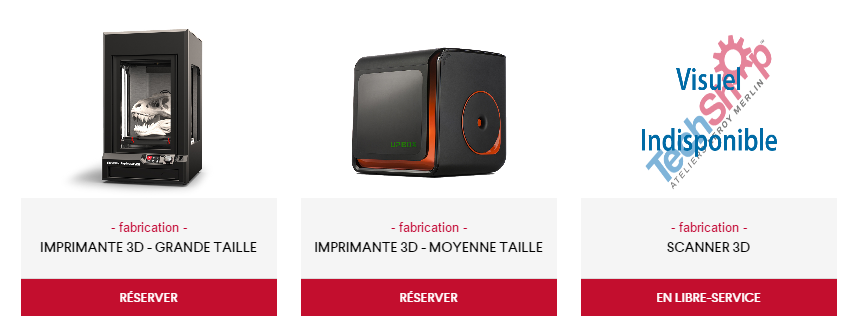
So, I googled a bit harder. Wow! Apparently a Techshop opened up in Paris. It’s about an hour away from where I live, but having toured a Techshop before, I knew they would have the nice version of the tool I need. So, one morning bright and early I got on the metro and headed over to get a tour of the place.
What I’ve discovered is this: If you need things like a water jet cutter, welding station, or a 50 grand CNC machine, Techshop is a really economical way to get access to and play with tools like that. However, if all you want is access to a laser cutter and a 3D printer, it will set you back five-hundred dollars and you’ll have to jump through some incredibly annoying hoops just to get access to them.
Only a small fee of 400 euros to used these bad boys.
See, most pieces of equipment at a Techshop need to be reserved. Only the 150 euro and 300 euro a month membership tiers can reserve equipment. The 150 tier can reserve something for two hours, the 300, four. If you’ve ever 3D printed you can immediately spot the problem with that. For small prints this could be workable, but if you have a lot of large prints four hours is just not enough. However, there is a work around. If you’re willing to take a metro ride late at night, arriving at the Techshop at 10:00pm, you can, of course, run a print overnight.
There were two more glitches in the Techshop plan. To be able to touch the printers required a two-hour course with a 100 euros fee. The filament also ran 65 euro per 500 g. My printing needs would easily cost me tens of hours in travel and had a starting fee of 400 euros to be workable.
The entrance to Usine.io is terrifying. It’s this massive pitch black hallway. I had no idea if I was in the right place until I got to the desk.
Now, I’m not saying Techshop isn’t absolutely wonderful when it comes to more advanced tools. It’s probably the only Hackerspace in the world where you’re entitled to expect that the CNC machine is in working order, properly trammed, and there are actually cutting bits for it. However, if all you need is a 3D printer, don’t bother.
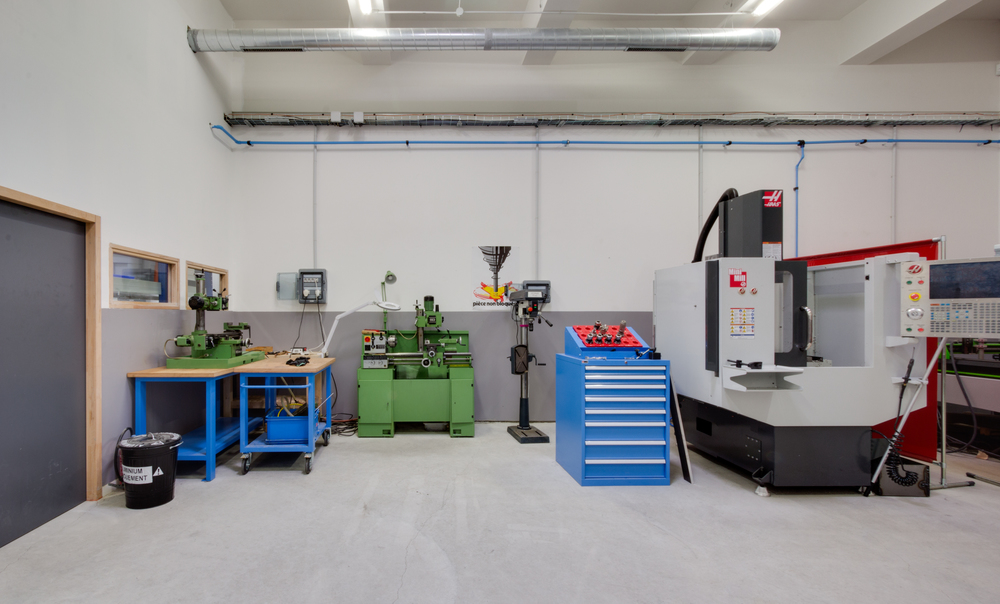
Now, I asked around some more and found that there was a competing space in Paris called Usine.io. It had a flat fee of 180 euros a month and the training was free. I actually did end up getting a membership here for access to a CNC and basic tools, but for 3D printing it was a bust. They only had three printers serving a sizable membership base. This left the printers with a 48 hour line to get your print started and a maximum of 40 hours of printing a month. A die-hard user of 3D printing can easily use 40 hours in 3 days. Because I had to test many iterations for my project, my need the next month was easily triple that number.
However, the shop itself is really nicely outfitted.
The last avenue available to me aside from 3D printer ownership was contracting someone with a 3D printer to run my prints for me. However, after asking around I found the service to be quite expensive. Rent isn’t cheap in Paris after all. If I just needed a single small print it would be worth it, but if I needed lots of printing it would quickly add up to be more money than I had.
That left me with one option. Which, honestly, sounded absolutely insane for someone visiting a country for a few months. Buy a printer. It’s an indication of the state of 3D printing that the price has come down so far that buying a printer is more economical than having someone do it for you. Even a few years ago this was not possible. However, European Amazon Prime had a workable enough import printer to my doorstep faster than any commercially available service could even process my order. We’ve come a long way since the Darwin. That’s for sure.
The Starship Enterprise (no bloody A, B, C, or D) recently got a makeover. It was donated to the Smithsonian, and the workers at the Air and Space Museum took it apart and put it back together. Why? It’s the 50th anniversary of TOS. Hopefully the new show will be using some practical effects.
After years of trying, we’ve finally attained max buzzword. Here’s a pentesting hacker quadcopter drone, “a hacker’s laptop that can fly.” Why would anyone do this? Because, “You need to be close to the wireless signal to be able to read it. [Danger Drone] removes that barrier of physical access.” For just $500, you can do the same thing a coat hanger yagi can do. Amazing.
Q2 reports for 3D printer companies! Lulzbot is going gangbusters yet again. We’re looking at the greatest success of Open Source Hardware here. Stratasys, on the other hand, lost less money in Q2 2016. That’s their good news.
About a year ago, we heard about an LCD that was one inch high and ten inches long. That’s bizarre, but great for rackmount gear. The company behind this weird LCD is updating this weird and wonderful LCD and giving it touchscreen capability.
A few weeks ago, we posted a link to this video, demonstrating an absurdly clever method for creating a mold for a fiberglass dome. You can just use a pendulum and a pile of dirt. Now, the mold for this fiberglass dome is complete. [J Mantzel] has already pulled 1/8th of his gigantic fiberglass sphere out of his mold, and there are only seven more to go. After that, he’ll find out if these sphere sections actually line up.
I arrived in Vegas a day (or two) early for DEF CON. Instead of contemplating the banality of existence on the strip, I decided on a meetup at the grave of James T. Kirk. The meetup was a huge success. Walking two miles in 115° heat was not a great idea, but I didn’t die.
If you haven’t heard, retrogaming is a thing. 40-somethings are playing the games of their youth alongside millennials who are just discovering these classic games. There are even folks developing new homebrew games for consoles as far back as the Nintendo Entertainment System and the Atari 2600. This week on the Hacklet, we’re highlighting some of the best retrogaming console hardware hacks on Hackaday.io. Note that I did say hardware hacks. The focus this week is on games played on the original hardware. Don’t worry though, I’ll give emulated projects some love in a future Hacklet.
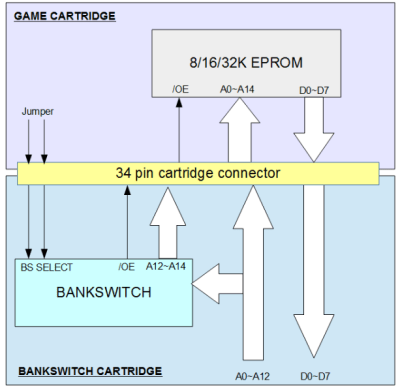
We start with [danjovic] and Atari 2600 Bankswitch Cartridge. The Atari 2600 is a legendary system. Millions of hackers’ first exposure to gaming came through its one button joystick. To make the unit affordable, Atari used a MOS Technology 6507 processor. Essentially it’s a 6502 in a 28-pin package. This meant several features got nerfed, most notably the address space. The 6507 can only address 8KB of RAM. In the Atari, only 4KB is available to the cartridge. Games got around the 4KB limit by bank switching – write a value to a magic address, and the bank switching logic would swap in a whole different section of cartridge ROM. There were several different bank switching schemes used over the years. [Danjovic] has created his own version of this bank switching logic, using only classic 74 series logic chips.
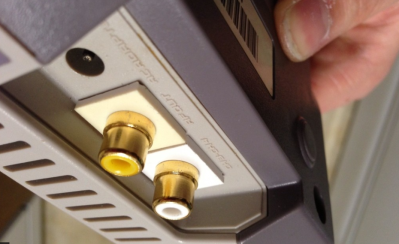
Next up is [ThunderSqueak] with Top Loader NES composite mod. Toward the end of the NES’s life, Nintendo introduced a cost-reduced version known as the “top loader”. This version had a top loading cartridge and no DRM lock-out chip. Unfortunately it also did away with composite AV ports. The only way to hook this NES to your TV was through the RF modulated output. [ThunderSqueak] and a number of other intrepid hackers have fixed this problem. All it takes is a 2N3906 PNP transistor and a few jellybean parts. The video and audio outputs are pulled from the motherboard before they enter the RF modulator. One nice feature is the clean connectors. [ThunderSqueak] used connectors from modular in-wall AV boxes for a setup that looks as good as it works.
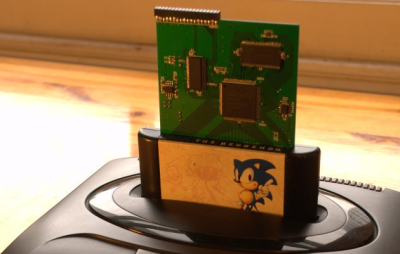
Next we have [makestuff] with USB MegaDrive DevKit. Sega’s MegaDrive, or Genesis as it was known here in the USA, was a groundbreaking console. It used a Motorola 68000 16-bit CPU while most other systems were still running a Z80 or a 6502. People loved this console, and there are plenty who still want to develop software for it. Enter [makestuff] with his development kit. On a card with a $40 USD bill of materials, he’s managed to fit SDRAM, an FPGA, and a USB interface. This is everything you need to load and debug software on an unmodified console. The FPGA had enough logic left over that [makestuff] was able to implement a continuous bus cycle tracer over USB. Nice work!
Finally, we have our own [Joshua Vasquez] with R.O.B. 2.0. The original NES came in a deluxe version with a special pack in – a robot. Robotic Operating Buddy, or ROB for short, would play games with the player. Unfortunately ROB was a bit of a flop. It only worked with two games, Gyromite and Stack-Up Ice Climber. Most ROB units eventually found their way to the recycling bin. [Joshua] is building a new version of the ROB, with modern controls. He’s already modeled and 3D printed ROB’s head. I can’t wait to see this project come together!
If you want to see more retrogaming goodness, check out our new retrogaming hardware hacks list. See a project I might have missed? Don’t be shy, just drop me a message on Hackaday.io. That’s it for this week’s Hacklet, As always, see you next week. Same hack time, same hack channel, bringing you the best of Hackaday.io!
If you are someone whose interests lie in the field of RF, you won’t need telling about the endless field of new possibilities opened up by the advent of affordable software defined radio technology. If you are a designer or constructor it might be tempting to believe that these radios could reduce some of the problems facing an RF design engineer. After all, that tricky signal processing work has been moved into code, so the RF engineer’s only remaining job should be to fill the not-so-huge gap between antenna and ADC or DAC.
In some cases this is true. If you are designing an SDR front end for a relatively narrow band of frequencies, perhaps a single frequency allocation such as an amateur band, the challenges are largely the same as those you’d find in the front end of a traditional radio. The simplest SDRs are thus well within the abilities of a home constructor, for example converting a below-100kHz-wide segment of radio spectrum to the below-100kHz baseband audio bandwidth of a decent quality computer sound card which serves as both ADC and DAC. You will only need to design one set of not-very-wide filters, and the integrated circuits you’ll use will not be particularly exotic.
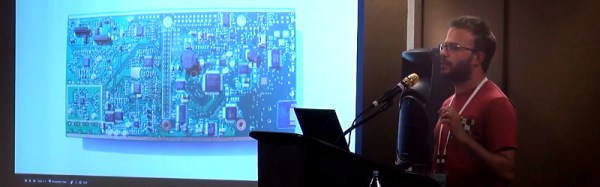
But what happens if the SDR you are designing is not a simple narrow-band device? [Chris Testa, KD2BMH] delivered a talk at this year’s Dayton Hamvention looking at some of the mistakes he made and pitfalls he encountered over the last few years of work on his 50MHz to 1GHz-bandwidth Whitebox handheld SDR project. It’s not a FoTW in the traditional sense in that it is not a single ignominious fail, instead it is a candid and fascinating examination of so many of the wrong turnings a would-be RF engineer can make.
The video of his talk can be found below the break, courtesy of Ham Radio Now. [Chris]’s talk is part of a longer presentation after [Bruce Perens, K6BP] who some of you may recognise from his activities when he’s not talking about digital voice and SDRs. We’re jumping in at about the 34 minute mark to catch [Chris], but [Bruce]’s talk is almost worth an article in itself..
Measuring length is a pain, and it’s all the fault of Imperial measurements. Certain industries have standardized around either Imperial or metric, which means that working on projects across multiple industries generally leads to at least one conversion. For everyone outside the last bastion of Imperial units, here’s a primer on how we do it in crazy-land.
Definitions
The basic unit of length measurement in Imperial units is the inch. twelve inches make up one foot, three feet make up one yard, and 5,280 feet (or 1,760 yards) make up a mile. Easy to remember, right?
Ironically, an inch is defined in metric as 25.4 millimeters. You can do the rest of the math for exact lengths, but in general, three feet is just shy of a meter, and a mile is about a kilometer and a half. Generally in Imperial you’ll see lots of mixed units, like a person’s height is 6’2″ (that’s shorthand for six feet, two inches.) But it’s not consistent, it’s English; the only consistency is that it’s always breaking its own rules. You wouldn’t say three yards, two feet, and six inches; you’d say 11 1/2 feet. If it was three yards, one foot, and six inches, though, you’d say 3 1/2 yards. There’s no good rule for this other than try to use nice fractions as often as you can.
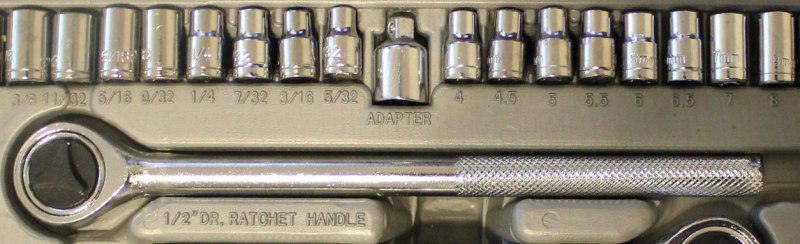
Users of Imperial units love fractions, especially when it comes to parts of an inch or mile. You’ll frequently find drill bits in fractions of an inch, which can be extremely frustrating when you are trying to do math in your head and figure out if a 17/64″ bit is bigger than a 1/4″ bit (hint, yes, it’s 1/64″ bigger).
A socket wrench set in Imperial fractions on the left and metric on the right. Metric is so much easier.
If it wasn’t hard enough already, there came the thousandth of an inch. As the machine age was getting better and better, and parts were getting smaller and more precise, there came a need for more accurate measurements than 1/64 inch. Development of appropriate tools for measuring such fine resolution was critical as well. You can call a 1/8″ bit a .125″ bit, and that means 125 thousandths of an inch. People didn’t like to wrap their mouths around that whole word, though, so it was reduced to “thou.” Others used the latin root for thousand, “mil.” To summarize, a mil is the equivalent of a thou, which is one thousandth of an inch. It should not be confused with a millimeter. It takes about 40 mils to make 1 millimeter. Also, the plural of mil is mils, and the plural of thou is thou.
Tools
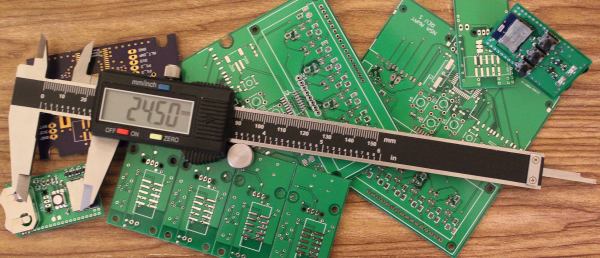
Outside calipers for measuring the outer dimensionBy Glenn McKechnie (Own work) [GFDL, CC-BY-SA-3.0 or CC BY-SA 2.5-2.0-1.0], via Wikimedia CommonsMeasuring length is done with a variety of tools, from GPS for long distances, to tape measures for feet/meters, and rulers for inches/centimeters. When it comes to very small measurements, the caliper is the tool of choice. This is the kind of tool that should be in everyone’s toolbox. Initially it started with the inside caliper and outside caliper, which were separate tools used to measure lengths. The Vernier caliper combined the two, added a depth meter and a couple other handy features, and gave machinists an all-around useful tool for measuring. Just like the slide rule, though, as soon as digital options became available, they took over. The digital caliper can usually switch modes between decimal inches, fractional inches, and metric.
Every industry has picked a different convention. Plastic sheets are usually measured in mils for thin stuff and millimeters or fractions of an inch for anything greater than 1/32″. Circuit boards combine units in every way imaginable, sometimes combining mils for trace width and metric for board dimensions, with the thickness of the copper expressed in ounces. (That’s not even a unit of length! It represents the amount of copper in one square foot of area and 1 oz is equivalent to 1.4mil.) Most of the time products designed outside of the U.S. are in metric units, while U.S. products are designed in either. When combining different industries, though, the difference in standards gets really annoying. For example, order 1/8″ plexiglass, and you may get 3mm plexiglass instead. Sure the difference is only .175mm (7 thou), but that difference can cause big problems for pieces that are press fit or when making finger joints on boxes, so it’s important that when sourcing components, you not only verify the unit, but if it’s a normal unit for that industry and it’s not just being rounded.
Often you can tell with what primary unit a product is designed with only a few measurements of a caliper. Find a dimension and see if it’s a nice round number in metric. If it’s not, switch it to imperial, and watch how quickly it snaps to a nice number.
Moving forward
Use metric if you can. The vast majority of the world does it. When you are sending designs overseas for production they will convert to metric (though they are used to working in both). It does take time to get used to it (especially when you are dealing with thou/mils), but your temporary discomfort will turn to relief when your design doesn’t crash into the Mars (or more realistically when you don’t have to pull out the Dremel and blade to get your parts to fit together).






![Outside calipers for measuring the outer dimensionBy Glenn McKechnie (Own work) [GFDL, CC-BY-SA-3.0 or CC BY-SA 2.5-2.0-1.0], via Wikimedia Commons](https://hackaday.com/wp-content/uploads/2016/07/outsidecalipers.jpg?w=400)