Soviet Soyuz Clock Teardown

We love spacecraft and we definitely love teardowns, especially if they are for vintage devices. [Ken Shirriff] writes about taking apart the digital clock module from the Soviet Soyuz series of spacecraft and there are a lot of interesting bits to the device. After all, it has been into space.

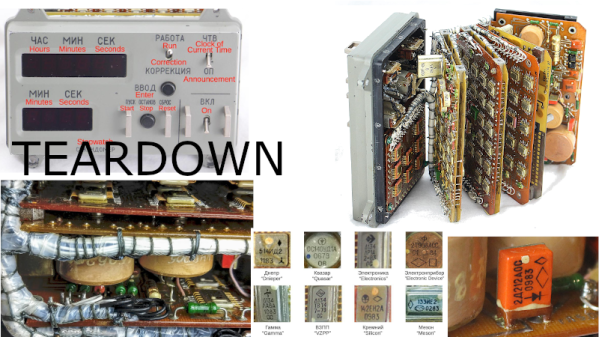
The Soyuz series of spacecraft made their maiden voyage in 1966, and are still flying today. The clock in question comes from somewhere in the middle, around 1996. On the outside, it seems like any spaceship gizmo, and the digital clock keeps local time along with a stopwatch and an alarm function. The guts are much more interesting with no less than 10 PCBs sandwiched inside the small enclosure.

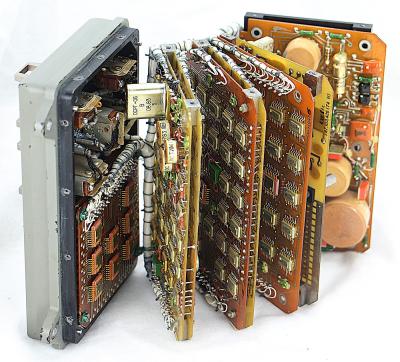
The system consists of dual layer-boards with a mix of SMD and through-hole components that are interconnected by a series of wires that are bunched and packed to create a wiring harness. The pictures show a very clever way of setting up the stack and the system is serviceable by design as the bunch opens up like a book. This gives access to the unique looking components that include 14-pin flat pack chips, large ceramic multicoil inductors, green colored resistors, and orange rectangular diodes.

There are isolated PSU boards, control boards, clock circuitry, some glue logic to put things together, and LED displays with driver circuits. [Ken Shirriff] dives into the clocking circuit and the various parts involved along with a comparison with US technology. There is a lot of interesting detail in these boards, and it may be a source of inspiration for some.

If you are looking for more spaceborne tech, have a look at the one that stowed away on the International Space Station.

Thanks for the tip [Thorsten Eggert]

Continue reading “Soviet Soyuz Clock Teardown”

COSMAC ELF Lives Again, In FPGA

Looking around at the personal computing markets in modern times, there seem to be a lot of choices in the market. In reality, though, almost everything runs on hardware from a very small group of companies, and software is often available across platforms. This wasn’t the case in the personal computing boom of the 70s and 80s, where different computers were wildly different in hardware and even architecture. The Cosmac ELF was one of the more interesting specimens from this era, and this one has been meticulously reproduced on an FPGA.

The original hardware was based on an RCA 1802 microprocessor and had a rudimentary (by today’s standards) set of switches and buttons as the computer’s inputs. It was low cost, even for the time, but was one of the first single-board computers available. This recreation is coded in SpinalHDL and the simplicity of the original hardware makes it relatively easy to understand. The FPGA is cycle-accurate to the original hardware, too, which makes it nearly perfect even without any of the original hardware.

The project’s creator, [Winston] aka [wel97459], found that SpinalHDL made this project fun to work on (and released his code on his GitHub page), and was able to get the code down to just 1500 lines to recreate the original hardware. It’s very impressive, and also an accessible read for anyone interested in some of the more unique computers offered during the early computer renaissance in the 70s.

TRS-80 Clone Uses Modern Parts

Before RadioShack decided the best business model for an electronics store was to harass its customers into buying overpriced batteries and cellphones, it was a great one-stop shop for most discrete components, knobs, resistors, radio equipment, and even a popular computer. That computer, the TRS-80, is a popular one in the retrocomputing world and if you can’t get original parts to restore one, you can always build your own clone.

This build comes to us from [Glen] aka [glenk] who is known for retrocomputing builds like this classic PET we featured a little over a year ago, and this TRS-80 is his latest project. He really gets into the weeds on the hardware, too. This isn’t an FPGA or Raspberry Pi running a TRS-80 on lookalike hardware. [Glen] has completely redesigned the computer from the ground up using modern CMOS components in order to make a modern, perfectly functional replica of the RadioShack classic.

Because of the level of detail [Glen] goes into, this one is a must-read for anyone interested in computing hardware (as opposed to the software, which you could learn about through a more simple emulator) and retrocomputing in general, and also brings most of us back to a more nostalgic, simpler time where a trip to RadioShack was fun and interesting.

Continue reading “TRS-80 Clone Uses Modern Parts”

Awakening A Dragon From Its Slumber

For all the retrocomputing fun and games we encounter in our community, there are a few classic microcomputers that rarely receive any attention. Usually this is because they didn’t sell well and not many have survived, or were simply underwhelming machines that haven’t gathered a huge following today. One that arguably falls within both camps is the Dragon 32, a machine best known in those pre-Raspberry Pi days for being the only home computer manufactured in Wales, and for being nearly compatible with the Tandy Color Computer due to both machines’ designs coming from the same Motorola data sheet. Repeat restorer of retrocomputers, [Drygol], has given a Dragon 32 the full restoration and upgrade treatment, offering us a rare chance to take a look at this computer.

The Dragon arrived with a pile of contemporary books and software, but no power supply. A significant modification was made to the internal PSU board then to allow it to work with an Amiga unit, and the black-on-green Dragon text came up on the TV screen. Recapping and a replacement for a faulty op-amp fixed poor video quality, then it was time for a 64K memory upgrade with some neatly done bodge-wiring. Finally there’s a repair to the very period-looking analogue joystick, and a home-made interface for the more common Atari/Amiga style sticks.

The Dragon may be only a footnote in the history of 8-bit home computing, but with its good expandability and decent quality keyboard it perhaps deserved to reach more homes than it did. This appears to be the first time a Dragon has featured here, though its Tandy CoCo cousin has made it into a few stories.

Retro PowerBook Gets A Mac Mini Transplant

Around these parts, seeing a classic laptop or desktop computer get revived with the Raspberry Pi is fairly common. While we’re not ones to turn down a well-executed Pi infusion, we know they can be controversial at times. There’s an impression that such projects are low-effort, and that the combination of old and new tech gains little in the way of usability due to the usability quirks of the Pi itself.

But we think even the most critical in the audience will agree that this build by [Tylinol], which sees the internals of a circa 1993 PowerBook 165c get replaced with that of a 2014 Mac Mini, is something else entirely. For one thing, there’s no question that packing a modern (relatively) desktop computer motherboard into a laptop’s body takes a lot more planning and effort than hot gluing the comparatively tiny Pi into the same space. Plus as an added bonus, anyone who counts themselves among the Cult of Mac will be happy to see the vintage machine retain its Cupertino pedigree.

So how do you get a Mac Mini inside of a PowerBook? Very carefully. As explained by [Tylinol], the inside of the PowerBook’s case was coated in graphite and conductive enough to be a problem. So after the original hardware was removed, a layer of tape was added to insulate it; though we imagine a suitably thick spray-on coating could be used as well if you don’t have that kind of patience.

Once the case was gutted and insulated, [Tylinol] added new stand-offs to mount the Mac Mini motherboard and hard drive. For anyone wondering, the 2014 model was used because the shape of the board almost perfectly fits around the trackball PCB. A board from a newer Mac could be used, but it would likely mean using an external mouse.

Which would have been a problem for [Tylinol], because one of the main goals of this build was to get the original input working. That meant adapting the Apple Desktop Bus (ADB) devices to USB, which turns out to be something of a Dark Art. But with the help of some contemporary information about the long-forgotten protocol and a Teensy 3.5, both devices are now picked up as standard USB HID.

But of course, that’s just scratching the surface. [Tylinol] also had to figure out how to swap the original display out for a modern panel, and then get the whole thing running on internal battery power. Even if you’re not particularly interested in retro Apple hardware, this is really a phenomenal build that deserves a thorough read-through.

For those of you who don’t mind getting a Pi in a PowerBook, we recently saw a recreation of Lord Nikon’s laptop from Hackers that went that route.

HiFi Audio On The Commodore 64 – 48KHz, Yo!

Prior to the development of CD-quality audio hardware in the mid-1990s, home computers and consoles typically made do with synthesized music. Due to the storage and RAM limitations of the time, there weren’t a whole lot of other practical options. If you’re willing to ignore practicality, however, you can do some wonderful things – such as playing high-quality audio on a Commodore 64!

The project is the work of [Antonio Savona], who set out to play hi-fi audio on a Commodore 64 using only period-correct hardware. That means no 16MB RAM expansions, and no crazy high-capacity carts. The largest carts of the era were just 1MB, as produced by Ocean, and [Antonio] intended to cram in a full 90 seconds of music.

Targeting a sample rate of 48 KHz with 8-bit samples would mean the cartridge could only fit 20 seconds of raw audio into its 1MB of storage. This wasn’t good enough, so the audio would have to be compressed, with the target being a 4:1 ratio to reach the 90 second goal. With the C64’s CPU running at just 1MHz, there are just 21 clock cycles to deal with each sample when playing at 48 KHz.

Obviously, [Antonio] had set quite the challenge, and some masterful assembly coding was used to get the job done. The final result has the audio sounding impressively good, given that it’s being pumped out by a 6502 that is surely sweating to get the job done.

We love a good C64 hack around these parts, and it’s now even possible to build a new one from scratch if that’s your particular itch. Video after the break.

Continue reading “HiFi Audio On The Commodore 64 – 48KHz, Yo!”

Vintage Mini Inkjet Prints On-Demand ASCII Art

Readers of a certain age may fondly remember ASCII art emerging from line printers in a long-gone era of computing; for others, it’s just wonderfully retro. Well, when [Emily Velasco] found a vintage Kodak Diconix 150 inkjet at a local thrift store for $4, she knew what she had to do: turn it into a dedicated ASCII-art machine.

Dating to the mid-1980s, the diminutive printer she scored was an early example of consumer inkjet technology; with only 12 “jets,” it sported a resolution roughly equivalent to the dot-matrix impact printers of the day. [Emily] notes that this printer would have cost around $1000 in today’s money — this is from a time before printer companies started selling the printer itself as a loss leader to make revenue on the back end selling consumables. It seems you can’t escape the razor-and-blades model, though: [Emily] had to pay $16 for a new ink cartridge to revive the $4 printer.

With the new ink in place, and some tractor-feed paper acquired, [Emily] started work on the art generator. The concept is something that might have been sold on late-night TV ads: a “cartridge” you plug into your printer to make ASCII masterpieces. Starting with a stripped-down Centronics printer cable that matches the printer’s port, she added an Arduino nano to store and serve up the art. The user interface is foolproof: a single button press causes a random selection from one of ten ASCII images to be printed. The whole thing is ensconced within a slick 3D printed case.

One of the coolest aspects of this project is the lack of power supply. When she first hooked the Arduino to the printer’s parallel port, [Emily] noticed that it powered right up with no external supply, and in true hacker fashion, just ran with it. Upon reflection, it seems that power is being supplied by the printer status lines, Busy and/or Ack, through the input protection diodes of the Atmega328 on the nano.

We really like this project, and are more than a little bummed we tossed those old printers that were kicking around the Hackaday labs for years. If you still have yours, and would like turn out some rad ASCII art, the code for this project is up on GitHub.

We’re no strangers to [Emily]’s work, but if you aren’t familiar with it, check out her inspiring talk from the 2019 Hackaday Superconference. Meanwhile, don’t miss the excellent video about the ASCII art printer cartridge, after the break.

Continue reading “Vintage Mini Inkjet Prints On-Demand ASCII Art”