Don’t Tase Me, Keeb!

Okay, so this doesn’t really use a taser — that’s just click bait and we apologize. An actual taser would be a terrible way to train yourself to be a better typist, because depending on where you choose to deliver the shock, you could damage your typing nerves pretty quickly with a few milliamps at 50,000 volts.

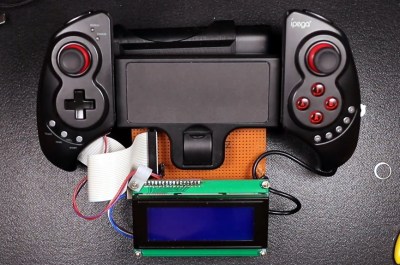
Instead of a taser, [nobody6502] got a pack of prank gum off of Amazon that delivers a much more doable shock that is painful enough to get the user to type more carefully. [nobody6502] set up a simple no-pain, no-train website that presents random English words one at a time and checks for typos against an open-source list of nearly half a million entries. Misspell a word, and a get a relay-driven shock from the gum circuit.

The main brain of this pain trainer is a Particle Argon board which has I/O pins that can be controlled from the web. When the website detects a typo, it sends a signal to the Argon, which turns on a relay that activates the shock mechanism. What’s most impressive is that [nobody6502] doesn’t have a full-blown computer and programmed everything on an iPad. Check out the build video after the break.

Are you a hunt and peck typist? There’s a negative reinforcement keyboard for that.

Continue reading “Don’t Tase Me, Keeb!”

Tired Of Popcorn? Roast Coffee Instead

We’ve seen a lot of coffee roaster builds over the years. [Ben Eagan] started his with a hot-air popcorn maker. If you think it is as simple as putting beans in place of the popcorn, think again. You need to have good control of the heat, and that requires some temperature monitoring and a controller — in this case, an Arduino. [Ben’s] video below shows how it all goes together.

With the Arduino and the power supply strapped to the sides, it looks a bit like something out of a bad post-apocalypse movie. But it looks like it gets the job done.

In addition to the Arduino, a thermocouple measures the temperature and that takes a little circuitry in the form of a MAX31855. There’s also a relay to turn the heater on and off. There are other ways to control AC power, of course, and if a relay offends your sensibilities you can always opt for a solid state one.

Continue reading “Tired Of Popcorn? Roast Coffee Instead”

Motor-Driven Movement Modernizes POV Toy

Just as we are driven today to watch gifs that get better with every loop, people 100+ years ago entertained themselves with various persistence of vision toys that used the power of optical illusions to make still images come to life. [jollifactory] recently recreated one of the first POV devices — the phenakistoscope — into a toy for our times.

The original phenakistoscopes were simple, but the effect they achieved was utterly amazing. Essentially a picture disk with a handle, the user would hold the handle with one hand and spin the disk with the other while looking in a mirror through slits in the disk. Unlike the phenakistoscopes of yore that could only be viewed by one person at a time, this one allows for group watching.

Here’s how it works: an Arduino Nano spins a BLDC motor from an old CD-ROM drive, and two strips of strobing LEDs provide the shutter effect needed to make the pictures look like a moving image.The motor speed is both variable and reversible so the animations can run in both directions.

To make the disks themselves, [jollifactory] printed some original phenakistiscopic artwork and adhered each one to a CD that conveniently snaps onto the motor spindle. Not all of the artwork looks good with a big hole in the middle, so [jollifactory] created a reusable base disk with an anti-slip mat on top to spin those.

If you just want to watch the thing in action, check out the first video below that is all demonstration. There be strobing lights ahead, so consider yourself warned. The second and third videos show [jollifactory] soldering up the custom PCB and building the acrylic stand.

There are plenty of modern ways to build old-fashioned POV toys, from all-digital to all-printable.

Continue reading “Motor-Driven Movement Modernizes POV Toy”

Stochastic Markov Beats

[Attoparsec] has been building intriguing musical projects on his YouTube channel for a while and his latest is no exception. Dubbed simply as “Node Module”, it is a rack-mounted hardware-based Markov chain beat sequencer. Traditionally Markov chains are software state machines that transition between states with given probabilities, often learned from a training corpus. That same principle has been applied to hardware beat sequencing.

Each Node Module has a trigger input, four outputs each with a potentiometer, and a trigger out. [Attoparsec] has a wonderful explanation of all the different parts and theories that make up the module at the start of his video, but the basic operation is that a trigger input comes in and the potentiometers are read to determine the probabilities of each output. One is randomly selected and fired. As you can imagine, there are loops and even dead-end nodes and for some musical pieces there is a certain number of beats expected, so a clever reset signal can be sent to pull the chain back to the initial starting state at a regular interval. The results are interesting to listen to and even better to imagine all the possibilities.

The module itself is an Arduino-based custom PCB that is laid out quite cleanly. The BOM, code, and KiCad files are available on GitHub if you want to make one yourself. This isn’t the first instrument we’ve seen [Attoparsec] make, and we’re confident it won’t be the last.

Continue reading “Stochastic Markov Beats”

Dynamic Macro Keyboard Controls All The Things

Keyboard shortcuts are great. Even so, a person can only be expected to remember so many shortcuts and hit them accurately while giving a presentation over Zoom. [Sebastian] needed a good set of of shortcuts for OBS and decided to make a macro keyboard to help out. By the time he was finished, [Sebastian] had macro’d all the things and built a beautiful and smart peripheral that anyone with a pulse would likely love to have gracing their desk.

The design started with OBS, but this slick little keyboard turned into a system-wide assistant. It assigns the eight keys dynamically based on the program that has focus, and even updates the icon to show changes like the microphone status.

This is done with a Python script on the PC that monitors the running programs and updates the macro keeb accordingly using a serial protocol that [Sebastian] wrote. Thanks to the flexibility of this design, [Sebastian] can even use it to control the office light over MQTT and make the CO2 monitor send a color-coded warning to the jog wheel when there’s trouble in the air.

This project is wide open with fabulous documentation, and [Sebastian] is eager to see what improvements and alternative enclosure materials people come up with. Be sure to check out the walk-through/build video after the break.

Inspired to make your own, but want to start smaller? There are plenty to admire around here.

Continue reading “Dynamic Macro Keyboard Controls All The Things”

Coding A Dynamic Menu For Character LCDs On Arduino

These days, there’s a huge variety of screens on the market for use with microcontrollers. OLEDs and graphic LCDs abound, while e-ink devices tempt the user with their clean look and low energy consumption. However, for many purposes, the humble HD44780 character LCD does the job just fine. If you’re using such a device, you might want to implement a simple menu system, and in that case, [MyHomeThings] has you covered.

The menu code is simple to modify and implement. It allows the user to define a certain number of menu items, along with button labels and functions to be executed with button presses. By default, it’s set up to work with  left and right function buttons, with up and down buttons to toggle through the menu’s various entries. This suits the commonly available Arduino shields which combine a 16×2 character LCD with a set of four tactile buttons in a cross formation. However, modifying the code to use an alternate button scheme would be simple for those eager to tweak things to their liking.

For the absolute beginner to programming, it’s a great way to put together a simple interface for your microcontroller projects. It’s the sort of thing you might use if you’d built a do-everything Arduino handheld device, as we’ve seen built before. If you find text menus too archaic for your purposes, though, be sure to sound off with your favourite solutions in the comments.

Arduino Announces Board Based On Raspberry Silicon

The Raspberry Pi Pico burst onto the microcontroller scene last month with much fanfare, and is already popping up in projects left, right and center. Notable for its high clock speed and exciting IO features, it’s a breath of fresh air in a market slowly weaning itself onto ARM architectures and away from 8-bit staples. Not one to miss out on a slice of the action, Arduino have announced their own upcoming board based on the Pico’s RP2040 chip.

The board is named the Arduino Nano RP2040 Connect, a moniker that’s not just a mouthful but likely to be confused with existing Arduino Nano products. It sports several differences to the Raspberry Pi Pico, namely packing WiFi, Bluetooth, and an IMU on board which should make developing motion-sensitive and IoT projects easier, particularly in cases where the Pico’s flexible IO could be useful.

Naturally, Arduino IDE integration will be a major plus point that gets many makers on board, and we can imagine there will be swift development of libraries leveraging the RP2040’s PIO subsystem. If you still haven’t gotten the low down on the Raspberry Pi Pico yet, though, never fear – our own [Elliot Williams] can tell you everything you need to know!

[Thanks to Darrell Flenniken for the tip, via Tom’s Hardware]