Spraychalk Anoints Your Sidewalks With Precision Sandprints

Giant lines in the sand are incredibly useful for pleasing the gods and hailing overpassing extraterrestrials. Beautiful, unwarranted spray-painted sidewalks might land you in detention with local law enforcement. Of course, why not have both? With the Sand-and-Spraychalk machine, you can!

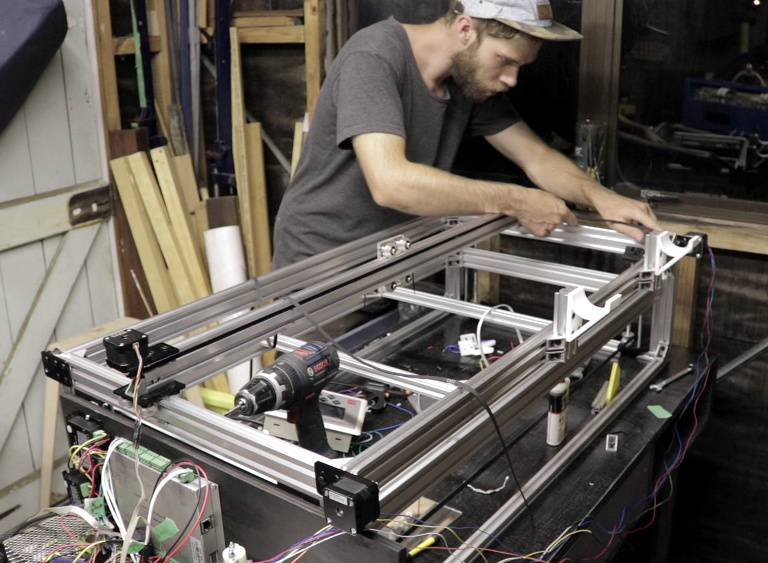
The Sand-and-Spraychalk machine Is a moving two-axis CNC machine that can anoint its path with a spray of either sand bits or spray paint.  As with any self-respecting power tool these days, the Spraychalk is driven by a rechargeable Bosch 18 V battery pack. As far as safety goes, leveraging an already-product-proven solution instead of cooking our lawns with questionable LiPos is downright clever.

Elegance is in simplicity, and the Spraychalk is no exception. The entire build is a collection of off-the-shelf parts mixed with a few laser cut plates and a one custom nozzle made of POM (Acetal). Precise spraying might sound like a hard problem, but it’s executed here with just a motor-driven cam and a couple levers. Finally, adapting a 18 V battery pack may seem like a form-factor nightmare, but our creator, [kallibaba], managed to pull it off with just a few laser-cut plates.

The Spraychalk rightfully sits next to its previously mentioned cousins that have graced these pages before. The next time we’re wondering just who vandalized your lawn so majestically, we know where to look!

Continue reading “Spraychalk Anoints Your Sidewalks With Precision Sandprints”

A Pick-And-Place That Is A Work Of Art

It’s a Holy Grail among hackerspaces, the possession of a pick-and-place machine. These robotic helpers for placing surface-mount components on PCBs are something of a gateway to electronic production, but they can carry a fearsome cost. Happily for the cash-strapped would-be electronic manufacturer, it is possible to build a pick-and-place for yourself. [Mcuoneclipse] has demonstrated this with a rather impressive build that works with the freely available OpenPnP software.

Superficially it shares much with what you might expect from a small CNC mill, in that it has a frame made from extruded aluminium that carries rails that trace an X and a Y axis supporting a tool head. But instead of a blade it has a box made from laser-cut ply that contains a camera and a vacuum pick-up tool that can collect a component from the tapes and deposit it in the correct point on the board. At the machine’s heart is a Smoothieboard, and the work is done by an assortment of solenoid valves and actuators. A huge amount of attention to detail has been paid to this build, with a holder for all the interchangeable nozzles for different component sizes, laser-cut mountings for all the motorised components, and automatic feeders for the SMD tapes all being carefully designed and built. Several iterations of the design are presented, in particular around the head itself which has passed through more than one form to remove as much vibration as possible. But don’t take it from us, have a look at the video we’ve pasted in below the break.

This isn’t the first pick-and-place machine we’ve brought you here at Hackaday. If you already have a 3D printer, would you consider this upgrade?

Continue reading “A Pick-And-Place That Is A Work Of Art”

MakerbotCNC PCB etcher

Makerbot Printer Reborn As PCB Engraver

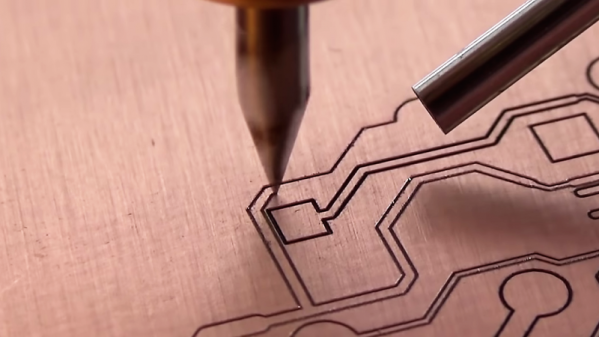
Makerbot 3D printers were among the first to hit the market, so it makes sense that old and broken ones now litter the shelves of hackerspaces and home workshops alike. Rather than throw his one out, [Foaly] saw an opportunity to convert it to some sort of CNC machine. Given its lack of inherent rigidity and relatively weak motors, he opted to make a low-impact circuit board engraver which he appropriately calls the MakerbotCNC. We like the thought he put into this project, and it was clearly backed by plenty of experience.

Circuit board etched using MakerbotCNC

Fortunately, his Makerbot Replicator 2 stemmed from a time when MakerBot was more open, meaning he could control the machine using a simple, open library. A little more open software handled his conversion of Gerber files to G-code. First tests drawing with a pen were successful, so he moved on to the carving head. He opted for an inrunner brushless motor to minimize dust getting into the motor but since these motors have a tendency to heat up he had to add fans to cool it. That still didn’t stop the heat from melting and bending his attempt at a 3D printed PLA carriage, so he switched it to a laser-cut MDF board to fix it. Finding the right collet proved tricky but eventually, he found the perfect fit was a collet clutch normally used to couple flex shafts to RC boat motors.

The result, as you can see was worth it. Using shallow passes, he can even cut carbon fiber parts.

While [Foaly] didn’t opt to replace more parts and go for a more powerful CNC, check out this 3D printer to CNC conversion which can cut wood, acrylic, and even aluminum.

CNC Mod Pack Hopes To Make Something Useful From A Cheap Machine Tool

It is probable that many of us have noticed a variety of very cheap CNC mills in the pages of Chinese tech websites and been sorely tempted. On paper or as pixels on your screen they look great, but certainly with the more inexpensive models there soon emerges a gap between the promise and the reality.

[Brandon Piner] hopes to address this problem, with his CNC Mod Pack, a series of upgrades to a cheap mill designed to make it into a much more useful tool. In particular he’s created a revised 3D-printed tool holder and a set of end stop switches. The tool holder boasts swappable mounts on a dovetail fitting with versions for both a laser diode and a rotary tool, allowing much better tool positioning. Meanwhile the end stops are a necessary addition that protects both tool and machine from mishaps.

The same arguments play out in the world of small CNC mills as do in that of inexpensive 3D printers, namely that the economy of buying the super-cheap machine that is nominally the same as the expensive one starts to take a knock when you consider the level of work and expense needed to make your purchase usable. But with projects like this one the barrier to achieving a quality result from an unpromising start is lowered, and the enticing prospect is raised of a decent CNC machine for not a lot.

A CNC Plasma Cutter Table, From The Shop Floor Up

Some projects are simple, some focus on precision and craftsmanship, and some are more of the quick-and-dirty variety. This home-built CNC plasma cutter table seems to follow a “go big or go home” philosophy, and we have to say we’re mighty impressed by the finished product.

For those who follow [Bob]’s “Making Stuff” YouTube channel, this build has been a long time coming. The playlist below has eight videos that cover the entire process from cutting the first tubes of the welded frame to the initial test cuts with the finished machine. [Bob] took great pains to make the frame as square and flat as possible, to the extent of shimming a cross member to correct a 0.030″ misalignment before welding. He used good-quality linear rails for each axis, and hefty NEMA 23 steppers. There were a few false starts, like the water pan that was going to be welded out of five separate pieces of steel until the metal shop guys saved the day with their press brake. In the end, the machine turned out great; with a build cost of $2000 including the plasma cutter it’s not exactly cheap, but it’s quite a bargain compared to similar sized commercial machines.

We think the video series is a great guide for anyone looking to make a CNC plasma table. We’ve seen builds like this before, including [This Old Tony]’s CNC router. Watching these builds gives us the itch to get into the shop and start cutting metal. Continue reading “A CNC Plasma Cutter Table, From The Shop Floor Up”

Direct CNC Control With The Raspberry Pi

If you’re building a CNC router, laser cutter, or even 3D printer, you’ll usually be looking at a dedicated controller. This board takes commands from a computer, often in the form of G-Code, and interprets that into movement commands to the connected stepper motors. Historically this has been something of a necessary evil, as there was really no way to directly control stepper motors with a computer fast enough to be useful. That may not be the case anymore.

A stepstick driver

Thanks to the Raspberry Pi (and similar boards), we now have Linux computers with plenty of GPIO pins. The only thing missing is the software to interpret the G-Code and command the steppers over GPIO, which thanks to [pantadeusz], we now have. Called raspigcd, this software interprets a subset of G-Code to provide real-time control over connected steppers fast enough to drive a small CNC router.

Of course, you can’t directly control a beefy stepper motor to the GPIO pins of a Pi. You’ll let out all the magic smoke. But you can wire it up directly to a stepper driver board. These little modules connect up to a dedicated power supply and handle the considerable current draw of the steppers, all you need to do is provide them the number of steps and direction of travel.

This method of direct control offers some very interesting possibilities for small, low-cost, CNC projects. Not only can you skip the control board, you could conceivably handle the machine’s user interface (either directly via a touch screen or over the network) on the same Pi.

We’ve seen attempts at creating all-in-one Linux stepper controllers in the past, but the fact that anyone with a Raspberry Pi 2 or 3 (the boards this software has currently been tested on) can get in on the action should really help spur along development. Has anyone used this?

Antique Lighthouse Lens Via CNC

Before the invention of the high-powered LED, and even really before the widespread adoption of electric lights in general, lighthouses still had the obligation of warning ships of dangers while guiding them into various safe harbors. They did this with gas lights and impressive glass lenses known as Fresnel lenses which helped point all available light in the correct direction while reducing weight and material that would otherwise be used in a conventional lens.

Now, a company in Florida is using acrylic in reproductions of antique Fresnel lenses. At first glance, it seems like acrylic might not be the best substitute for glass, but the company is able to achieve extreme precision using a CNC machine and then polishing and baking the acrylic which makes it transparent and excellent for use in lighthouse lenses like this. The reproduction lenses are built out of brass, and the lens elements are glued in place with a special adhesive. It’s a convincing replication worthy of use in any lighthouse.

Be sure to check out the video below to see how these lenses are built, and although we’re not entirely sure what exactly is being sprayed on the lenses when they are being polished, perhaps someone in the comments section can illuminate that for us. Of course, there are other uses for Fresnel lenses than in lighthouses, and we’ve seen some great examples of them put to use for many different applications.

Continue reading “Antique Lighthouse Lens Via CNC”