Inputs Of Interest: The OrbiTouch Keyless Keyboard And Mouse

I can’t remember how exactly I came across the OrbiTouch keyboard, but it’s been on my list to clack about for a long time. Launched in 2003, the OrbiTouch is a keyboard and mouse in one. It’s designed for people who can’t keyboard regularly, or simply want a different kind of experience.

The OrbiTouch was conceived of by a PhD student who started to experience carpal tunnel while writing papers. He spent fifteen years developing the OrbiTouch and found that it could assist many people who have various upper body deficiencies. So, how does it work?

It’s Like Playing Air Hockey with Both Hands

To use this keyboard, you put both hands on the sliders and move them around. They are identical eight-way joysticks or D-pads, essentially. The grips sort of resemble a mouse and have what looks like a special resting place for your pinky.

One slider points to groups of letters, numbers, and special characters, and the other chooses a color from a special OrbiTouch rainbow. Pink includes things like parentheses and their cousins along with tilde, colon and semi-colon. Black is for the modifiers like Tab, Alt, Ctrl, Shift, and Backspace. These special characters and modifiers aren’t shown on the hieroglyphs slider, you just have to keep the guide handy until you memorize the placement of everything around the circle.

You’re gonna need a decent amount of desk space for this. Image via OrbiTouch

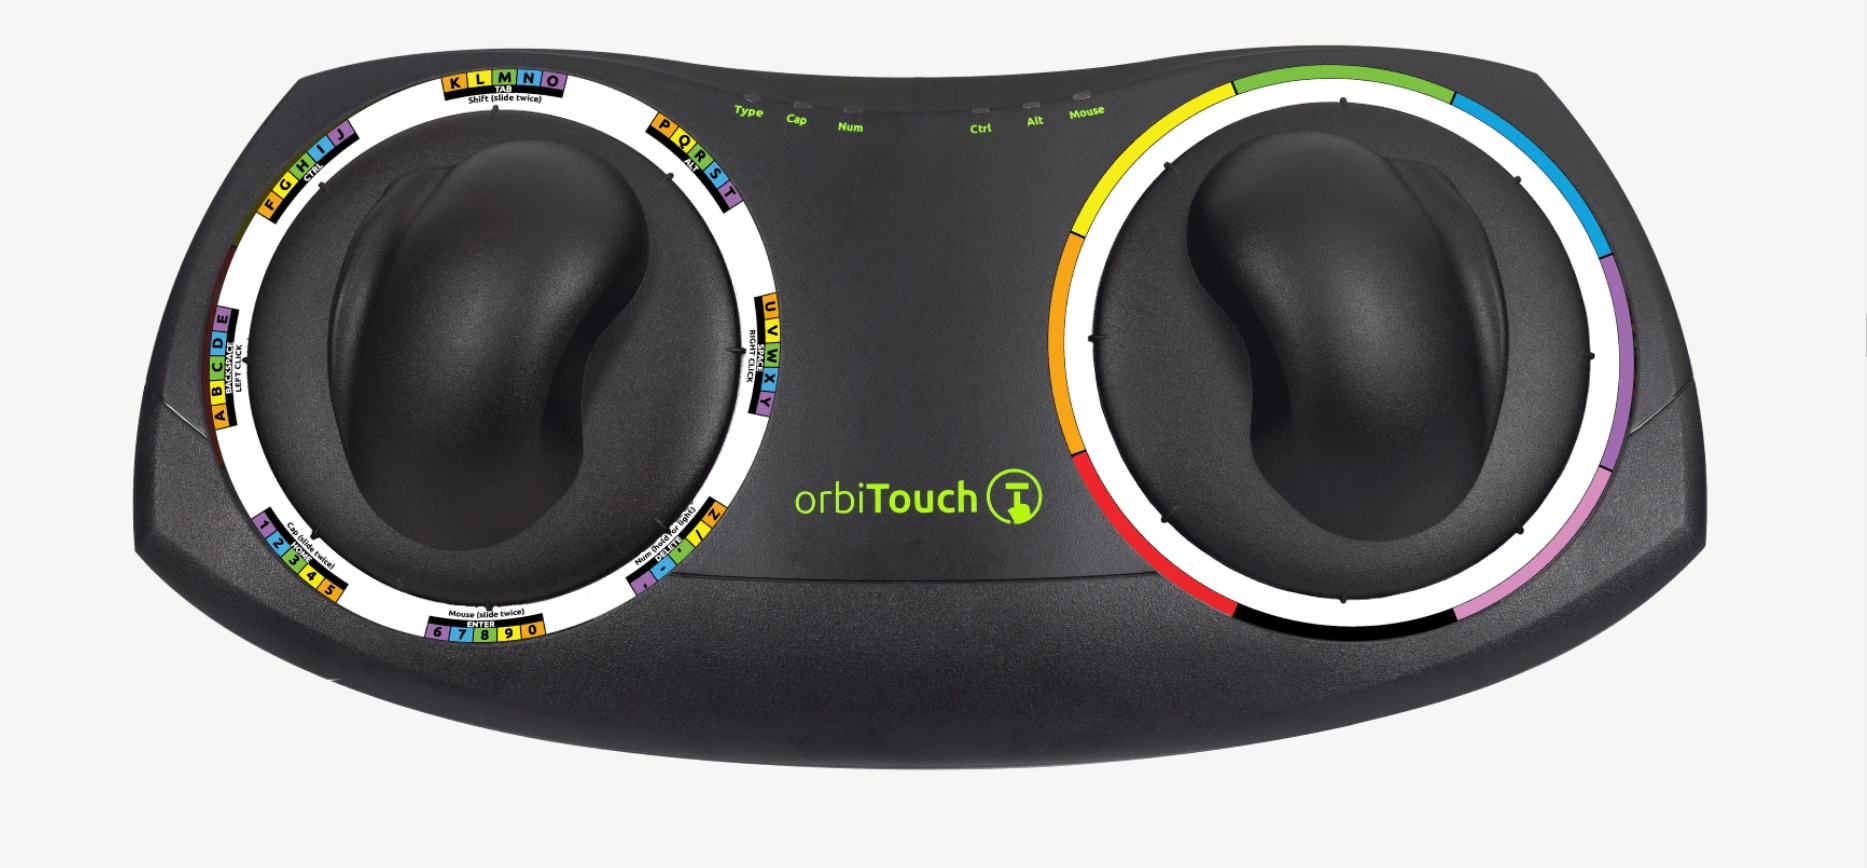
The alphabet is divided up into groups of five letters which are color-coded in rainbow order that starts with orange, because red is reserved for the F keys. So for instance, A is orange, B is yellow, C is green, D is blue, E is purple, then it starts back over with F at orange. If you wanted to type cab, for instance, you would start by moving the hieroglyph slider to the first alphabet group and the color slider to green.

Continue reading “Inputs Of Interest: The OrbiTouch Keyless Keyboard And Mouse”

Hardware Vs Software: Fight!

It’s one of the great cliches in the hacker world: the hardware type and the software type. You can tell which of these two you are quite easily. When a project is actually 20% done, but you think it’s 90% done, and you say to yourself “And the rest is a simple matter of software”, you’re a hardware type. Ask anyone who has read my code, and they’ll tell you, I’m a hardware type.

Along with my blindness to the difficulties of getting the code right, I’ve also admittedly got an underappreciation of what powers lie in the dark typing arts. But I am not too proud to tip my hat when I see an awesome application of the soft stuff. Case in point: this Go board sequencer that we ran last week. An overhead webcam parses players’ moves as they put black and white stones down while playing the game of Go, and turns this into music.

The pure software type will be saying “but there’s a webcam and a Go board”. And indeed, that’s true. There are physical elements to this project that anchor it in the shared reality of the two people playing. But a hardware project this isn’t; it’s OpenCV and Max/MSP that make it work.

For comparison, look at the complexity of this similar physical sequencer. It’s got a 16 x 16 array of LEDs and switches and a CNC milled, primed, and painted surface that’s the size of a twin bed. Sawdust and hand-soldering: that’s a hardware project.

What I love about the Go sequencer is that it uses software just right. The piece is still physical. It could have just as easily been a VR world, where the two people would interact with each other only inside their goggles. But somehow that’s not quite as human as putting stones on a wooden board, sitting across from, and maybe even looking at, your opponent. The players aren’t forced to think about the software. They don’t feel like they’re playing a video game.

But at the same time, the software side of things makes all of the horrible hardware problems go away. Nobody is soldering a rat’s nest of 169 switches. There’s a webcam plugged into the USB port of a laptop. There’s a deep simplicity there.

Should you always trade out arcade buttons for OpenCV? Absolutely not! But is it worth considering the soft side when doing it in hardware is just too, well, hard? I’m open.

How To Shoot A Great Project Video

Creating projects is fun, but the real value, as far as the imaginary Internet points are concerned, is how well you show them off for the clout. Taking a few snaps is fine, but if you want to produce a quality video of your project, it pays to put some thought and effort into the process.

Telling The Story

Before setting out to document your project on video, think about what you’re trying to communicate to the viewer. Are you attempting to create a step-by-step guide on how to recreate what you’ve done, or are you simply trying to show off the awesome finished product? These are two very different types of video, and will require different content and delivery entirely. It also guides how you shoot your video.

If you want to show off your build process, you’ll need to shoot as you go. This can be time consuming, but also a great way to show the reality of what goes into your work. I always like it when people convey the pitfalls and successes they faced along the way, and get people involved in the story. It also means that you’ll end up shooting a lot of footage and you’ll spend plenty of time editing it all together. Continue reading “How To Shoot A Great Project Video”

Hackaday Podcast 088: Flywheel Trebuchet, Thieving Magpies, Hero Engines, And Hypermiling

Hackaday editors Elliot Williams and Mike Szczys riff on the hardware hacks that took the Internet by storm this week. Machining siege weapons out of aluminum? If they can throw a tennis ball at 180 mph, yes please! Welding aficionados will love to see the Hero Engine come together. We dive into the high-efficiency game of hypermiling, and spin up the polarizing topic of the Sun Cycle. The episode wouldn’t be complete without hearing what the game of Go sounds like as a loop sequencer, and how a variable speed cassette player can be abused for the benefit of MIDI lovers the world over.

Take a look at the links below if you want to follow along, and as always, tell us what you think about this episode in the comments!

Take a look at the links below if you want to follow along, and as always, tell us what you think about this episode in the comments!

Direct download (60 MB or so.)

Continue reading “Hackaday Podcast 088: Flywheel Trebuchet, Thieving Magpies, Hero Engines, And Hypermiling”

This Week In Security: Code Scanning, Information Gathering, And Seams In The Cloud

GitHub has enabled free code analysis on public repositories. This is the fruit of the purchase of Semmle, almost exactly one year ago. Anyone with write permissions to a repository can go into the settings, and enable scanning. Beyond the obvious use case of finding vulnerabilities, an exciting option is to automatically analyse pull requests and flag potential security problems automatically. I definitely look forward to seeing this tool in action.

The Code Scanning option is under the Security tab, and the process to enable it only takes a few seconds. I flipped the switch on one of my repos, and it found a handful of issues that are worth looking in to. An important note, anyone can run the tool on a forked repo and see the results. If CodeQL finds an issue, it’s essentially publicly available for anyone who cares to look for it.

Simpler Code Scanning

On the extreme other hand, [Will Butler] wrote a guide to searching for exploits using grep. A simple example, if raw shows up in code, it often signals an unsafe operation. The terms fixme or todo, often in comments, can signal a known security problem that has yet to be fixed. Another example is unsafe, which is an actual keyword in some languages, like Rust. If a Rust project is going to have vulnerabilities, they will likely be in an unsafe block. There are some other language-dependent pointers, and other good tips, so check it out.

Continue reading “This Week In Security: Code Scanning, Information Gathering, And Seams In The Cloud”

Sensing The Earth’s Wobble In Time

In the 1850s British railway companies started introducing a single standard time to make their timetables consistent. Before that, every city would set its own clock based on the observation of the position of the sun. Nowadays, precise time standards are not only needed so people don’t miss their trains but also make modern communication technologies and satellite navigation work.

Generally, there are two methods of defining time, one is based on the local passage of time as measured by atomic clocks, while the other relies on the exact measurement of Earth’s rotation. The latter is not an easy exercise that involves extragalactic radio sources or huge laser-based gyroscopes. The constant survey of the Earth’s spin tells us that days are constantly getting longer, but surprisingly, severe earthquakes and weather phenomena can also take little discrete bites out of the planet’s supply of rotational kinetic energy.

How do we keep our ultra precisely measured time, the rotation of the Earth, and our position in the heavens in line?

Continue reading “Sensing The Earth’s Wobble In Time”

The Prusa I3 MK3S And A Tale Of Two Sensors

When the Prusa i3 MK3 was released in 2017, it was marketed as being “bloody smart” thanks to the impressive number of sensors that had been packed into the printer. The update wasn’t really about improving print quality over the MK2, but rather to make the machine easier to use and more reliable. There was a system for resuming prints that had stopped during a power outage, a thermometer so the firmware could compensate against thermal drift in the inductive bed sensor, RPM detection on all of the cooling fans, and advanced Trinamic stepper drivers that could detect when the printer had slipped or gotten stuck.

The optical filament sensor of the Prusa i3 MK3.

But the most exciting upgrade of all was the new filament sensor. Using an optical encoder similar to what you’d find in a mouse, the Prusa i3 MK3 could detect when filament had been inserted into the extruder. This allowed the firmware to pause the print if the filament had run out, a feature that before this point was largely unheard of on consumer-grade desktop 3D printers. More than that, the optical encoder could also detect whether or not the filament was actually moving through the extruder.

In theory, this meant the MK3 could sense problems such as a jammed extruder or a tangle in the filament path that was keeping the spool from unrolling. Any other consumer 3D printer on the market would simply continue merrily along, not realizing that it wasn’t actually extruding any plastic. But the MK3 would be able to see that the filament had stalled and alert the user. The capabilities of the optical filament sensor represented a minor revolution in desktop 3D printing, and combined with the rest of the instrumentation in the MK3, promised to all but eradicate the heartbreak of failed prints.

Fast forward to February of 2019, and the announcement of the Prusa i3 MK3S. This relatively minor refresh of the printer collected up all the incremental tweaks that had been made during the production of the MK3, and didn’t really add any new features. Though it did delete one: the MK3S removed the optical encoder sensor used in the MK3, and with it the ability to sense filament movement. Users would have to decide if keeping the ability to detect clogs and tangles was worth giving up all of the other improvements offered by the update.

But why? What happened in those three years that made Prusa Research decide to abandon what promised to be a huge usability improvement for their flagship product? The answer is an interesting look at how even the cleverest of engineering solutions don’t always work as expected in the real-world.

Continue reading “The Prusa I3 MK3S And A Tale Of Two Sensors”