Tetris On Split-Flap Go Brrr

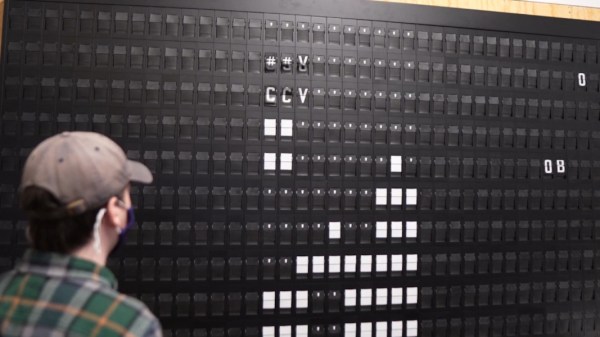
It hardly seems possible, but engineer collective and split-flap display purveyors [Oat Foundry] were able to build a working implementation of Tetris on a 10 x 40 split-flap display in the span of a single day. Check it out in the video after the break.

This project is a bit understaffed in the details department, but we do know that [Oat Foundry] started with [Timur Bakibayev]’s open-source implementation of Tetris in Python and modified the draw function to work on a split-flap display. As you may have guessed, the biggest obstacle is the refresh rate and how it affects playability — particularly during those tense moments when a player rotates a piece before dropping it. Split-flaps flip quickly from on to off, but flipping back to on requires a full trip around through all the other characters.

We think this is nice work for a one-day build. Should they go further, we’d like to see the same things implemented as [Oat Foundry] does: a high score tracker and a preview of the next piece.

Don’t have a split-flap display? Yeah, us either, but we do have televisions. Turn on the tube and check out this Nano-scale Tetris.

Continue reading “Tetris On Split-Flap Go Brrr”

Buttonpusher Automates Animal Crossing Tasks

Press button, wait, press button again, repeat. There must be a better way! If that kind of interaction drives you nuts, you’ll probably appreciate [Tommy]’s buttonpusher, which has only one job: automate away some of the more boring parts of Nintendo’s Animal Crossing. On one hand the job the device does is very simple: press a button on the Nintendo joy-con in a preprogrammed pattern. There’s no feedback loop, it just dumbly presses and waits. But there are still quite a few interesting bits to this build.

Rigid mounting combined with interfacing the actuator to the servo horn (instead of to the servo shaft) were the keys to reliable button pushing.

For one thing, [Tommy] discovered that the little 9g RC servo can reliably exert enough force to press the button on the joy-con with the right adapter. He had assumed the servo would be too weak to do the job without a greater mechanical advantage, but a simple hammer-style actuator that attaches to the servo horn easily does the job. Well, it does as long as the servo and joy-con are held rigidly; his first version allowed a little too much wiggle in how well the parts were held, and button presses didn’t quite register. With a 3D-printed fixture to rigidly mount both the servo and the joy-con, things were fine.

In the process of making buttonpusher, which uses CircuitPython, [Tommy] created a tool to automate away another pesky task he was running into: circuitpython_tools was created to automatically watch for code changes, convert the .py files into (smaller) MicroPython bytecode .mpy files, then automatically deploy to the board. This saved [Tommy] a lot of time and hassle during development, but it was only necessary because he quickly ran out of memory on his M0 Metro Express board, and couldn’t fit his code in any other way.

Still, it’s a good example of how one project can sometimes spawn others, and lead to all kinds of lessons learned. You can see buttonpusher automate the crafting process in Animal Crossing in the video, embedded below.

Continue reading “Buttonpusher Automates Animal Crossing Tasks”

RetroArch Open Hardware Aims For Plug-and-Play

At its core, the RetroArch project exists to make it easier to play classic games on more modern hardware. The streamlined front-end with its tailored collection of emulators helps take the confusion out of getting your favorite game from decades past running on whatever gadget you please, from your smartphone to the venerable Raspberry Pi. But there’s always room for improvement.

In a recent blog post, the folks behind RetroArch took the wraps off of an exciting hardware project that’s been in the works for about a year now. Referred to simply as “RetroArch Open Hardware”, the goal is to develop a fully open source cartridge adapter that will integrate seamlessly with the RetroArch software. Just plug in your original cartridge, and the game fires right up like back in the good old days.

Now to be clear, this isn’t exactly a new idea. But the team at RetroArch explain that previous devices that blurred the line between hardware and emulation have been expensive, hard to find, and worst of all, proprietary. By creating an open hardware project, they hope to truly unleash this capability on the community. Instead of having to deal with one vendor, multiple companies will be free to spin up their own clones and potentially even improve the core design. Should none of the ones on the market fit your particular needs, you’d even be free to build your own version,

What’s more, the gadget will also make it easier to create your own ROMs from cartridges you own. By appearing to the operating system as a USB Mass Storage device, users can literally drag and drop a game ROM to their computer’s desktop. No arcane software fired off from the command line; as much as we might enjoy such things, it’s not exactly intuitive for the gaming community at large. The same technique will also allow users to backup their saved progress before it’s inevitably lost to the ravages of time. The device demonstrated by the team currently only works on Nintendo 64 games, but presumably compatibility with be expanded to other cartridges in the future.

Over the years, we’ve seen a number of hombrew devices designed to read and copy game cartridges. We’ve even seen some rather polished examples that were released as open hardware. But those devices never had the public backing of such a well known group in the emulation scene, and we’re excited to see what kind of development and adoption can be spurred on by this level of legitimacy.

[Thanks to Nick for the tip.]

Arduboy FX Mod-Chip: Now You’re Playing With Power

Traditionally, a forum full of technical users trying integrate their own hardware into a game system for the purposes of gaining unfettered access to its entire software library was the kind of thing that would keep engineers at Sony and Nintendo up at night. The development and proliferation of so called “mod chips” were an existential threat to companies that made their money selling video games, and as such, sniffing out these console hackers and keeping their findings from going public for as long as possible was a top priority.

But the Arduboy is no traditional game system. Its games are distributed for free, so a chip that allows users to cram hundreds of them onto the handheld at once isn’t some shady attempt to pull a fast one on the developers, it’s a substantial usability improvement over the stock hardware. So when Arduboy creator Kevin Bates found out about the grassroots effort to expand the system’s internal storage on the official forums, he didn’t try to put a stop to it. Instead, he asked how he could help make it a reality for as many Arduboy owners as possible.

Now, a little less than three years after forum member Mr.Blinky posted his initial concept for hanging an external SPI flash chip on the system’s test pads, the official Arduboy FX Mod-Chip has arrived. Whether you go the DIY route and build your own version or buy the ready-to-go module, one thing is for sure: it’s a must-have upgrade for the Arduboy that will completely change how you use the diminutive handheld.

Continue reading “Arduboy FX Mod-Chip: Now You’re Playing With Power”

Complicated And Useless Cancel Each Other Out

We all know what it means to procrastinate, but what about actively spending time building a useless machine? You have undoubtedly seen the ornamental boxes with a tempting little toggle switch on the top. When you inevitably flip the switch, an actuator pops out from one half of the enclosure with the sole purpose of undoing its own power switch. [Paz Hameiri] took it a step further by adding some [Rube Goldberg] flavor, and with the help of a microcontroller, his levers take their sweet time powering themselves down. (Video after the break.)

We didn’t find any code or diagrams for the project, but if you know the useless machine’s internals, it shouldn’t be any trouble to recreate one for your desk. The most significant design factor is that the switches. Their contacts must be wired in parallel so that the controller has power as long as one is active. How would you spice up the useless machine?

Even though these are called useless machines, they serve the purpose of decoration, conversation-starting, or a way to show off your woodworking and programming skills.

Continue reading “Complicated And Useless Cancel Each Other Out”

Micro:bit Makes Cardboard Pinball More Legit

What have you been doing to ward off the winter blues? [TechnoChic] decided to lean in to winter and make a really fun-looking game out of it by combining the awesome PinBox 3000 cardboard pinball sandbox with a couple of Micro:bits to handle and display the player’s score. Check it out the build and gameplay in the video after the break.

The story of Planet Winter is a bittersweet tale: basically, a bunch of penguins got tired of climate change and left Earth en masse for a penguin paradise where it’s a winter wonderland all year round. There’s a party igloo with disco lights and everything.

[TechnoChic] used a Micro:bit plugged into a Brown Dog Gadgets board to keep track of scoring, control the servo that kicks the ball back out of the igloo, and run the blinkenlights. It sends score updates over Bluetooth to a second Micro:bit and a Pimoroni Scrollbit display that sit opposite the pinball launcher. She went through a few switch iterations before settling on conductive maker tape and isolating the ball so it only contacts the tape tracks.

There are two ways to score on Planet Winter — the blizzard at the end of the ball launcher path nets you ten points, and getting the ball in the party igloo is good for thirty. Be careful on the icy lake in the middle of the playfield, because if the ball falls through the ice, it’s gone for good, along with your points. It’s okay, though, because both the party igloo and the ice hole trigger an avalanche which releases another ball.

Seriously, these PinBox 3000 kits are probably the most fun you can have with cardboard, even fresh out of the box. They are super fun even if you only build the kit and make a bunch of temporary targets to test gameplay, but never settle on a theme (ask us how we know). Not convinced? Hackaday Editor-in-Chief [Mike Szczys] explored them in depth at Maker Faire in 2018.

Continue reading “Micro:bit Makes Cardboard Pinball More Legit”

Robotic Pool Cue Can Be Your Friend Or Your Foe

In his everlasting quest to replace physical skill with technology, [Shane] of [Stuff Made Here] has taken aim at the game of eight-ball pool. Using a combination of computer vision and mechatronics, he created a robotic pool system that can allow a physical game of pool over the internet, or just beat human players. See the video after the break.

Making a good pool shot requires three discrete steps. First, you need to identify the best shot, then figure out how exactly to strike the balls to achieve the desired results, and finally physically execute the shot accurately. [Shane’s] goal was to automate all these steps. For the physical part, he built a pool cue with a robotic tip which only requires the user to place in approximately the right position, while a pneumatic piston mounted on a Stewart platform does the rest. A Stewart platform is a triangular plate mounted with six reciprocating rods, which gives it the required freedom of motion. The rods’ bases are attached to a set of cranks actuated by tension cables pulled by servos mounted at the rear-end of the cue. An adjustable air system allows the power of the shot to be adjusted as required.

A camera mounted is mounted over the table and connected to computer vision software to gather the required position information. Fiducials on the corners of the table and the cue tip allow the position of the pockets, balls, and cue to be accurately determined, and theoretically should allow the robot to take the perfect shot. Getting this to work in reality quickly turned into a very frustrating experience. After many hours of debugging, [Shane] tracked the error to a tiny forgotten test function that was introducing 5-10 mm of position error, and 2 of the six servos in the cue not performing up to spec. To determine the vertical positioning of the cue, an IMU and fixed height foot were added. [Shane] also added an overhead projector to overlay all required information directly on the table. Continue reading “Robotic Pool Cue Can Be Your Friend Or Your Foe”