On the hardware side, the first prototype radar horn was made out of cardboard with aluminum foil taped around it. With the concept proven, [JBeale] made a second horn out of thin copper-clad sheets, but reports that the performance is just about the same. The other hardware hack was simply to tack a wire on the radar module’s analog output and add a simple op-amp gain stage, which extended the sensing range well beyond the ten feet or so that these things are usually used for.
With all that signal coming in, [JBeale] separates out the noise by taking an FFT of the Doppler frequency-shift signal. Figuring that people walk around 2.2 miles per hour, [JBeale] focuses on the corresponding 70 Hz frequency bin and finds that the radar will detect people out to 80 feet. Wow!
This trick of taking an el-cheapo radar unit and amplifying the signal to do something useful isn’t new to Hackaday. [Mathieu] did it with the very same HB-100 unit way back in 2013, and then again with a more modern CDM324 model. But [JBeale]’s hacked horn and clever backend processing push out the limits of what you can expect to do with these cheap units. Kudos.
Everyone knows how to convert from Celsius to Fahrenheit, right? On a digital thermometer you just flick the little switch, on a weather app you change the settings, or if worse comes to worse, you let Google do the math for you. But what if you want to solve the problem the old-fashioned way? Then you pull out a few op amps and do your conversions analog style.
We’ve seen before how simple op amp circuits can do basic math, and the equation that [Kerry Wong] wants to solve is even simpler. Recalling the old Tf = 9/5·Tc + 32 formula (and putting aside the relative merits of metric versus traditional units; we’ve had enough of that argument already), [Kerry] walks us through a simple dual op amp circuit to convert the 1 mV/°C output of a thermocouple module to 1 mV/°F. The scaling is taken care of by a non-inverting amplifier with resistors chosen to provide a gain of 1.8, while the offset is handled by a differential amplifier that adds 32 mV to the scaled input. Strategically placed trimmers allow [Kerry] to tweak the circuit to give just the right conversion.
For jobs like this, it’s tempting to just use an analog input on an Arduino and take care of conversions in code. But it’s nice to know how to do it old school, too, and hats off to [Kerry] for showing us the details.
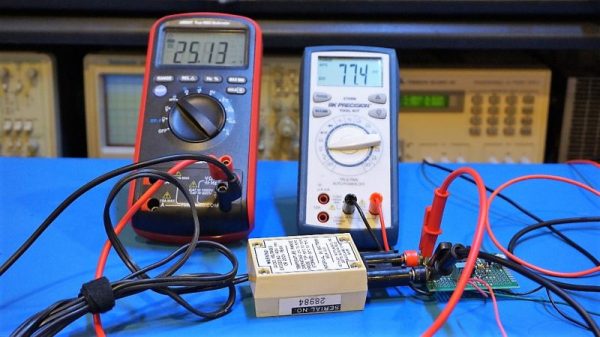
[Pete] wondered how real-time clock modules could be selling on eBay for $1.50 when the main component, the Maxim DS3231 RTC/TCXO chip, cost him more like $4 apiece. Could the cheap modules contain counterfeit chips?
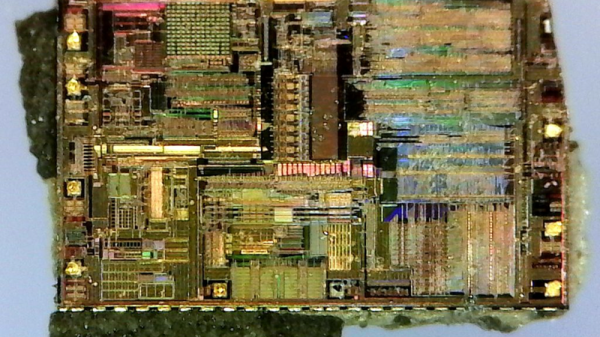
Well, sure they could. But in this case, they didn’t, and [Pete] has the die shots to prove it. He started off by clipping the SOIC leads rather than desoldering — he’s not going to be reusing this chip after he’s cut it in half. Next was a stage of embrittling the case by heating it up with a lighter and dunking it in water. Then he went at it with sandpaper.
It’s cool. You can see the watch crystal inside, and all of the circuitry. The DS3231 includes a TCXO — temperature-corrected crystal oscillator — and it seems to have a bank of capacitors that it connects and disconnects depending on the chip’s temperature to keep the oscillator running at the right speed. [Pete] used one in an offline situation, and it only lost sixteen seconds over a year, so we’d say that they work fine.
At this point, it’s not really correct to describe DEF CON as a single, gigantic conference for security, tech, and other ‘hacky’ activities. DEF CON is more of a collection of groups hosting villages, get-togethers, meetups, and parties where like-minded individuals share their time, company, electronic war stories, and whiskey. One of the largest groups measured by the number of rideable, inflatable unicorns is Queercon, a ‘conference within a conference’ dedicated to LGBT causes, a rager of a party, and a killer conference badge.
The Queercon badge is always a work of art, and this year is no exception. Last year, we took a look at an immaculate squid/cuttlefish badge, and a few years before that, the Queercon badge was a beautiful 3.5″ floppy embedded with far too many RGB LEDs. This year’s Queercon badge was equally as amazing, quite literally pushing badgecraft into another dimension. The folks behind the Queercon badge just wrote up their postmortem on the badge, and it’s an excellent example of how to push PCBs into the space of human interaction.
The development of the 2017 Queercon badge had a really tough act to follow. Last year’s Blooper squid/cuttlefish badge is a high point in the world of functional PCB art, and by January of this year, the team didn’t know where to take badgecraft next.
In the end, the QC badge team decided on a ‘failsafe’ design — it wasn’t necessarily going to be the best idea, but the design would minimize risk and development time.
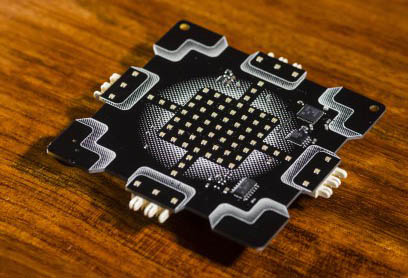
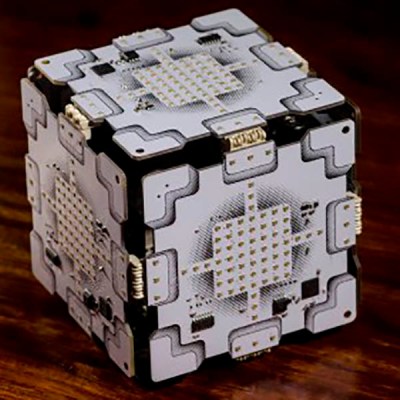
A single 2017 Queercon badge
The two obvious features of this badge are an incredible number of tiny RGB LEDs, and very strange hermaphroditic edge connectors, allowing these badges to be plugged together into a panel of badges or a cube. What does this badge do? It blinks. If you have five friends, you can make something that looks like the Companion Cube from Portal.
Hardware
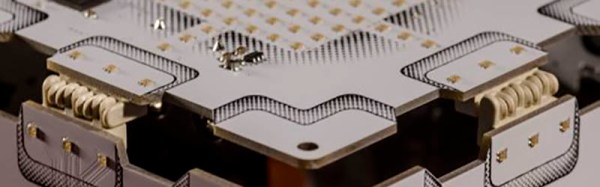
The killer feature for this badge is a vast array of RGB LEDs. Instead of going with WS2812s or APA101s, the Queercon badge team found simple, 0604 RGB LEDs, priced at about $0.026 a piece. There are 73 LEDs in total, all driven by the same TI LED driver used in previous years, combined with two shift registers and 15 FETs to control the LED commons. Although the LED driver is able to address all 219, and even though the badge is powered by a 32-bit ARM Cortex M3 microcontroller, this is pretty much the limit of how many LEDs can be controlled with this setup.
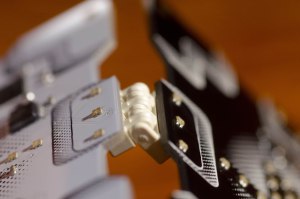
The Queercon badge always has a bit of interconnectedness built in, and this year is no exception. This year the badge uses a strange universal connector mounted along the four sides of the badge. When one badge is plugged into the other, they mate producing a ‘fabric’ of glowing badges. The range of motion on this connector allows for 180 degrees of rotation, but surprisingly most Queercon badge holders only assembled single planes of badges. It took a bit of cajoling from the badgemakers to get people to assemble a cube, and no other weird shapes were constructed out of multiple badges. If anyone likes this idea of interconnected badges, I would like to personally suggest equilateral triangles — this would allow for icosahedrons or hexagon-based solids.
A Game
A badge wouldn’t be complete without a game, and the Queercon badge has it in spades. The UI/UX/graphics designer [Jonathan] came up with a game loosely based on a game called ‘Alchemy’. Every badge comes loaded with a set of basic elements (air, fire, water, earth), represented as pixel art on the 7×7 RGB LED matrix. Combining these elements leads to even more elements — water plus fire equals beer, for example. Think of it as crafting in Minecraft, but with badges.
Starbucks was responsible for sponsoring a portion of Queercon this year, so ten special badges were loaded up with a fifth element: coffee. Elements derived from the coffee element required a Starbucks sponsor badge.
As we all expect from a DEF CON badge, there was a crypto challenge and contest. The full write up is available here, with the solution somewhat related to a cube of badges.
A Complete Success
When the badges came back from the fab house, the failure rate for this year’s Queercon badge was 0.7%. That’s an amazing yield for any independent hardware badge, and is honestly one of the most impressive aspects of this year’s Queercon. Failure modes during the con were probably related to spilling a drink on a badge, although there was a rash of failed CPUs. This is probably related to ESD, and during the con rework of failed badges was basically impossible because of drunk soldering in a dimly lit hotel room.
If there’s one failure of this year’s Queercon, it’s simply that it’s becoming too popular. From last year, Queercon saw 200% growth for the main party, which meant not everyone got a badge. That’s unfortunate, but plans are in the works for more inventory next year, providing DEF CON 26 isn’t cancelled, which it is. A shame, really.
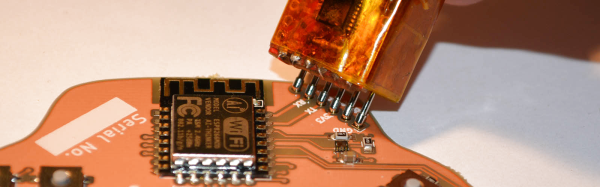
A few weeks ago, I was working on a small project of mine, and I faced a rather large problem. I had to program nearly five hundred badges in a week. I needed a small programming adapter that would allow me to stab a few pads on a badge with six pogo pins, press a button, and move onto the next badge.
While not true for all things in life, sometimes you need to trade quality for expediency. This is how I built a terrible but completely functional USB to serial adapter to program hundreds of badges in just a few hours.
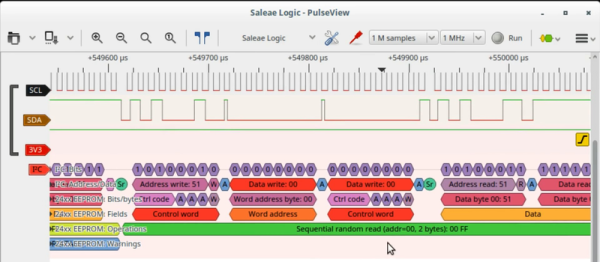
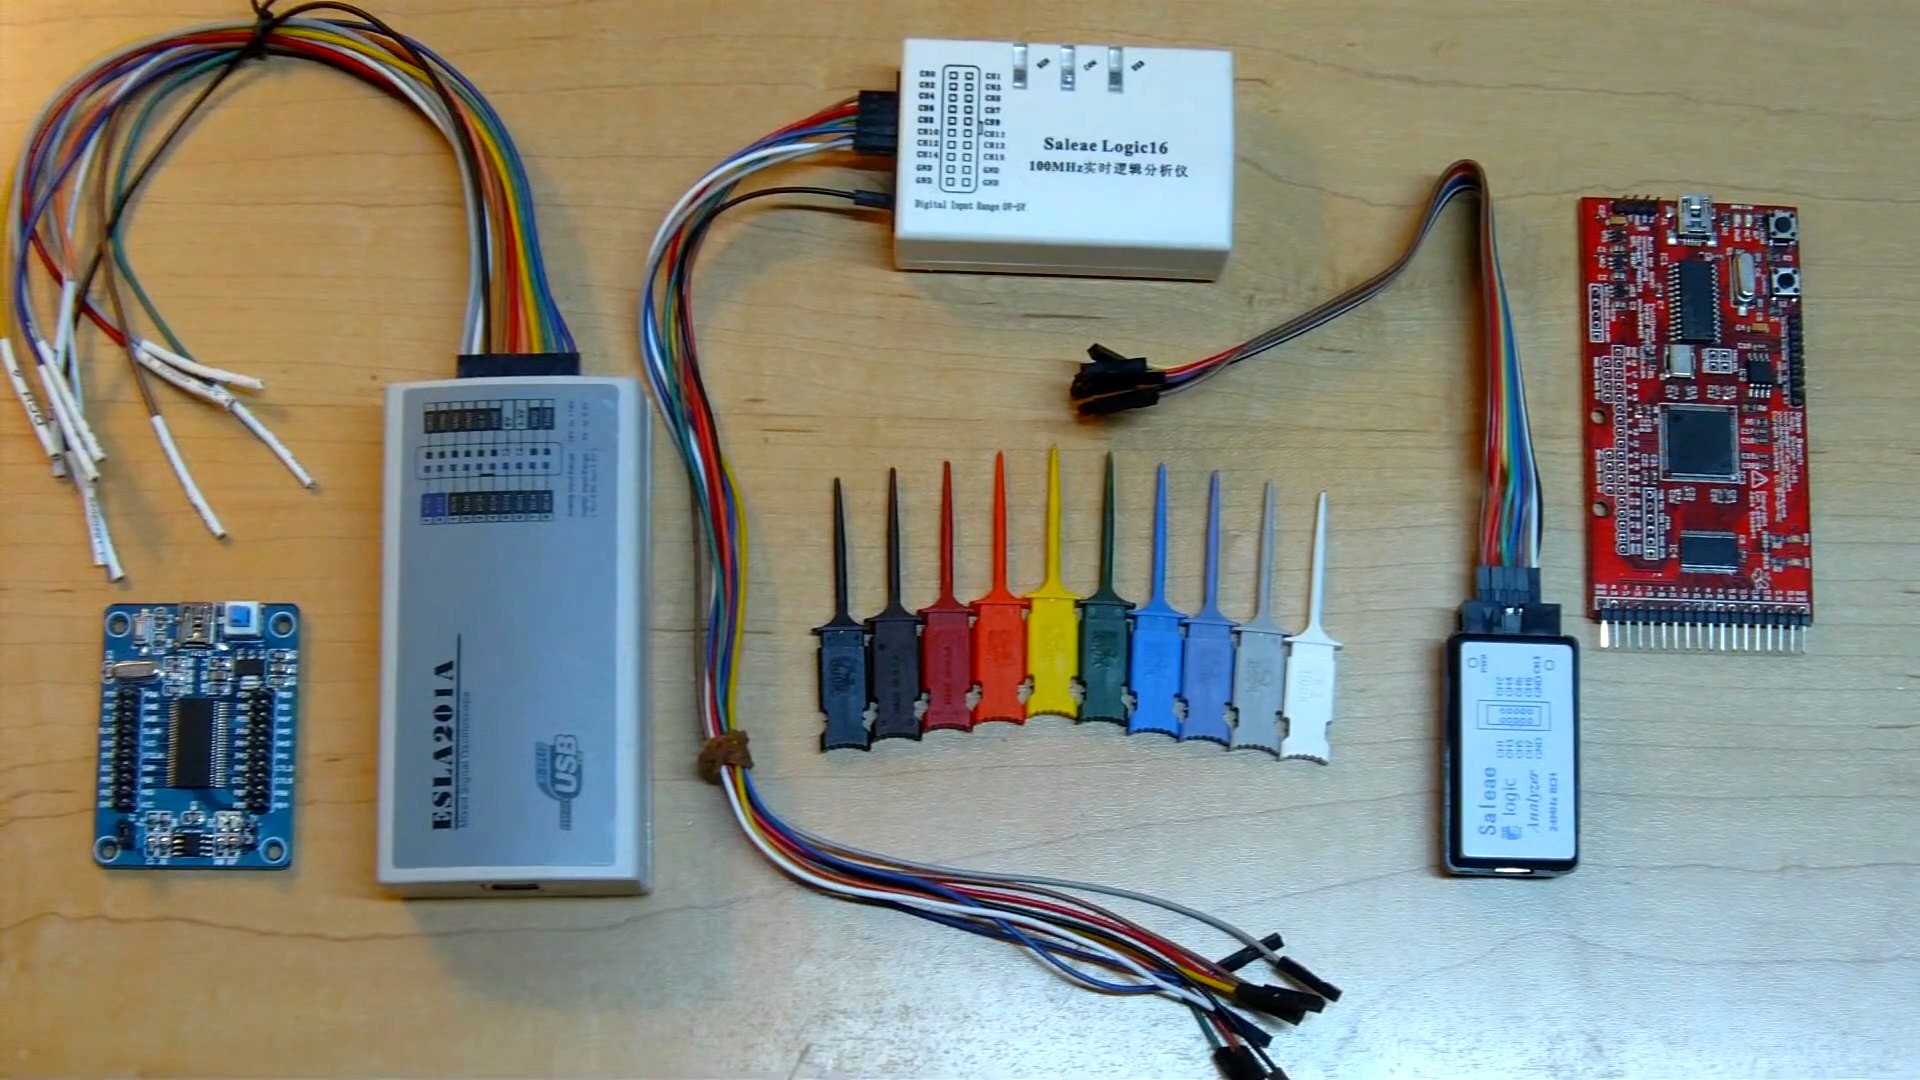
We just spent the last hour watching a video, embedded below, that is the most comprehensive treasure trove of information regarding a subject that we should all know more about — sniffing logic signals. Sure, it’s a long video, but [Joel] of [OpenTechLab] leaves no stone unturned.
At the center of the video is the open-source sigrok logic capture and analyzer. It’s great because it supports a wide variety of dirt cheap hardware platforms, including the Salae logic and its clones. Logic is where it shines, but it’ll even log data from certain scopes, multimeters, power supplies, and more. Not only can sigrok decode raw voltages into bits, but it can interpret the bits as well using protocol decoder plugins written in Python. What this all means is that someday, it will decode everything. For free.
[Joel] knows a thing or two about sigrok because he started the incredibly slick PulseView GUI project for it, but that doesn’t stop him from walking you through the command-line interface, which is really useful for automated data capture and analysis, if that’s your sort of thing. Both are worth knowing.
But it’s actually the hardware details where this video shines. He breaks down all of the logic probes on his bench, points out their design pros and cons, and uses that basis to explain just what kind of performance you can expect for $20 or so. You’ll walk away with an in-depth understanding of the whole toolchain, from grabber probes to GUIs. Continue reading “Everything You Need To Know About Logic Probes”→
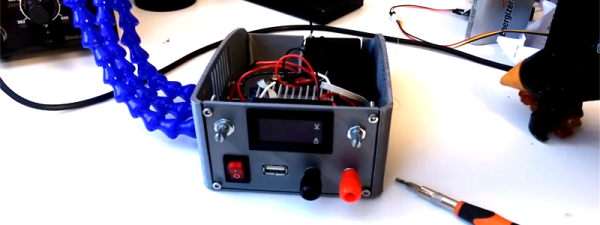
[Sverd Industries] have created a pretty cool bench power supply integrating soldering helping hands into the build. This helps free up some much-needed bench space along with adding that wow factor and having something that looks unique.
The build is made from a custom 3D printed enclosure (Thingiverse files here), however if you have no access to a 3D printer you could always just re-purpose or roll your own instrument enclosure. Once the enclosure is taken care of, they go on to install the electronics. These are pretty basic, using a laptop PSU with its output attached to the input of a boost/buck module. They did have to change the potentiometers from those small PCB mounted pots to full size ones of the same value though. From there they attach 4 mm banana sockets to the output along with a cheap voltmeter/ammeter LCD module. Another buck converter is attached to the laptop PSU’s output to provide 5 V for a USB socket, along with a power switch for the whole system.
Where this project really shines is the integrated helping hands. These are made from CNC cooling tubes with alligator clips super glued to the end, then heat shrink tubing is placed over the jaws to stop any accidental short circuiting while using them.
This isn’t a life changing hack but it is quite a clever idea if space is a hot commodity where you do your tinkering, plus a DIY bench power supply is almost a rite of passage for the budding hacker.

 The Queercon badge is always a work of art, and this year is no exception. Last year, we took a look at