Screenshot of the Insteon's new blog post, showing the Insteon logo in the header, the "A New Day for Insteon!" title, and some of the intro paragraph of the blog post

Insteon Gets Another Chance

It would appear that, sometimes, miracles happen. A few days ago, an update graced the website of Insteon, a company whose abrupt shuttering we covered in detail two months ago. An entity described as “small group of passionate Insteon users” has bought what was left of the company, and is working on getting the infrastructure back up. Previously, there was no sign of life from the company’s APIs. Now, Insteon hubs are coming back to life — or perhaps, they’re Inste-online again.

We’ve explained that revival of these devices without acquiring the company IP would’ve been tricky because of stuff like certificate pinning, and of course, a pile of proprietary code. Buying a company that’s undergoing a liquidation is not exactly end-user-friendly, but it would seem that someone sufficiently business-savvy got it done. The new CEO, as reported by [CNX Software], is a member of an investment committee — it’s fair to assert that this would help. A more sustainable funding source rather than ‘sell hardware and then somehow provide indefinite services’ is promised; they are moving to a subscription model, but only for Insteon Hub users. Recurring payments don’t sound as bad when it comes to paying developers and covering operational costs, and we hope that this revival succeeds.

Nothing is mentioned about moving towards openness in software and hardware — something that protects users from such failures in the first place. The new company is ultimately vulnerable to the same failure mode, and may leave the users in the dark just as abruptly as a result. However, we have our fingers crossed that the updated business model holds, purely for users’ sake. At least, unlike with the Wink hub, Insteon’s transition to a subscription model is better than the Inste-off alternative.

We thank [Itay] for sharing this with us! Via [CNX Software].

IKEA LED Lamp Gets Hacked For Night Light Duty

IKEA make a lot of different lamps, including useful motion-sensitive models that can click on when you walk past. [Andrew Menadue] trialed one as a night light, but it was far too bright for the task. It also would come on during the day time, wasting its precious battery life when it wasn’t needed. Thus, in order to mold the lamp to its new purpose, hacking ensued.

The first step, as it so often is, was to crack open the case and look inside. Preliminary inspections revealed a BISS0001 chip —  a simple passive infrared motion sensor. The chip has a function built in that can disable the output from triggering if it detects light. Adding a light-dependent resistor and a further 100K resistor was all that was needed to enable this feature.

Now, the lamp only kicks on if it detects motion at night. Some further tweaks also cut the current limit to the LEDs, reducing the brightness to a more suitable level for night time. [Andrew] now has a useful night light that suits his needs, and likes it so much that he once drove 150 miles to recover one that he left behind on vacation. That’s dedication!

Automated Blinds Can Be A Cheap And Easy Build

Blinds are great for blocking out the sun, but having to get up to open and close them grows tiresome in this computationally-advanced age. [The Hook Up] decided to automate his home blinds instead, hooking them up to the Internet of Things with some common off-the-shelf parts.

The basic idea was to use stepper motors to turn the tilt rod which opens and closes the blinds. An early attempt to open blinds with unipolar stepper motors proved unsuccessful, when the weak motors weren’t capable of fully closing the blinds when running on 5 volts. Not wanting to throw out the hardware on hand, the motors were instead converted to bipolar operation. They were then hooked up to DRV8825 driver boards and run at 12 volts to provide more torque.

With the electromechanical side of things sorted out, it was simple to hook up the motor drivers to a NodeMCU, based on the ESP8266. The IoT-ready device makes it easy to control the motors remotely via the web.

The build came in at a low cost of around $10 per blind. That’s a good saving over commercial options which can cost hundreds of dollars in comparison. We’ve seen other work from [The Hook Up] before too, like his creative Flex Seal screen build. Video after the break.

Continue reading “Automated Blinds Can Be A Cheap And Easy Build”

A fridge magnet with a display showing recycling reminders

Hackaday Prize 2022: BinPal Is A Convenient Recycling Reminder

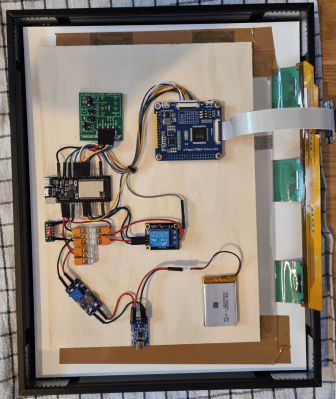
While curbside pickup of recyclables is convenient, it does require you to keep track of which type of waste is picked up when: miss the biweekly paper pickup and you’ll soon find yourself stockpiling four weeks’ worth of boxes and newspapers. When [Dominic Buchstaller]’s stack of cardboard began to reach his ceiling, he decided to take action by building himself BinPal: a fridge magnet that helps you remember when to take out which bin.

At heart of the simple but effective BinPal is an ESP32 board that connects to Google Apps Script and retrieves the pickup schedule from Google Calendar. If one of four categories of waste is due for pickup, its icon is highlighted on an LCD screen. The user can press a touch-sensitive button to confirm the bin has been brought out for pickup; if that hasn’t been done by 8 pm, the display’s backlight starts flashing as an additional reminder.

The outer shell of the device is made from laser-cut plywood, with a few strong magnets glued inside to ensure the BinPal stays firmly attached to the fridge. In the true spirit of recycling, [Dominic] used only components that he had in his parts bin to make the BinPal. However, these parts are all easily available online, and with the full schematics and code available on the project’s Hackaday.io page it should be easy to adapt the design to different hardware platforms as well.

[Dominic]’s design was inspired by a flashing LED chore reminder we featured a few years ago. You can also make household task reminders by reusing a Kindle for its ePaper display.

A brick mailbox with a LIDAR sensor mounted inside

Using A LIDAR Sensor To Monitor Your Mailbox

The inconvenience of having to walk to your mailbox to check for mail has inspired many hackers to install automated systems that let them know when the mail has been delivered. Mailbox monitors have been made based on several different mechanisms: some measure the weight of the items inside, some use cameras and machine vision, while others simply trigger whenever the mailbox’s door or flap is moved. When [Gary Watts] wanted to install a notification system for his 1940s brick letterbox, his options were limited: with no flap or door to monitor, and limited space to install mechanical contraptions, he decided to use a LIDAR sensor instead.

Probably best-known for their emerging application in self-driving cars, LIDAR systems send out a laser pulse and measure the time it takes for it to be reflected off a surface. In the case of [Gary]’s mailbox, that surface is either the brick wall or a letter leaning against it. Since letters are inserted through a vertical slot, they will usually be leaning upright against the wall, providing a clear target for the laser.

The LIDAR module, a VL53L0X made by ST, is hooked up to a Wemos D1 Mini Pro. The D1 communicates with [Gary]’s home WiFi through an external antenna, and is powered by an 18650 lithium battery charged through a solar panel. The whole system is housed inside a waterproof plastic case, with the LIDAR sensor attached to the inside of the mailbox through a 3D-printed mounting bracket. On the software side, the mailbox notifier is powered by Home Assistant and MQTT. The D1 spends most of its time in deep-sleep mode, only waking up every 25 seconds to read out the sensor and send a notification if needed.

We’ve seen quite a few fancy mailbox monitors over the years: some are extremely power efficient, some use multiple sensors to allow for different use-cases, and some others are simply beautifully designed.

A wooden platform for a litter box

Track Your Cat’s Weight Through This Internet-Connected Litter Box

With feline obesity on the rise, keeping track of your cat’s weight is an important part of keeping them healthy. However, a weighing session can be anything from a routine job to a painful procedure, depending on your cat’s temperament. [Andy]’s cat Ellie is one of those who dislike being weighed, so in order to track her weight without drama [Andy] got creative and built an internet-connected weighing platform for her litter box.

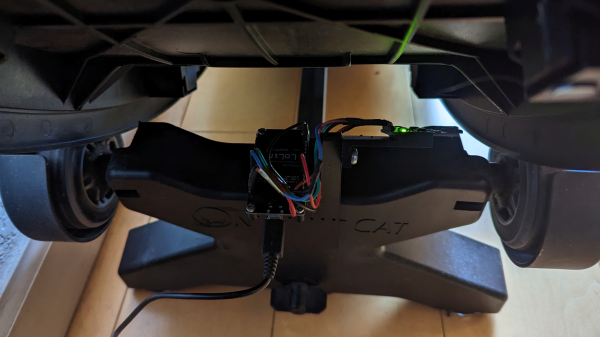
The platform consists of two pieces of MDF held apart by two load cells, which are hooked up to an ESP8266. The ESP reads out the load cells and reports its findings to the Adafruit IO platform through its WiFi connection, sending updates to [Andy] whenever litter box use has been detected. The cat’s weight can be simply calculated by subtracting the weight of the unused litter box from the weight measured when it’s in use.

A smartphone pop-up message from an IoT litter boxGetting reliable readings from the load cells was a bit of a challenge, since the measured weight fluctuated wildly as Ellie moved around the litter box. A combination of waiting for the readings to settle and using timeouts to discard the effect of brief movements resulted in reasonably stable measurements. The resolution was even good enough to measure the difference in litter weight before and after use. We’re not sure what’s the practical value of knowing how much your cat poops each time, but if the data is there you might as well log it.

[Andy] also imagines smart-home features of the IoT litter box: for example, he could run an air purifier or send in the Roomba after heavy usage. This is not even the first internet-connected litter box we’ve featured; we’ve seen one connected to the Thingspeak platform, as well as one that sends poop alerts through Twitter. If you’re not around to clean up the mess, an automatic fume extractor might come in handy.

Continue reading “Track Your Cat’s Weight Through This Internet-Connected Litter Box”

the dongle developed by Marcel, with a USB-A plug on one end and an SMD antenna on the other

Hackaday Prize 2022: House Ventilation Reverse-Engineered And Automated

[Marcel] thought – what if he had more control over his house ventilation system? You could add some nifty features, such as automatically ventilating your house in the mornings when everyone’s away, only creating noise when nobody’s around to hear it. Sadly, most ventilation systems are not automation-friendly at all – he was lucky, however, as his system came with a wireless remote. [Marcel] reverse-engineered this remote, created a USB dongle speaking the same protocol, and tied it into his Home Assistant setup!

The remote in question is Orcon R15, with an Atmel MCU talking to a CC1101 chip through SPI. He sniffed the SPI communications when pressing different buttons, figured out the protocol by comparing the recordings, and built a test setup with a spare Arduino and CC1101 module. It worked, and he set out to design a separate dongle, using an ATMega32U4. The dongle looks pretty neat, and fits a Hammond enclosure – what’s not to like?

Then he set out to develop the firmware, and didn’t disappoint on that front either. His code doesn’t just imitate the original remote perfectly in terms of control, it also has user-friendly pairing flow, keeps track of the system’s current state, and still lets the original remote be used in parallel. Eagle files for the PCB are available on the project page, with the code and a PDF schematic available in the GitHub repo. This entire journey is described in the Hackaday.io page, and we would recommend you check it out for all the insights it provides!

Ventilation systems don’t tend to be designed for automation, and it’s endearing to see hackers working on conquering this frontier. Last time we’ve seen a ventilation system hack, it had the additional challenge of being landlord-friendly, and we think the hacker nailed it!