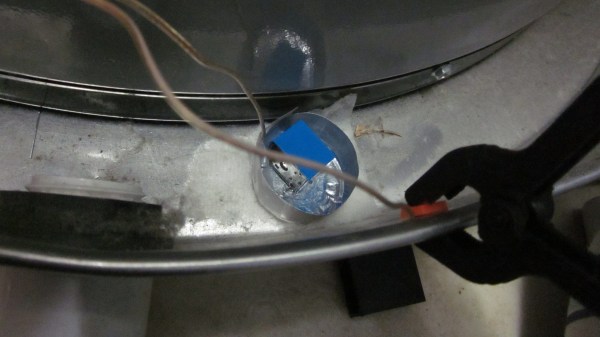
[mcu_nerd] is like any engineer, which is why his problem of an occasionally leaky water heater sure looks like a research project with no end in sight. Sure there’s probably a commercial product out there that can be had for half the cost and a few clicks of the mouse, but what’s the point in actually solving the problem?
His log starts with research into detecting low battery voltages. Then it was a quick exploration in designing low-power circuits. When the Flexible PCB contest came along, he realized that there was a chance to design a better electrode, and he ended up winning one of the vouchers; which is where he’s at now.
It’s definitely a work in progress, and if anything it’s just a quick five minute read and an opportunity to commiserate with another wayward soul. We do like his clever use of a tealite candle tin as both the second electrode and case for his water detection circuit. There are also some KiCad files and code.
At first sight, [Kyle]’s Elroy lamp is simply an attractive piece of modern-styled interior furnishing; its clean lines, wood grain, and contemporary patterning being an asset to the room. But when he pulls out his phone, things change. Because this lamp hides a secret: at its heart may be a standard LED bulb, but the shade conceals four LCD screens driven by an Nvidia Jetson. These can be controlled through a web app to display a variety of textures, completing the effect.
This is not however simply a set of laptop screens bolted to a lampshade. The screens started life in laptops sure enough, but have since had their reflective backing removed to create a transparent LCD panel. Then an appropriate diffuser had to be found, which after much experimentation became a composite including more than one textured paper. Finally the whole was enclosed in an attractive wooden lamp frame and became part of the furniture. We like it, both as an aesthetically pleasing lamp and as a genuine departure from the norm.
Back at the 2017 Superconference, Hackaday Managing Editor Elliot Williams started his talk about the so-called “Internet of Things” by explaining the only part he doesn’t like about the idea is the Internet… and the things. It’s a statement that most of us would still agree with today. If anything, the situation has gotten worse in the intervening years. Commercial smart gadgets are now cheaper and more plentiful than they’ve ever been, but it seems like precious little has been done to improve their inherent privacy and security issues.
But his talk doesn’t serve to bash the companies producing these devices or even the services that ultimately folded and left their customers with neigh useless gadgets. That’s not his style. The central theme of “Nexus Technologies: Or How I Learned to Love WiFi”is that a smart home can be wonderful thing, assuming it works the way you want it to. Elliot argues that between low-cost modular hardware and open source software, the average hacker has everything they need to build their own self-contained home automation ecosystem. One that’s not only cheaper than what they’re selling at the Big Box electronics store, but also doesn’t invite any of the corporate giants to the party.
Of course, it wasn’t always so. A decade ago it would have been all but impossible, and five years ago it would have been too expensive to be practical. As Elliot details his journey towards a truly personal smart home, he explains the advances in hardware and software that have made it not just possible on the DIY level, but approachable. The real takeaway is that once more people realize how cheap and easy it is to roll your own smart home gadgets, they may end up more than willing to kick Big Brother to the curb and do IoT on their own terms.
This previously unpublished recording somehow slipped between the cracks of the editing room floor but upon recent discovery, it’s still just as relevant today. Take a look at Elliot’s view on Nexus Technologies, then join us after the break for a deeper dive. Make sure to subscribe to Hackaday’s YouTube channel to get in on the 2019 Hackaday Superconference live stream starting Saturday, November 16th.
It’s one of the rituals of our age, rebooting the family router when the bandwidth falters. Flip the power, and after half a minute or so your YouTube video starts up again. Consumer-grade router hardware is not the most reliable computing equipment you will own, as [Nick Sayer] found out when the router at his vacation home wasn’t reliable enough to support his remote monitoring equipment. His solution is an auto-reboot device, that power-cycles the offending device on command.
An obvious method might be to switch the mains supply, but instead he’s taken the simpler option of switching the DC from the router’s wall wart power supply with a cunning arrangement of three MOSFETs to keep the router defaulting to on under all conditions except when it is commanded to power down by the ATtiny microcontroller overseeing it. This chip provides extra fail-safe and debouncing functions to ensure no accidental rebooting.
Driving the circuit is a Raspberry Pi that handles the house monitoring, on which a Python script checks for Internet access and asks for a reboot if there is none. For extra safety it requires access to be down for a sustained period before doing so in case of a router firmware upgrade.
This isn’t the first router rebooter, for a mains-switching ESP8266 take a look at this one.
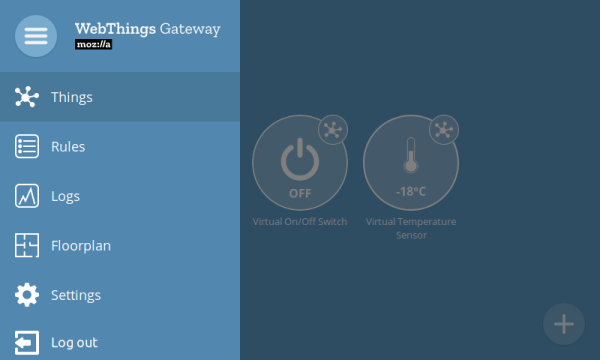
Mozilla recently officially released their IoT platform. This framework comes with “Gateway” software that can run on a Raspberry Pi and a framework that can run on any number of devices.
As we’ve seen, IoT is a dubious prospect for consumers. When you throw in all the privacy issues, support issues, and end-of-life issues; it gets even worse. Nobody wants their light bulbs to stop working because a server in faraway land shut down, but that’s an hilariously feasible scenario.
WebThings comes with a lot out of the box. It comes with a user interface, logging, rules, and an easy-to-understand API. Likewise the actual framework allows for building on many common devices and can be written in Node, Python, Java, Rust, Micropython, and used as an Arduino library. This opens it up for everything from a eBay ESP32 to a particle board.
We’ve started to notice some projects that use it trickling in on the tip line and on hackaday.io. We’re interested to see what kind of community grows around this, and are curious if it won’t be too long before easy-to-hack kits start showing up on your favorite online retailers.
There’s good documentation and of course, being open source, you can check out the source for yourself.
You’ve probably noticed that modern life has become rather complicated, and the projects we cover here on Hackaday have not been immune to the march of progress. We certainly aren’t complaining, but we’ll admit to the occasional wistful daydream of returning to the days when the front page of Hackaday looked more MacGyver than Microsoft.
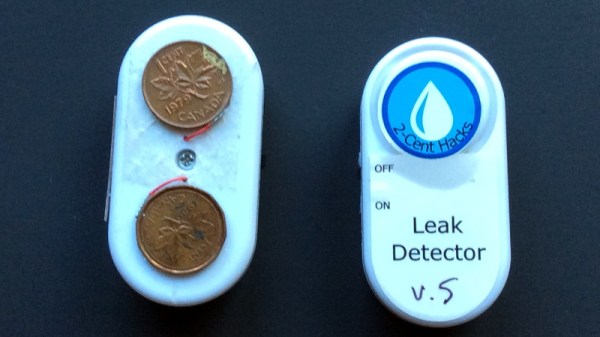
Which is precisely why this hacked together water alarm from [dB] is so appealing. Dubbed the “SqueakyLeaks”, this gadget started its life as a simple wireless intruder alarm from the Dollar Tree. When the magnet got far enough from the battery-powered base, a 90 dB warble would kick in and let you know somebody had opened a window or a door they shouldn’t have.
But with a little rewiring and two Canadian pennies serving as contacts, the alarm has been converted to a water detector that can be placed around potential leaky appliances like the water heater or in areas where you want to be alerted to water accumulation such as sumps. They’re basically “set and forget”, as [dB] says the three LR44 batteries used in the alarms should last about two years. Though with a BOM of $1.02 CAD, it’s probably cheaper to just make multiples and throw them out when the batteries die. Continue reading “Build This Handy Leak Detector For $1.02”→
Over the years we’ve seen several attempts at adding Internet connectivity to the lowly wired doorbell. Generally, these projects aim to piggyback on the existing wiring, bells, and buttons rather than replace them entirely. Which invariably means at some point the AC wiring is going to need to interface with a DC microcontroller. This is often where things get interesting, as it seems everyone has a different idea on how best to bridge these two systems.
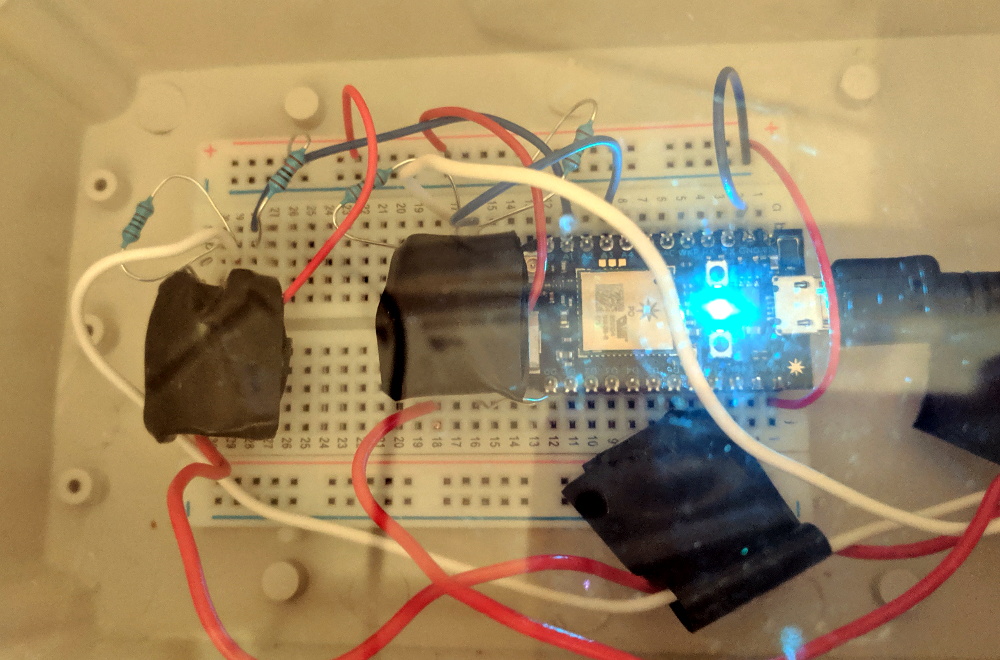
That’s the point where [Ben Brooks] found himself not so long ago. While researching the best way to tap into the 20 VAC pumping through his doorbells, he found a forum post where somebody was experimenting with optocouplers. As is unfortunately so often the case, the forum thread never really had a conclusion, and it wasn’t clear if the original poster ever figured it out.
DIY optocouplers wrapped in electrical tape
[Ben] liked the idea though, so he thought he would give it a shot. But before investing in real optocouplers, he created his own DIY versions to use as a proof of concept. He put a standard LED and photoresistor together with a bit of black tape, and connected the LED to the doorbell line with a resistor. Running the LED on 60 Hz AC meant it was flickering rapidly, but for the purposes of detecting if there was voltage on the line, it worked perfectly.
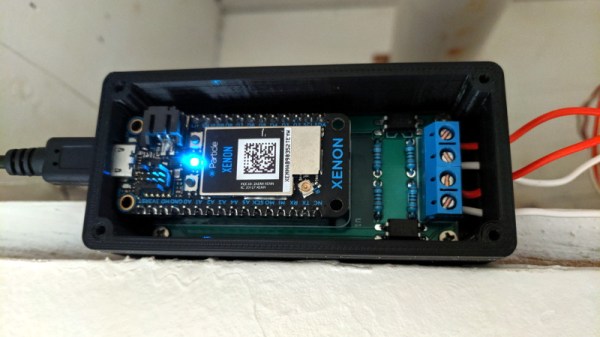
Wanting something slightly more professional for the final product, [Ben] eventually evolved his proof of concept to include a pair of 4N35s, a custom PCB, and a 3D printed enclosure. Powered by a Particle Xenon, the device uses IFTTT to fire off smartphone notifications and blink the lights in the house whenever somebody pushes the bell.